最近接觸到 Proxmox VE (PVE) 覺得超驚人的,把相關安裝知識整理後分享給大家。
Proxmox VE 是基於 Debian 修改的開源 (Open source) 虛擬化管理套件(基於 QEMU/KVM 與 LXC 技術)。
講到虛擬化 (virtualization),一定會提到 VMware 這家公司,它的 VMware ESXi 也是一絕,但 vSphere 系列需要授權,雖然有免費版本有對應的功能限制,下次會另開一篇來介紹。
本篇就來講講要怎麼開始、怎麼入門吧!
製作安裝 Live USB (Mac & Windows 使用者)
官方文件有特別強調,製作安裝 USB 時,絕不能使用 UNetbootin 這個工具。
會無法正常開機,小弟本身也踩過這個雷。
(因為 UNetbootin 有另外處理開機引導 (bootloader) 的部分,這部分與 Proxmox VE 不相容。)
Mac & Windows 使用者 推薦用 Etcher
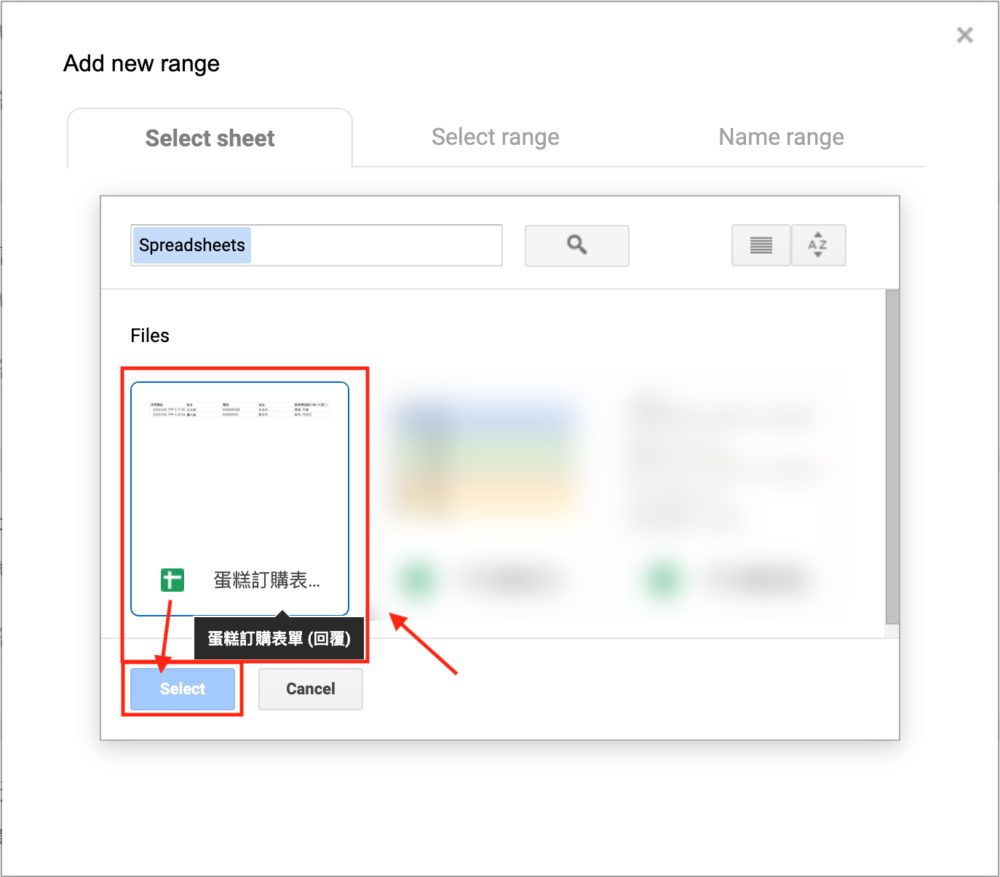
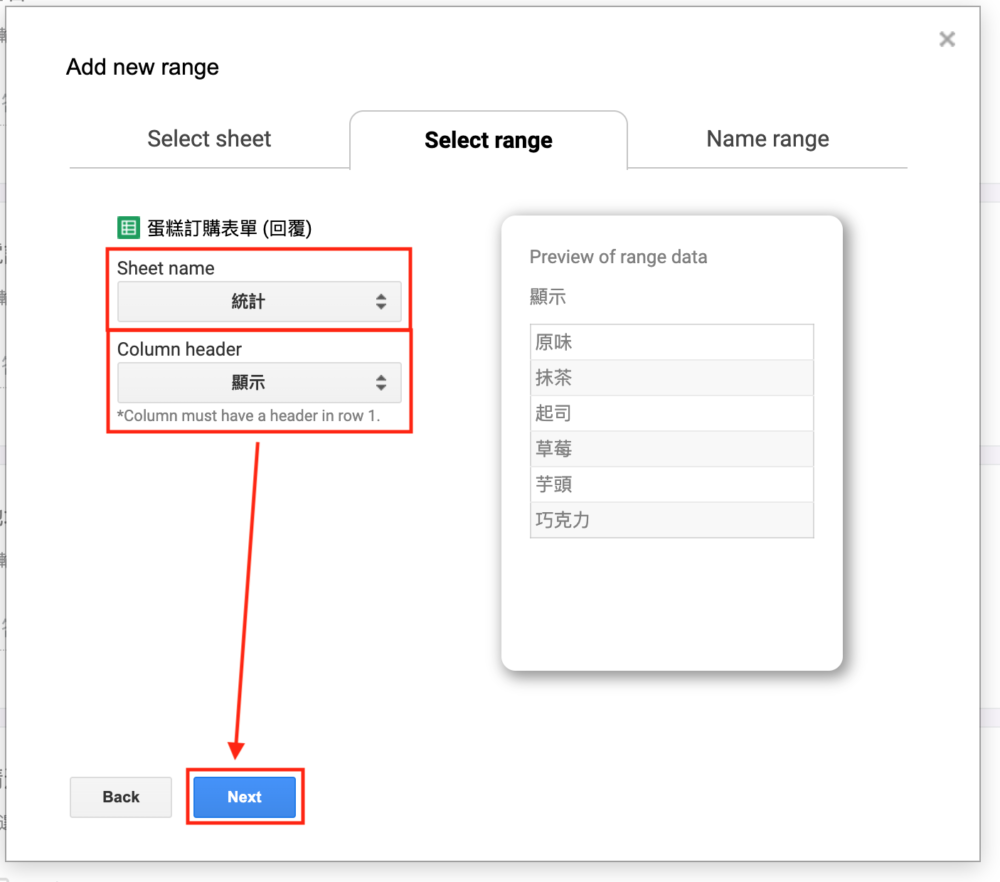
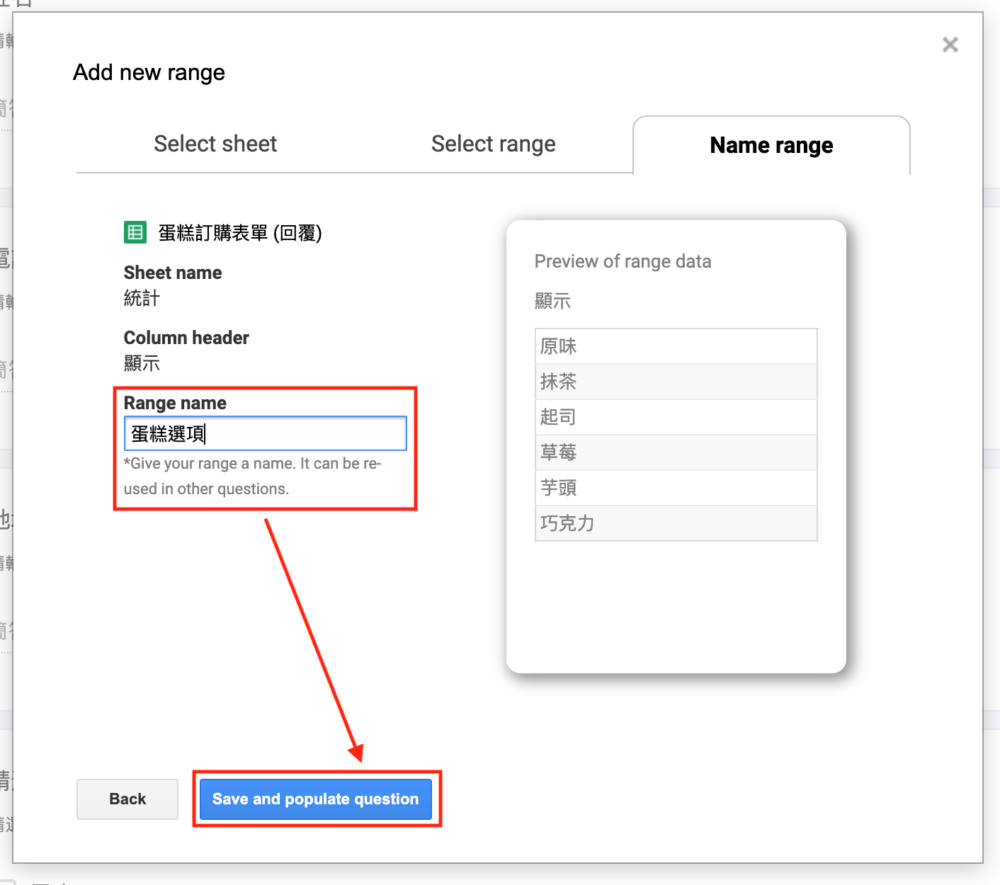
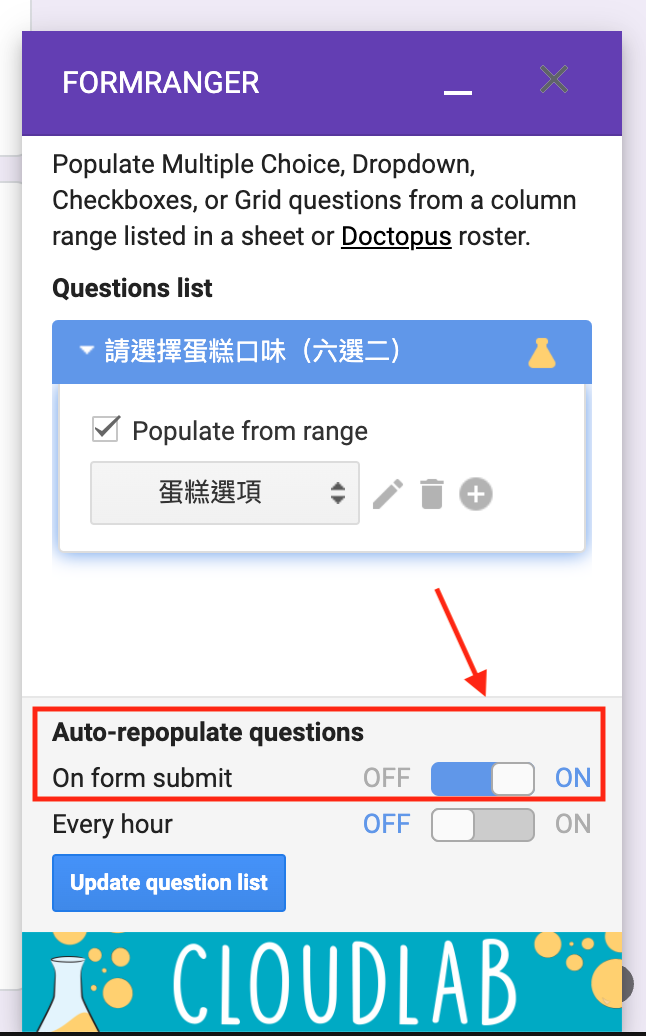
照個指示選擇 ISO 檔案,然後插入隨身碟選擇對應的隨身碟即可,這部分就不多述。
製作安裝 Live USB (Linux 使用者)
Linux 使用者 可以直接用 dd 指令
先列出有什麼 usb 裝置
# lsblk然後使用 dd 指令直接複製
# dd bs=1M conv=fdatasync if=./proxmox-ve_*.iso of=/dev/XYZ注意!這指令按下去會直接執行,請確定複製的目標路徑是否正確,不然弄錯會悲劇。
開啟虛擬化技術 (Intel VT-x / AMD-V)
另外一點,如果你要把 Proxmox VE 裝在實體機上的話,它需要在 BIOS 開啟虛擬化技術,
沒有開啟的話,它什麼事都做不了。
虛擬化技術在 Intel 跟 AMD 陣營有不同的名字:
- Intel (Intel Virtualization Technology, Intel VT-x)
- AMD (AMD Secure Virtual Machine, AMD SVM)
字詞雖不同,不過講的都是同一個功能。
這部分要在 BIOS 的 Chipset 裡面尋找對應的字詞(可能是 Virtualization Technology 之類的字詞)
然後開啟。這設定值有些預設為開啟,有些預設為關閉,如果安裝前有提示你的話,就要記得去開啟。
這部分每家廠牌主機板設定都不太一樣,沒有一體適用的教學。
安裝 Proxmox VE
建議是裝在實體機上,如果你要練習,裝在虛擬機上練習也是可以。
從 USB 隨身碟或光碟開機,然後使用 Next 大法,一路按 Next 安裝,應該不會遇到什麼問題。
注意硬碟會 重新格式化,不會保留資料。其中會設定 root 密碼與抓取當下的網路 IP,這部分要先記錄下來,安裝完成後重開機後會提示。安裝流程基本上不會遇到什麼問題。
比較有問題的應該是需在 BIOS 選擇正確的開機裝置,選擇到 USB 隨身碟。
移除網頁介面 No Valid Subscription 的提示 (選擇性)
這部分選擇性,做不做都可以。
每次登入網頁介面時都會出現 No Valid Subscription (無有效訂閱) 的提示,
You do not have a valid subscription for this server. Please visit www.proxmox.com to get a list of available options.意思就是,你沒有一個有效訂閱,沒有訂閱其實也可以正常使用沒有關係,
但常期使用看到這個視窗會有一點點煩,以下就是教你怎麼移除它。
(以下方式存在版本上的差異,我使用的是 PVE 7.1,如果出了更新的版本,請參考套用或者不套用。)
(如果對程式語言不熟悉也建議跳過這段)
修改前請先備份程式碼。
# cp /usr/share/javascript/proxmox-widget-toolkit/proxmoxlib.js /usr/share/javascript/proxmox-widget-toolkit/proxmoxlib.bak找到對應的檔案做修改:
# vi /usr/share/javascript/proxmox-widget-toolkit/proxmoxlib.js用 ? 來搜尋 checked_command 關鍵字,n 跟 Shift + N 來查找位置。
找到這個段落(修改前的版本):
checked_command: function(orig_cmd) {
    Proxmox.Utils.API2Request(
        {
            url: '/nodes/localhost/subscription',
            method: 'GET',
            failure: function(response, opts) {
                Ext.Msg.alert(gettext('Error'), response.htmlStatus);
            },
            success: function(response, opts) {
                let res = response.result;
                if (res === null || res === undefined || !res || res
                    .data.status.toLowerCase() !== 'active') {
                    Ext.Msg.show({
                        title: gettext('No valid subscription'),
                        icon: Ext.Msg.WARNING,
                        message: Proxmox.Utils.getNoSubKeyHtml(res.data.url),
                        buttons: Ext.Msg.OK,
                        callback: function(btn) {
                            if (btn !== 'ok') {
                                return;
                            }
                            orig_cmd();
                        },
                    });
                } else {
                    orig_cmd();
                }
            },
        },
    );
},
這個 if 條件式 ,裡面有緊接一個含有 No valid subscription 的 Ext.Msg.show() 函式。
Ext.Msg.show({
    title: gettext('No valid subscription'),
    icon: Ext.Msg.WARNING,
    message: Proxmox.Utils.getNoSubKeyHtml(res.data.url),
    buttons: Ext.Msg.OK,
    callback: function(btn) {
        if (btn !== 'ok') {
            return;
        }
        orig_cmd();
    },
});
我們直接槓掉整段打 API 驗證有沒有授權的程式,讓它跑原本的 orig_cmd(); 就好。
修改後的版本如下:
checked_command: function(orig_cmd) {
    orig_cmd();
},
然後重啟 Proxmox VE 網頁服務
# systemctl restart pveproxy網頁介面會斷線 3-5 分鐘不等,稍等之後再重新連線。
安裝相關套件
以下是小弟我個人常用的一些套件,一行指令來安裝,你也可以紀錄你自己喜愛的套件,修改這行指令
(以下都預設用 root 帳號登入執行)
# apt install -y net-tools vim curl sudonet-tools 裡面有 ifconfig 指令,習慣 ifconfig 指令可以選擇性安裝它。
安裝 sudo 套件與使用者設定
我使用的版本是 PVE 7.1,
目前 PVE 是沒有安裝 sudo 套件的。
如果有需要,一樣可以安裝。
# apt install -y sudo這樣就跟一般 Linux 幾乎無異了。
編輯 sudo 設定檔
在編輯設定檔之前,小弟我會先修改 visudo 預設會使用的編輯器。
(因為小弟我實在不習慣預設的 nano 編輯器)
# sudo update-alternatives --config editor會出現以下選單可以選擇:
There are 3 choices for the alternative editor (providing /usr/bin/editor).

  Selection    Path                Priority   Status
------------------------------------------------------------
* 0            /bin/nano            40        auto mode
  1            /bin/nano            40        manual mode
  2            /usr/bin/vim.basic   30        manual mode
  3            /usr/bin/vim.tiny    15        manual mode

Press <enter> to keep the current choice[*], or type selection number: 2
update-alternatives: using /usr/bin/vim.basic to provide /usr/bin/editor (editor) in manual mode
個人喜好用 vi 所以選擇 vim.basic。
如果沒有 vim.basic 選項,請安裝 vim。
# apt install -y vim編輯 sudo 設定檔,套用免密碼設定
編輯 sudo 設定檔,修改 sudo 時不需再次確認密碼
使用 visudo 修改指令
# visudo在這行
%sudo ALL=(ALL:ALL) ALL把它改成
%sudo ALL=(ALL:ALL) NOPASSWD: ALL新增使用者&加入使用者
簡單介紹一下 sudo 的用法
可以用指令新增使用者(例如:新增名字叫做 newuser)
# adduser newuser(註:請先不要使用 useradd 指令,因為它不會幫忙建立家目錄)
加入該使用者進 sudo 的使用者群組(允許使用 sudo)
# usermod -aG sudo newuser如果要修改這位使用者的密碼,可以用 passwd 指令
# passwd newuser(註:後面 必須 要接正確的使用者的名稱,如果沒有該參數會修改到 目前使用者 的密碼,
假設你登入 root 帳號就像修改到 root 的密碼,需注意。)
安裝桌面環境 (選擇性)
這步驟不一定需要做。因為通常我們使用 PVE 都是從網頁管理介面直接來,
實體機只會有一個醜醜的黑白 Console 命令列。
如果你需要桌面環境,需要 GUI 的話,可以用以下步驟安裝桌面環境。
安裝 X windows 與桌面
先更新系統套件
# apt update -y && apt dist-upgrade -y然後安裝指令安裝 xfce4 桌面環境, chromium 瀏覽器(開源版的 Google Chrome 瀏覽器)
# apt install -y xfce4 chromium lightdm新增使用者
在啟動桌面之前,先新增一個普通 linux 使用者,避免使用 root 帳號來登入。
可以用指令新增使用者(例如:新增名字叫做 newuser)
# adduser newuser(註:請先不要使用 useradd 指令,因為它不會幫忙建立家目錄)
啟動 X windows
最後用指令啟動登入管理器:
# systemctl start lightdm就有一個基本的桌面環境了。
改登入畫面桌布 (選擇性)
方式有二種,你可以安裝 lightdm-gtk-greeter-settings 圖形介面,
# apt install -y lightdm-gtk-greeter-settings或者用以下方法改設定:
把桌布圖檔放到 /usr/share/pixmaps/ 底下(假設檔名為 wallpaper.jpg)
然後修改 lightdm-gtk-greeter.conf 設定檔
# vi /etc/lightdm/lightdm-gtk-greeter.conf在 [greeter] 這個段落加上一行
background=/usr/share/pixmaps/wallpaper.jpg成果如下:
[greeter]
background=/usr/share/pixmaps/wallpaper.jpg
按 :wq 存檔離開。
最後,重啟 lightdm 服務
# systemctl restart lightdm就會看到新的桌布了~
基本 Proxmox VE 使用方式
以下介紹 Proxmox VE 基本使用方式,建立虛擬機 (Virtual machine, VM) 跟 Container 容器。
建立虛擬機 (Virtual machine, VM)
網頁介面進去,右上角就有二個大大的按鈕,
一個是 Create VM ,一個是 Create CT 。
首先,先去下載你要的系統光碟檔 (ISO) 用網頁上傳上去。
然後我們按下 Create VM,選擇內核,選擇 ISO 檔案,
設定 CPU、記憶體、硬碟容量大小,最後按 Finish 完成。
中間應該不會有什麼問題。
建立好的 VM 之後,選擇按下 Start 就開機了,
之後就是作業系統的安裝與操作,就這麼簡單。
建立 Container 容器
先說,這個 Container 不是 docker 裡講的那個 Container,而是 LXC 的 Container,
概念雖接近,但不是相同的東西。
簡單來說,虛擬機 (Virtual machine, VM) 會是模擬一個「完整的」電腦系統,
虛擬 BIOS、虛擬處理器、記憶體、硬碟、…等等。
Container 是一個從作業系統層,利用一些容器隔離技術,直接跑起來的 Process (處理程序)。
為了減少中間虛擬化造成的效能損耗。
如果有玩過,你會發現 Container 它會比 VM 較快。
但也有一些限制,就不是什麼 Image 都有,部分特殊情況會有相容性問題。
如果你有遇到問題,可以做一份相同版本的 VM 跟 Container,二者交叉比較看看。
在 CT Template 的區域有一些現成的 Templete 可以下載使用,常見的 Linux 版本都有。
像我個人使用 Ubuntu ,使用 Ubuntu 20.04 版本。
像是學 Redhat 系列的可以選 CentOS、 Rocky Linux 或 Fedora Core、
想要系統比較小可以選 Alpine…純憑個人喜好。
跟 VM 的建立方式接近,但你會發現預設資源設定就少很多,而且比較順暢,可以推薦玩玩看。
幾個重要的檔案路徑
列出幾個重要的檔案路徑,到時候要複製檔案的時候才知道要去哪裡找。
ISO 檔案的路徑
ISO 檔案的路徑在:
/var/lib/vz/template/iso/
這個是網頁介面上傳 ISO 檔案會存放的路徑。
虛擬機備份路徑
你的虛擬機 (VM) 備份、容器 (Container) 備份,
檔案位置都在 /var/lib/vz/dump/ 底下。
設定檔位置
開啟若干個虛擬機 (VM) 或 容器 (Container) 後,設定檔在
/etc/pve/lxc/ 底下。
例如:
我要修改 VMID = 100 的虛擬機,設定檔就是:
/etc/pve/lxc/100.conf
以此類推。
以上粗淺的分享,還有很多地方沒有提到,之後文章會慢慢補充。
參考資料
- https://pve.proxmox.com/wiki/Prepare_Installation_Media
- https://blog.pulipuli.info/2011/11/proxmox-ve-openvz-vmwarevirtual.html
- https://pve.proxmox.com/wiki/Developer_Workstations_with_Proxmox_VE_and_X11
- https://ithelp.ithome.com.tw/articles/10220001?sc=iThelpR
- https://onlybook0314.blogspot.com/2020/01/proxmox-veweb-gui-no-valid-subscription.html
- https://wiki.archlinux.org/title/LightDM#Changing_background_images/colors


