
蘋果在 2020 年 11 月發表了新的 Macbook 系列,
與新的 Apple M1 晶片 (Apple silicon),效能與省電上推向另外一個新的層次,
在軟體相容上推出了 Rosetta,利用軟硬體的設計,直接讓 arm 架構的 Apple M1 相容 x86_64 程式。
想當然爾,蘋果推出的 xcode 肯定會支援新的 arm 架構,但原有專案甚至套件管理程式並不完整支援。在 iOS 開發上要怎麼調校,才可以正確編譯,甚至效能上比 Intel 晶片更好呢?
請繼續看下去。
原有專案
原有專案是一個有啟用 CocoaPods 的一個 iOS 專案,其中有若干的套件。
(這應該是一個蠻常見的狀態)
沒調整前沒辦法在 Apple M1 晶片中正確編譯,但在 Intel 晶片上卻可以。
硬體
寫之前先解釋一下筆者的硬體:
- 型號:MacBook Pro (13-inch, M1, 2020)
- 晶片:Apple M1
- macOS 版本:Big Sur 11.5
- xcode 版本:12.5.1 (12E507)
- Cocoapod 版本:1.11.2
- Ruby 版本:2.6.3p62 (2019-04-16 revision 67580) [universal.arm64e-darwin20]
錯誤訊息
錯誤訊息可能會是這個:
Could not find module 'FrameworkName' for target 'arm64-apple-ios-simulator'; found: x86_64-apple-ios-simulator, x86_64導致其中一個函式庫無法正確跑在模擬器上。
操作步驟
- 安裝 Ruby-FFI ,在 x64 模式來安裝
$ sudo arch -x86_64 gem install ffiRuby-FFI 大致是一個動態連結原生元件庫的一個元件庫。說明如下:
Ruby-FFI is a gem for programmatically loading dynamically-linked native libraries, binding functions within them, and calling those functions from Ruby code. Moreover, a Ruby-FFI extension works without changes on CRuby (MRI), JRuby, Rubinius and TruffleRuby. Discover why you should write your next extension using Ruby-FFI.
- 用 x64 模式來執行 CocoaPods 的各種操作,
例如最常用的: pod install
原本是:
$ pod install改成這樣:
$ arch -x86_64 pod install其他操作以此類推。
- [極重要] 將
Pods的專案中的 Build settings 設定
將Build Active Architecture only改成NO
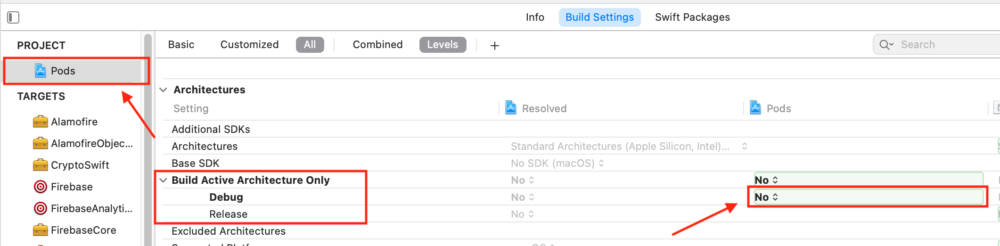
這選項設定成 NO 的意思是,不只編譯當前架構的二進位檔,反而編譯「所有」架構的二進位執行檔。
(中文翻譯大概是這樣)
所有架構,我列出一些已知的,例如:
arm64 arm64e armv7 armv7s i386 x86_64
一次全編譯。
另外一個做法,修改你的 Podfile 檔案,
原理就是用程式的方式,將所有依賴元件,全部修改 Build Active Architecture only 成 NO
可以直接把這段寫進 Podfile 中最後面
post_install do |installer|
  installer.pods_project.targets.each do |target|
    target.build_configurations.each do |configuration|
      target.build_settings(configuration.name)['ONLY_ACTIVE_ARCH'] = 'NO'
    end
  end
end
這樣 arm 架構的 iOS 模擬器就可以吃到正確的架構執行檔並執行了。
參考資料
- https://stackoverflow.com/questions/64901180/running-cocoapods-on-apple-silicon-m1
- https://stackoverflow.com/questions/68166924/xcode-13-executable-file-not-found?fbclid=IwAR2H1K7mPWGjB-Y5KDqS_lZrbzN9CxZaW6wFgPW5ntwJxsNbA_jgVA-BeOU
- https://stackoverflow.com/questions/19419781/cocoapods-arm64-issue/21789212#21789212
- https://gist.github.com/funroll/7faf18b4972d72cd284e
- https://newbedev.com/xcode-12-issue-could-not-find-module-frameworkname-for-target-arm64-apple-ios-simulator-found-x86-64-apple-ios-simulator-x86-64