

學了這麼厲害的 Kotlin 可不可以拿它來開發後端(Backend),答案是當然可以的!
我們使用 Kotlin 跟 Gradle 來做開發
先做一個非常簡單的 API 再來慢慢進階
前端?後端?前台?後台?有差嗎?
在這邊簡單解釋一下 Web 技術這些詞彙的定義,大家也常常搞錯。
-
前端 (Frontend):由後端 (Backend) 收到資料,透過瀏覽器渲染出來跟使用者互動的介面 (UI) 與程式都稱前端。
-
後端 (Backend):也就是伺服器 (Server) 的部分,專門處理由使用者的要求,提供對應資料的程式。
-
前台:大家比較通俗的講法,使用者看得到的操作得到的區域,如同舞台一般。
-
後台:大家比較通俗的講法,通常是指管理者介面,如同舞台的後台。
那前台、後台跟前端、後端有關係嗎?
答案是:沒有什麼關係。
前台需要有前端(介面),也需要後端(伺服器程式)幫忙,後台也是。
工作上可以細分成:
- 前台的前端
- 前台的後端
- 後台的前端
- 後台的後端
分別有前端工程師與後端工程師負責開發。
今天的主題是後端開發的主題,所以沒有介面只有資料。
學習目標
- 手把手製作一個 REST API
- 熟悉 Spring boot 的 Annotation 寫法
- 調整 404 頁面
準備開發環境
這邊有三種做法,好壞都不一
- 直接推薦:InteliJ IDEA Ultimate 付費版
- Visual studio code 外掛 Spring Initializr plug-ins
- Spring Tools 4 for Eclipse (前身為 STS3)
💡 小提醒:這個需要付費版 InteliJ IDEA Ultimate, 免費的 Community 會無法正確 Compile,小弟已經親身試過了。
小弟建議使用 InteliJ,因為他的優異程式碼提示、搜尋與重構等功能好過其他的 IDE 編輯器
小提醒:因為 InteliJ IDEA 有可能會小改版,介面可能會稍微長的不太一樣,如果真有找不到選項、或者文章失效歡迎聯繫小弟我。
開新專案
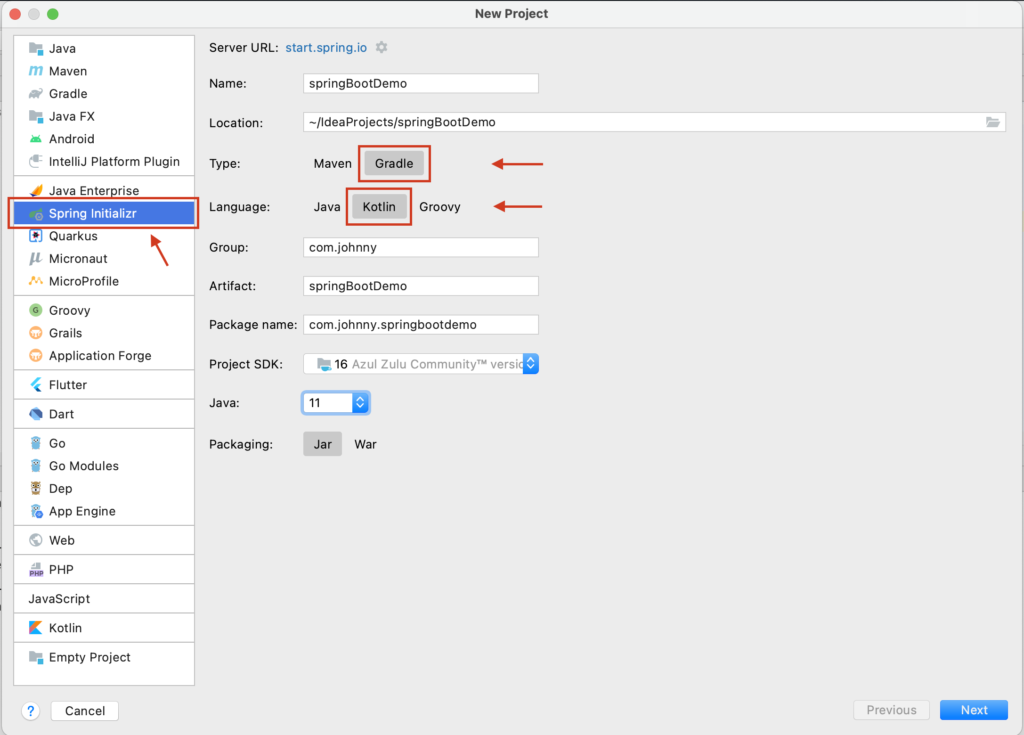
New Project,選擇 Spring Initializr
- Group: <自己填>
- Artifact: <自己填>
- Type: Gradle Project (Generate a Gradle based project archive.)
- Language: Kotlin
- Packaging: Jar
- Java Version: 11 (選更新的版本也可以)
- Version: <自己填>
- Name: <自己填>
- Description: <自己填>
- Package: <自己填>
然後按「Next」。
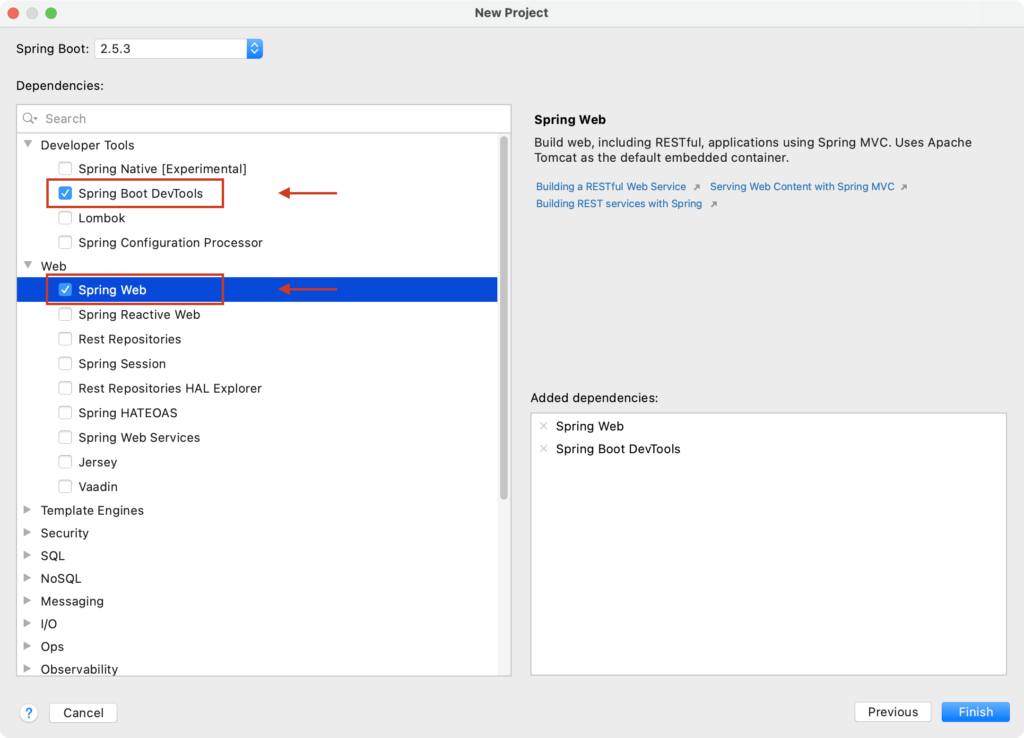
這邊選擇二個:
- Web > Spring Web
- Developer Tools > Spring Boot DevTools
不選也沒關係,後面可以自行新增。
按下「Finish」完成建立專案。
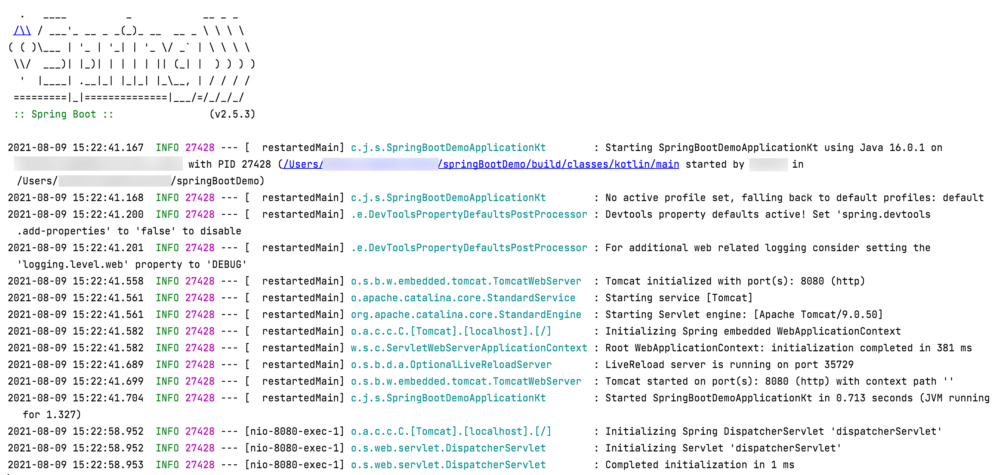
如果直接新增完跑的話,Log 大概會長這樣。
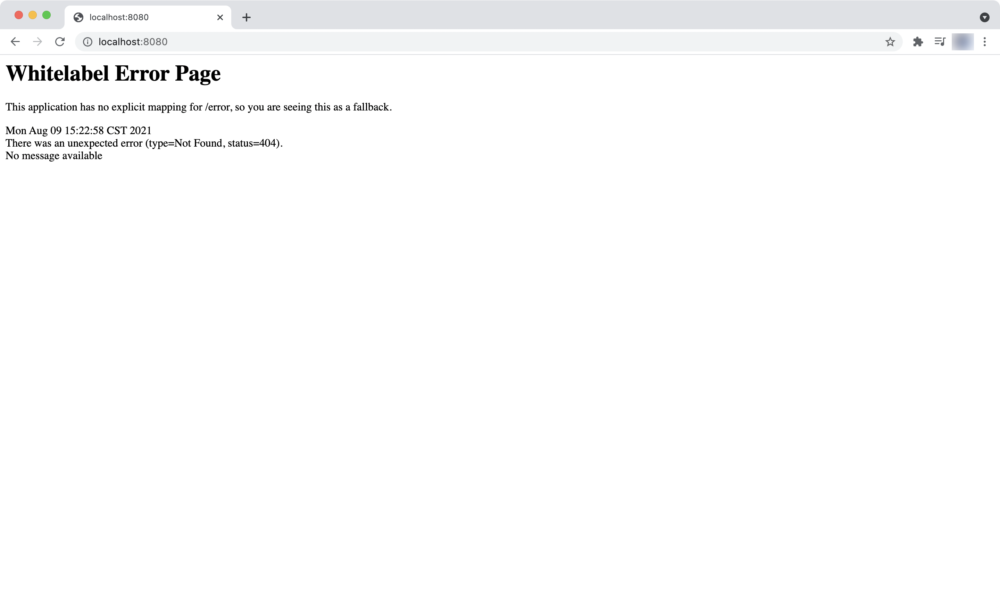
瀏覽會長這樣:
資料夾結構
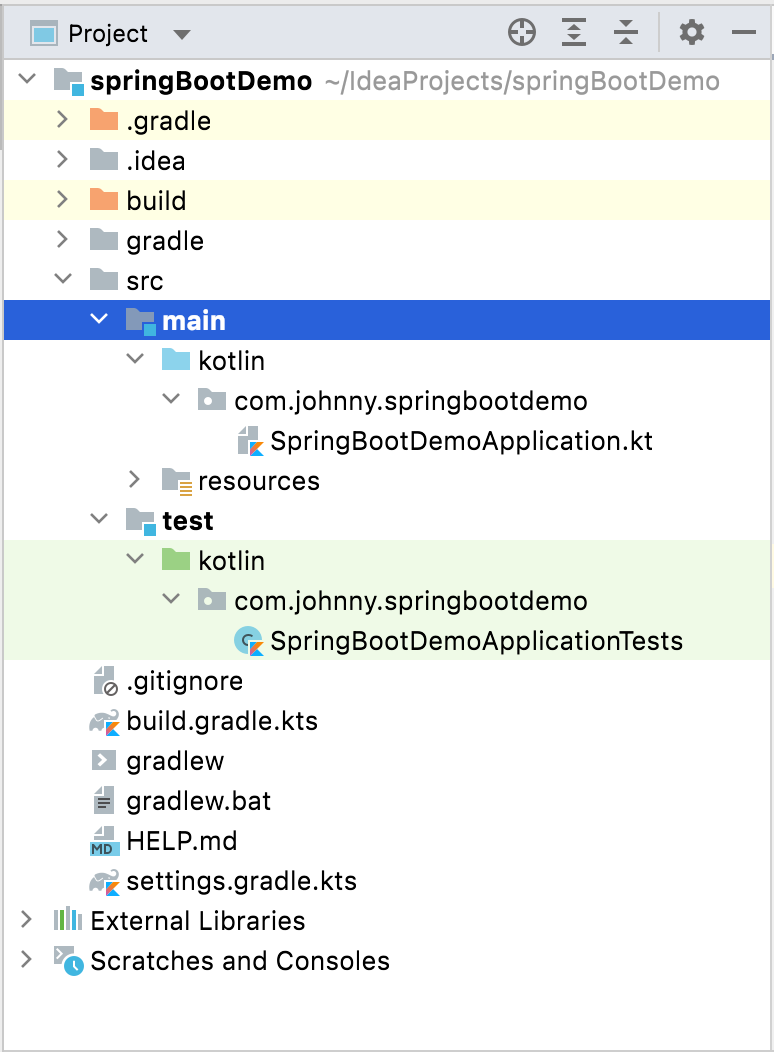
如果都是預設值的話,會看到以下資料夾結構:
- src/main/kotlin/\<packageName>/
主要程式碼的目錄 - src/test/kotlin/\<packageName>/
測試程式碼的目錄 - build.gradle.kts
專案的 gradle 檔案 - src/main/resources/static
存放一些靜態資源(例如:JavaScript、css、圖片…等) - src/main/resources/templates
存放一些樣板檔案 - src/main/resources/application.properties
參數設定配置檔,存放一些資料連線資訊、雜項設定等等
修改啟動的連接埠 (Port)
找到 application.properties 檔案,加入這句即可
server.port=8086啟動 Port 就改成 8086 了
其他參數請見:
https://docs.spring.io/spring-boot/docs/current/reference/html/appendix-application-properties.html
增加 Dependencies
打開 build.gradle.kts 找到 dependencies { } 的區塊
dependencies {
    implementation("org.springframework.boot:spring-boot-starter-web")
    developmentOnly("org.springframework.boot:spring-boot-devtools")
}
即是 Spring Web 跟 Spring Boot DevTools
觀察檔案
DemoApplication.kt (如果沒改名字的話)
或者有 @SpringBootApplication 標明字樣的檔案
即主要程式,程式的進入點
可以找到一個
fun main(args: Array<String>) {
    runApplication<DemoApplication>(*args)
}
可以找到 main 即程式進入點
寫第一個 Controller 寫一隻 API
著手來寫第一個 Controller
定義資料 Model
我們先定義幾個的 model class,
GeneralMessageResponse 是用來顯示範例 API 資料用的
GeneralMessageResponse.kt
package com.example.demo.model

data class GeneralMessageResponse(val message:String)
就這樣二句,就可以定義好資料 Model。
GeneralErrorResponse 用來顯示錯誤訊息的
GeneralErrorResponse.kt
package com.example.demo.model

data class GeneralErrorResponse(var message:String)
寫一個 Controller
製作一個 class 名叫 HelloController 使用 @RestController 標示,內容如下:
HelloController.kt
package com.example.demo

import com.example.demo.model.GeneralMessageResponse
import org.springframework.web.bind.annotation.RequestMapping
import org.springframework.web.bind.annotation.RestController

@RestController
class HelloController{

    @RequestMapping("/")
    fun hello(): GeneralMessageResponse {
        return GeneralMessageResponse("Hello, world!")
    }
}
做一個方法 (Method),方法名稱可以自訂,標上 @RequestMapping 標示,回傳一個物件
即回傳的資料
@RequestMapping 上面需標明綁定的 API 路徑(不可重複)
可綁定何種傳送方式 (GET, POST, PUT, DELETE)
可編譯此專案,並瀏覽之
預設會是 http://localhost:8080/
會得到以下結果:
{"message":"Hello, world!"}新增另外一個 Method
在剛剛的 HelloController 在新增一個方法 (Method),名叫 getHello()。
程式碼片段如下:
@RequestMapping("/hello", method = [RequestMethod.GET])
fun getHello(@RequestParam("name", defaultValue = "World") name: String): GeneralMessageResponse {
    return GeneralMessageResponse("Hello, $name")
}
比起剛剛的 Method 多了參數,只接受 GET 方法(使用其他方式存取會錯誤,因為沒定義)
不標明等於接收所有的方式
參數部分使用 @RequestParam 修飾字標明,標上參數名稱,
defaultValue 如果沒填資料的話的預設值為何
然後像剛才一樣,回傳一個 JSON 物件
方式+名稱 的組合不可重複,但可接受同名但不同的方式的 Method
例如這樣是合法的:
@RequestMapping("/hello")
fun hello(): GeneralMessageResponse {
    return GeneralMessageResponse("Hello, world (from default method)!")
}

@RequestMapping("/hello", method = [RequestMethod.GET])
fun getHello(@RequestParam("name", defaultValue = "World") name: String): GeneralMessageResponse {
    return GeneralMessageResponse("Hello, $name (from get)")
}

@RequestMapping("/hello", method = [RequestMethod.POST])
fun postHello(@RequestParam("name", defaultValue = "World") name: String): GeneralMessageResponse {
    return GeneralMessageResponse("Hello, $name (from post)")
}
後面 Restful API 的時候會再提到。
錯誤處理
錯誤處理有二個部分,不太一樣:
- 執行時出現 Exception 時,可自訂回傳的錯誤訊息
- 當存取一個不存在的 API 時,預設回的訊息( 404 Not found 頁面)
處理 Exception 錯誤
先新增一個 GeneralErrorResponse 做為錯誤訊息的回應
GeneralErrorResponse.kt
package com.example.demo.model

import com.fasterxml.jackson.annotation.JsonInclude

@JsonInclude(JsonInclude.Include.NON_NULL)
data class GeneralErrorResponse(
    val message:String,
    val requestUrl: String? = null,
    val errorStackStace: String? = null
)
新增一個 ThrowableExtension.kt 新增一個 stackTraceAsString() 拿到 stackTrace 的字串
ThrowableExtension.kt
package com.example.demo.utils

import java.io.PrintWriter
import java.io.StringWriter

fun Throwable.stackTraceAsString(): String {
    val errors = StringWriter()
    this.printStackTrace(PrintWriter(errors))
    return errors.toString()
}
最後新增 GlobalExceptionHandler 用來處理全域的 API 錯誤問題
GlobalExceptionHandler.kt
package com.example.demo

import com.example.demo.model.GeneralErrorResponse
import com.example.demo.utils.stackTraceAsString
import org.springframework.http.HttpStatus
import org.springframework.web.bind.annotation.ControllerAdvice
import org.springframework.web.bind.annotation.ExceptionHandler
import org.springframework.web.bind.annotation.ResponseBody
import org.springframework.web.bind.annotation.ResponseStatus
import javax.servlet.http.HttpServletRequest

@ControllerAdvice
class GlobalExceptionHandler {
    @ExceptionHandler(Throwable::class)
    @ResponseStatus(value = HttpStatus.BAD_REQUEST)
    @ResponseBody
    fun handleException(request: HttpServletRequest, error: Exception): GeneralErrorResponse {
        return GeneralErrorResponse("Error occurred!", request.requestURL.toString(), error.stackTraceAsString())
    }
}
這邊使用了 @ControllerAdvice 與 @ExceptionHandler 標示
當然不同情境有不同的用法,這邊示範回傳一個 JSON
最後在 Controller 新增一個測試用的 Exception 方法
@RequestMapping("/testErr")
fun testErr() {
    throw Exception("test exception")
}
然後瀏覽測試之。
處理 404 Not found 頁面
這裡處理當存取一個不存在的 API 時,預設回的資料。
我們再新增一個 Controller 名叫 MyErrorController 實作 ErrorController 介面,
範例如下:
MyErrorController.kt
package com.example.demo

import com.example.demo.model.GeneralErrorResponse
import org.springframework.boot.web.servlet.error.ErrorController
import org.springframework.web.bind.annotation.RequestMapping
import org.springframework.web.bind.annotation.RestController

@RestController
class MyErrorController : ErrorController {
    override fun getErrorPath(): String {
        return "/error"
    }

    @RequestMapping("/error")
    fun handleError(): GeneralErrorResponse {
        return GeneralErrorResponse("404 Error")
    }
}
這裡需實作 ErrorController 介面,定義錯誤發生的預設 Path 將走去哪裡
這裡使用 "/error"
然後綁定前述的值,回應一個預設訊息。
參考資料
- https://blog.csdn.net/hry2015/article/details/78806295
- https://matthung0807.blogspot.com/2019/12/spring-boot-controlleradvice.html
- https://matthung0807.blogspot.com/2018/03/spring-mvc-restcontrollercontroller.html
- https://www.baeldung.com/jackson-ignore-null-fields
- https://www.baeldung.com/exception-handling-for-rest-with-spring