之前耳聞 Mikrotik 的大名,Router OS 有很大的網路設定靈活度,
有平價版 Cisco 之稱,但相對的,設定也較複雜很多。
如有看過上次 OpenWRT 的獨立網路設定,
可以試試看在 Router OS 上能不能做到一樣的事情,也跟大家一個教學參考。
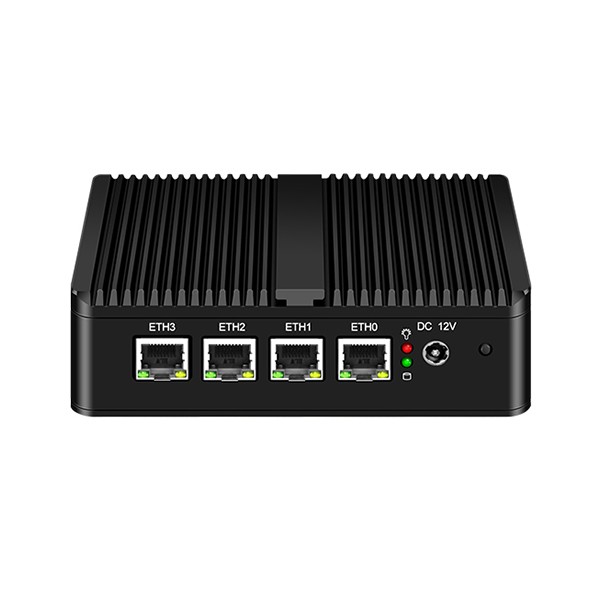
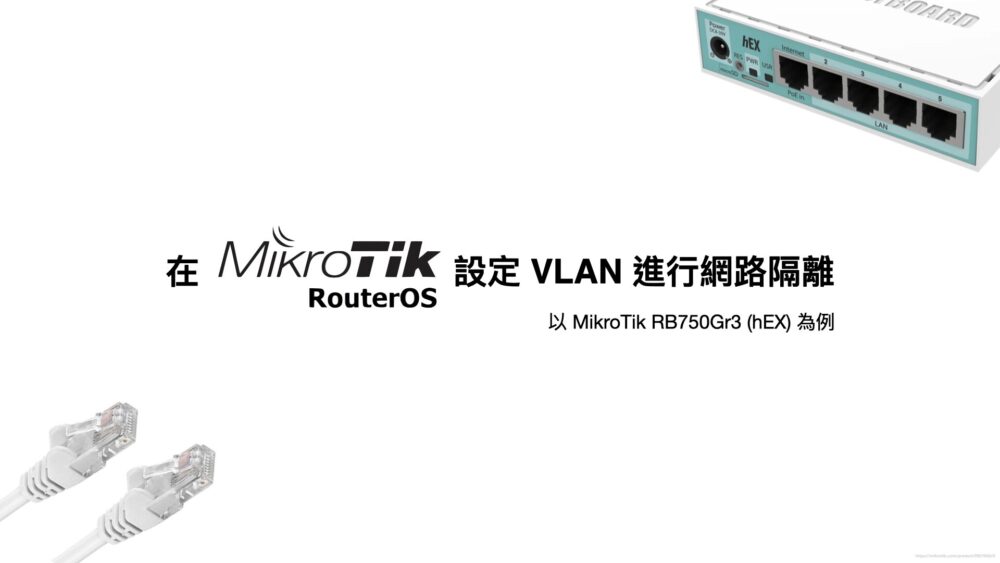
範例使用的機種是:MikroTik RB750Gr3 (hEX)
設定 VLAN 進行網路隔離 相關文章:
- 用 OpenWRT 設定 VLAN 進行網路隔離 – 以 TOTOLINK-X5000R 為例
https://blog.jks.coffee/openwrt-vlan-settings-totolink-x5000r/ - 用 OpenWRT 設定 VLAN 進行網路隔離 – 以 ASUS RT-AC58U 為例
https://blog.jks.coffee/openwrt-vlan-settings-rt-ac58u/
假設我們要設定以下的資訊
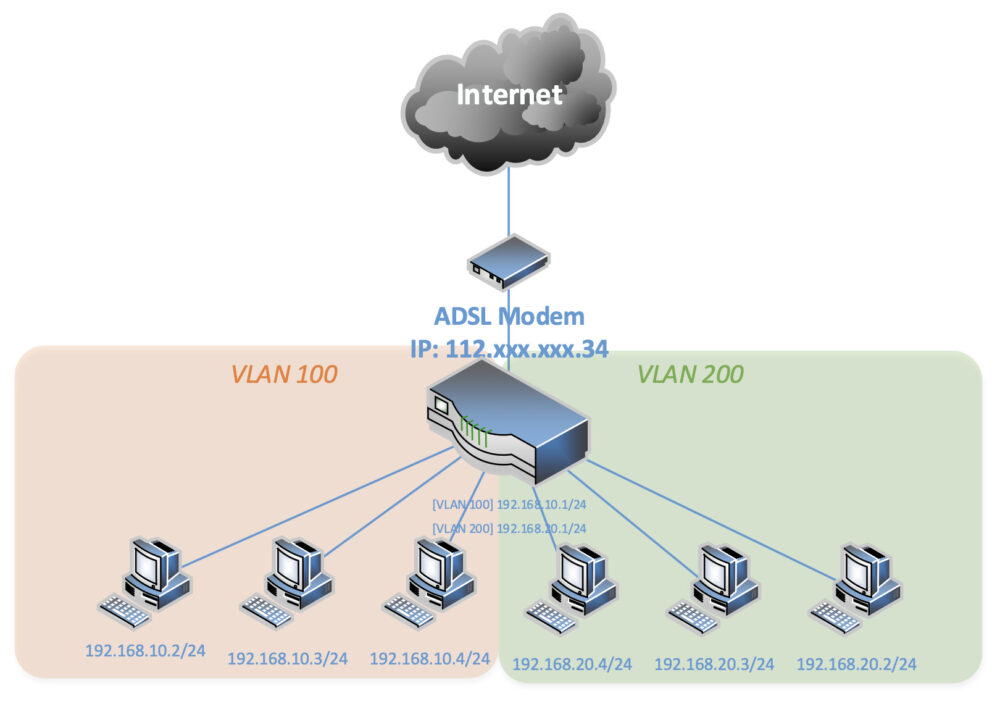
新設定的 IP 與網段:
-
VLAN 100
- 路由器 IP 為 192.168.10.1
- 網段為 192.168.10.0/24
- VLAN ID 為 100
- 配發 DHCP 範圍 192.168.10.2 – 192.168.10.254
-
VLAN 200
- 路由器 IP 為 192.168.20.1
- 網段為 192.168.20.0/24
- VLAN ID 為 200
- 配發 DHCP 範圍 192.168.20.2 – 192.168.20.254
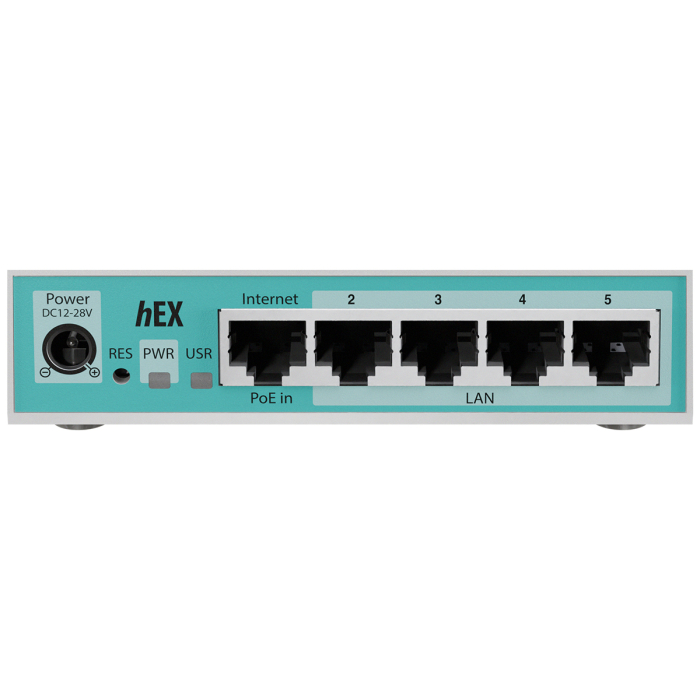
並設定實體網孔 Port
- Port 1 為 WAN 連接 Internet
- Port 2 設定為 VLAN 100,IP 網段: 192.168.10.0/24,發送 DHCP 至上述網段
- Port 3 設定為 VLAN 200,IP 網段: 192.168.20.0/24,發送 DHCP 至上述網段
- Port 4 設定為 Trunk Port,發 VLAN 100, VLAN 200 到同一條線路中
- Port 5 設定為 Trunk Port,發 VLAN 100, VLAN 200 到同一條線路中
💡 知識點補充:192.168.10.0/24 是 CIDR 標記方式,
意思等同於 192.168.10.1 ~ 192.168.10.255,
而 192.168.10.255 為廣播位址不能使用,
可用 IP 範圍為 192.168.10.1 ~ 192.168.10.254,
/24 的意思是子網路遮罩 (netmask) 為 255.255.255.0
Step 0: 硬體還原出廠設定步驟
在這開始之前,先學習怎麼重置你的路由器
我在學習的時候,重置了快 20 次,相信我,你會用到的(笑)
先拔除電源,
拿迴紋針按住 Reset 按鈕不放並插電
等待 USR LED 閃爍(大約 5-10 秒)
放開 Reset 按鈕,就可以原廠重置
Step 1: 連接 Router
有些一定要照順序,不然有可能會進不去管理介面
而 Router OS 設定起來,個人覺得不是那麼直覺
沒設定好,就會失去 IP 或進不去管理介面
將一條網路線接上 Router,電腦得到 IP: 192.168.88.254 (假設)
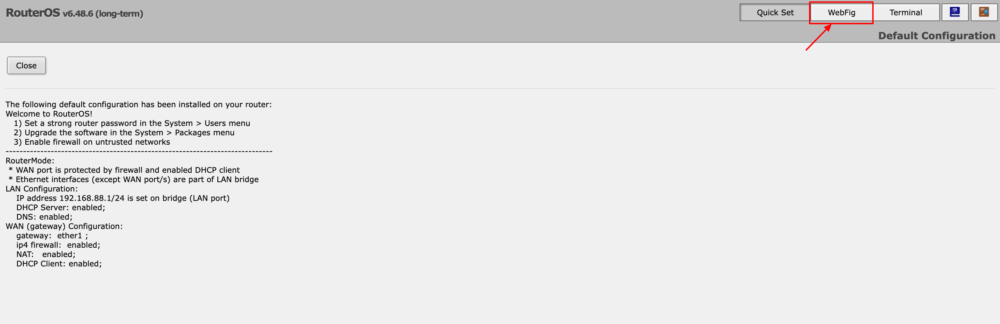
連上 http://192.168.88.1/ 進入 WebFig,我們開始吧
Step 1.5: 修改管理員密碼
第一次進到管理介面,強烈建議先把密碼改掉。
RouterOS 原廠的 admin 帳號預設是「空密碼」
(較新版本第一次登入會強制你設定),
不改的話,等下 VLAN 通了、甚至之後接上網際網路,會有安全風險。
介面操作版
在側邊欄點選 System -> Password
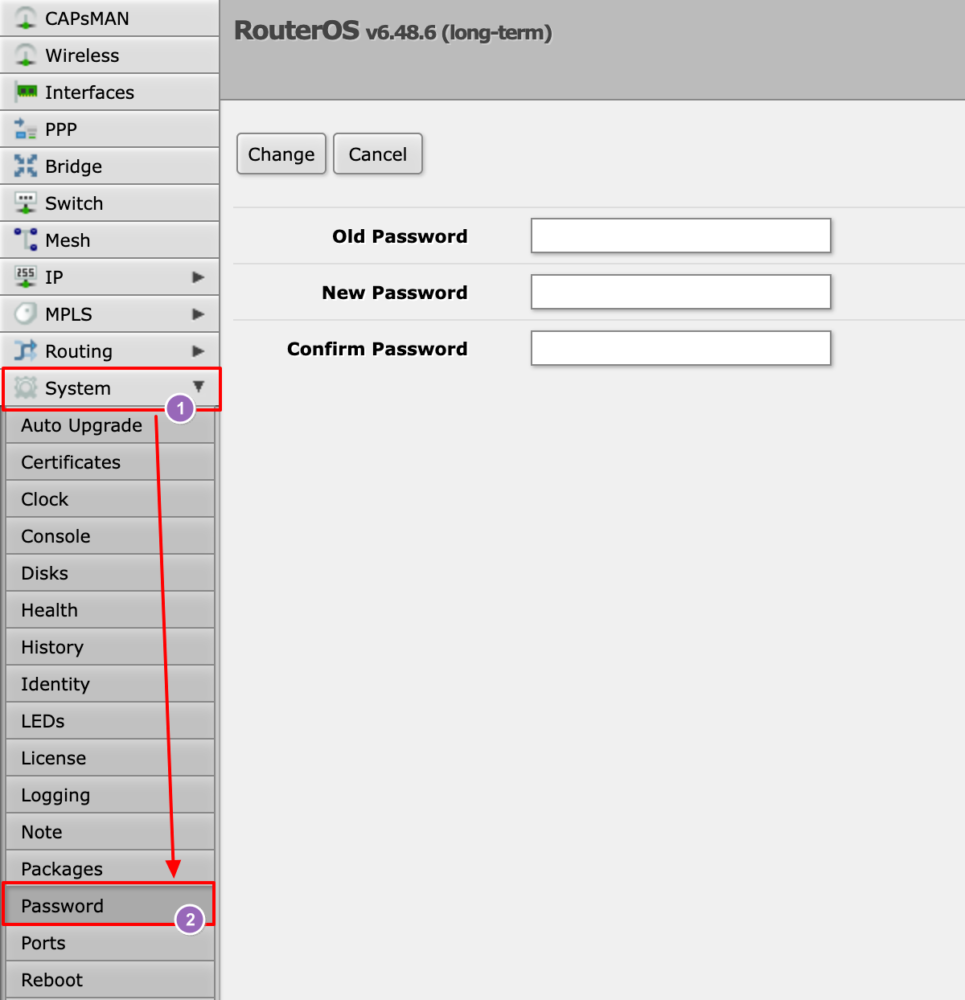
- New Password: 輸入你的新密碼
- Confirm Password: 再輸入一次
按下 OK 套用。
小提醒:改完密碼後,下次登入 WebFig / Winbox 就要用新密碼,
帳號一樣是 admin。建議也可以另外新增一個自己的管理帳號,
把 admin 停用或降權,安全性更好。
指令版
/user set admin password=YourStrongPasswordStep 1.6: 觀察原廠預設的設定值
這邊還是寫一個原廠設定值的觀察,帶你到等下要設定的頁面
先熟悉環境,避免到時候漏操作,造成又要重置機器
這段純觀察沒有要調整設定值,
覺得節奏慢的朋友,可以跳到 Step 2 開始設定
原廠預設值會配發 192.168.88.0/24 的網段 IP
在側邊欄點選 Interfaces,上方列切到 Interface 分頁
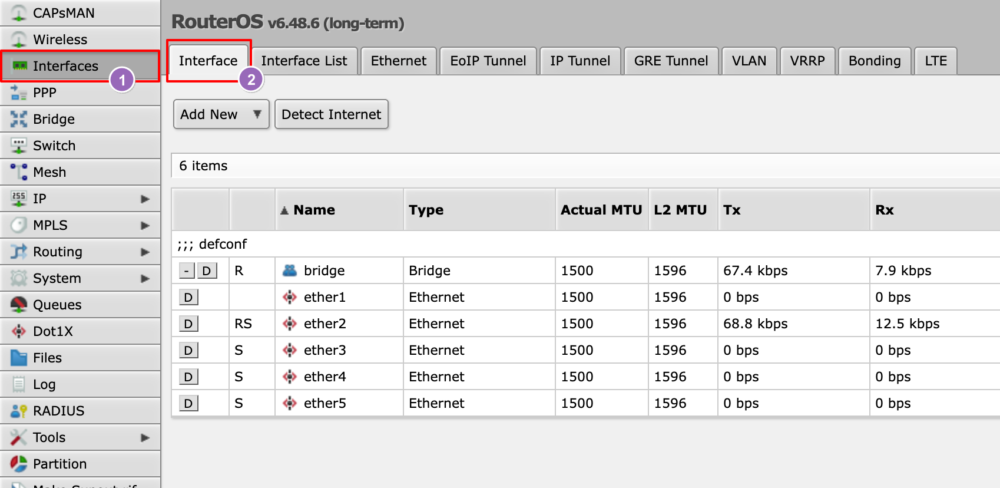
你會看到有 1 個 bridge 跟 5 個 Port 這邊講的是實體埠
(實體網路孔的意思)
- bridge
- ether1
- ether2
- ether3
- ether4
- ether5
範例的網路線插在 ether2 上,所以有流量
在側邊欄點選 Interfaces,上方列切到 Interface List 分頁
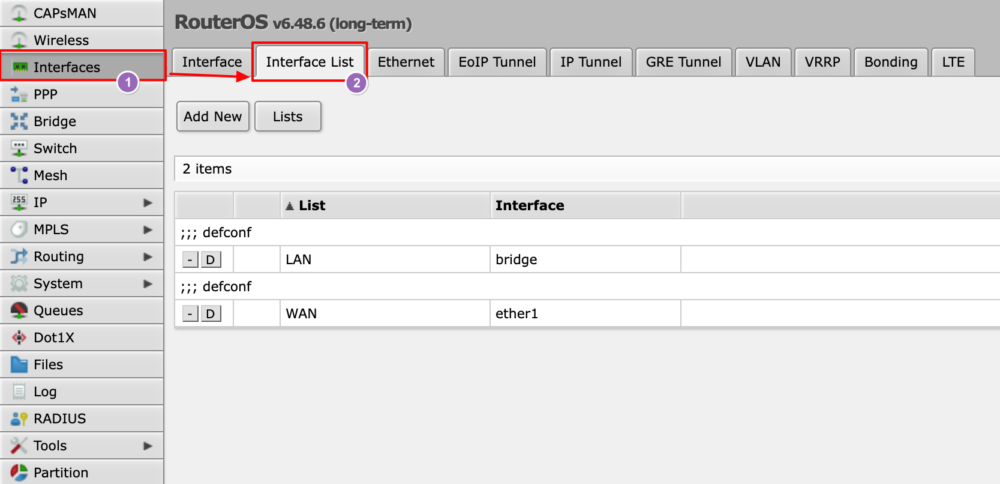
預設會有二個 List
- LAN
- WAN
在側邊欄點選 Bridge,上方列切到 Bridge 分頁
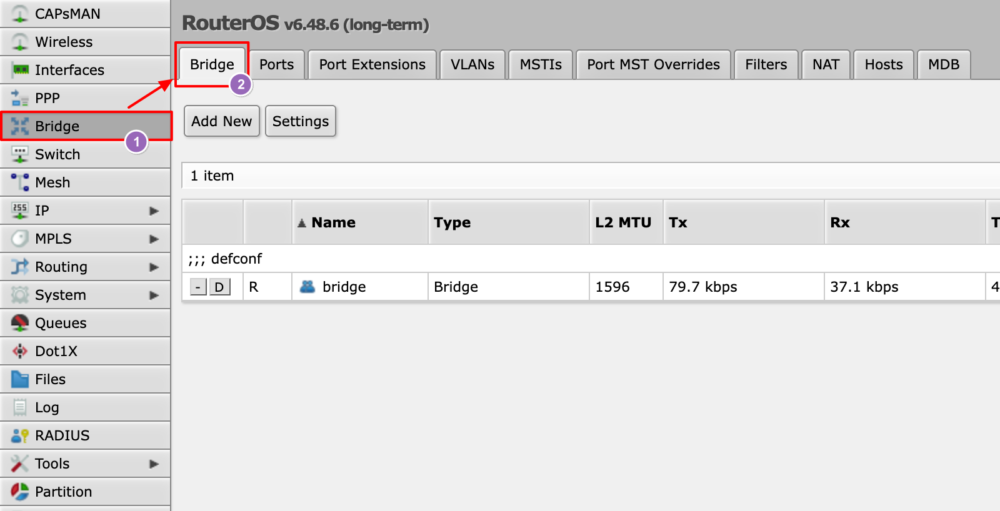
預設只有一個 bridge
- bridge
在側邊欄點選 Bridge,上方列切到 Ports 分頁
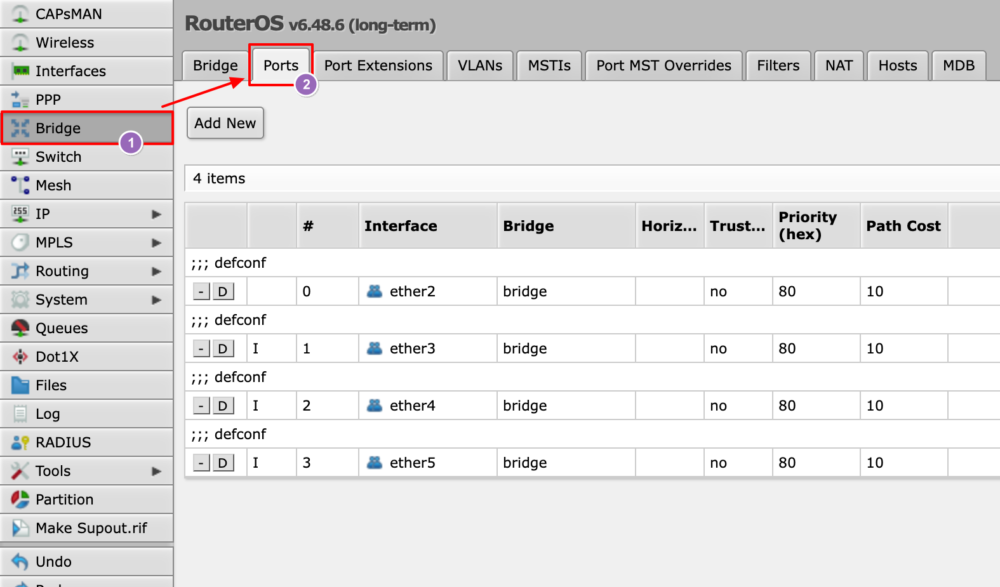
你會看到除了 WAN 的四個實體埠
- ether2
- ether3
- ether4
- ether5
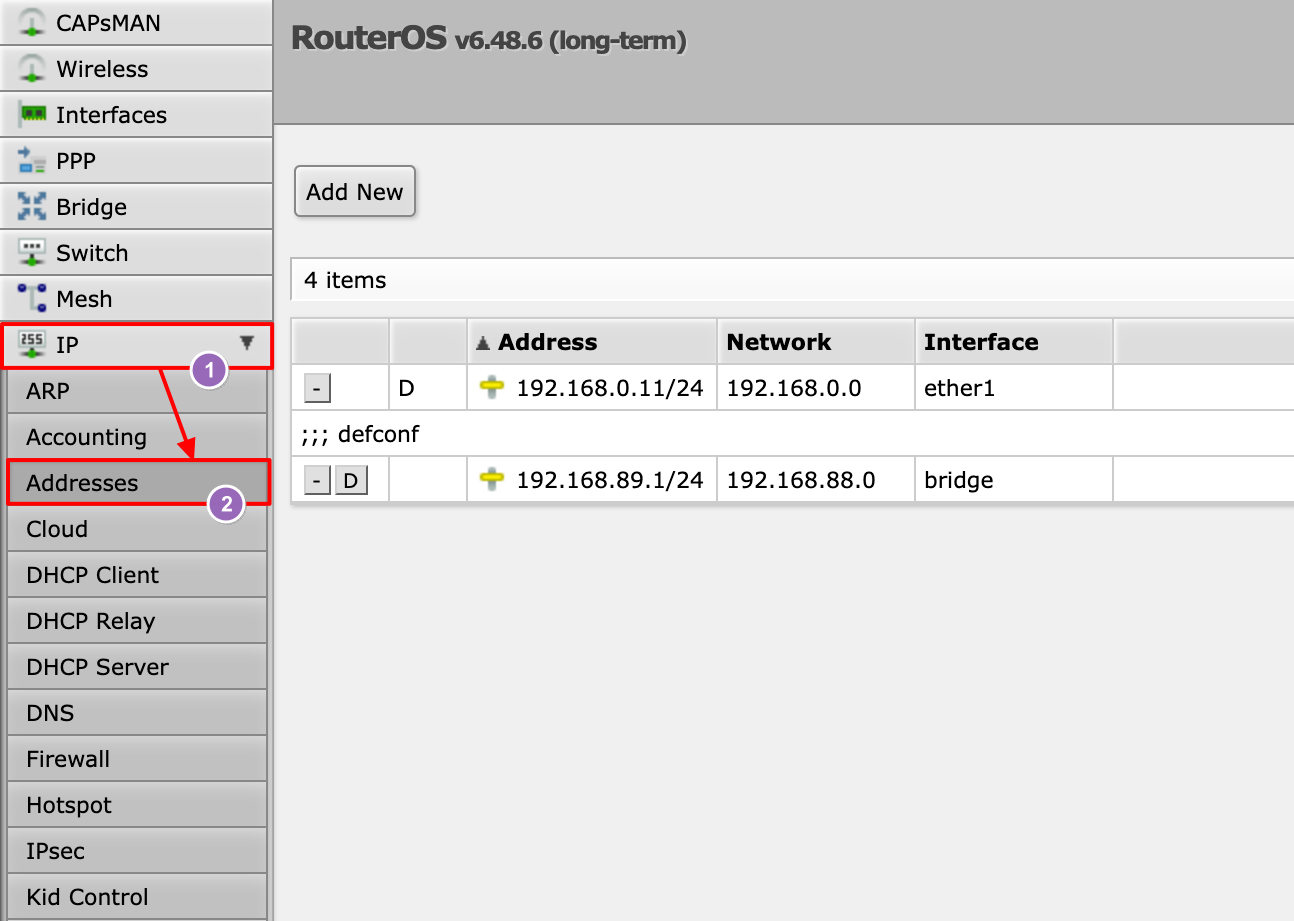
在側邊欄點選 IP -> Addresses 頁面
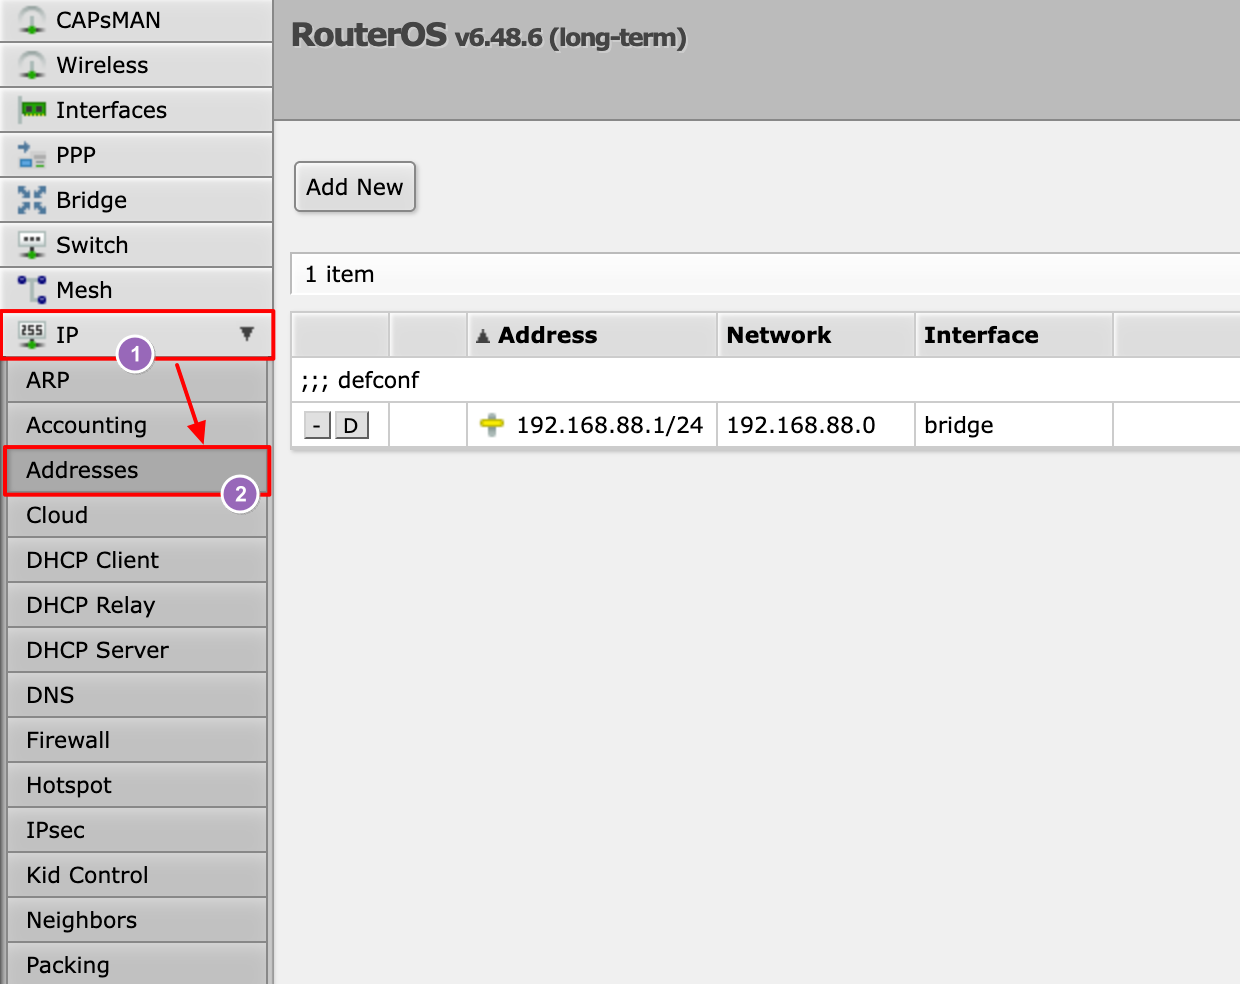
如果單接 LAN 沒接 WAN 的話,預設只有一個
- 192.168.88.1/24 (interface: bridge)
如果 WAN Port 有接對外 ADSL,又剛好 ADSL 是 DHCP 配發的話
會多一個
- (D) 192.168.0.11/24 (interface: ether1)
備註:這個 D 是 Dynamic 的意思,動態產生
其餘原廠預設值整理如下,等下設定時可以對照參考:
在側邊欄點選 IP -> Pool 頁面

預設會有一個位址池
- default-dhcp:192.168.88.10-192.168.88.254
在側邊欄點選 IP -> DHCP Server,上方列切到 DHCP 分頁
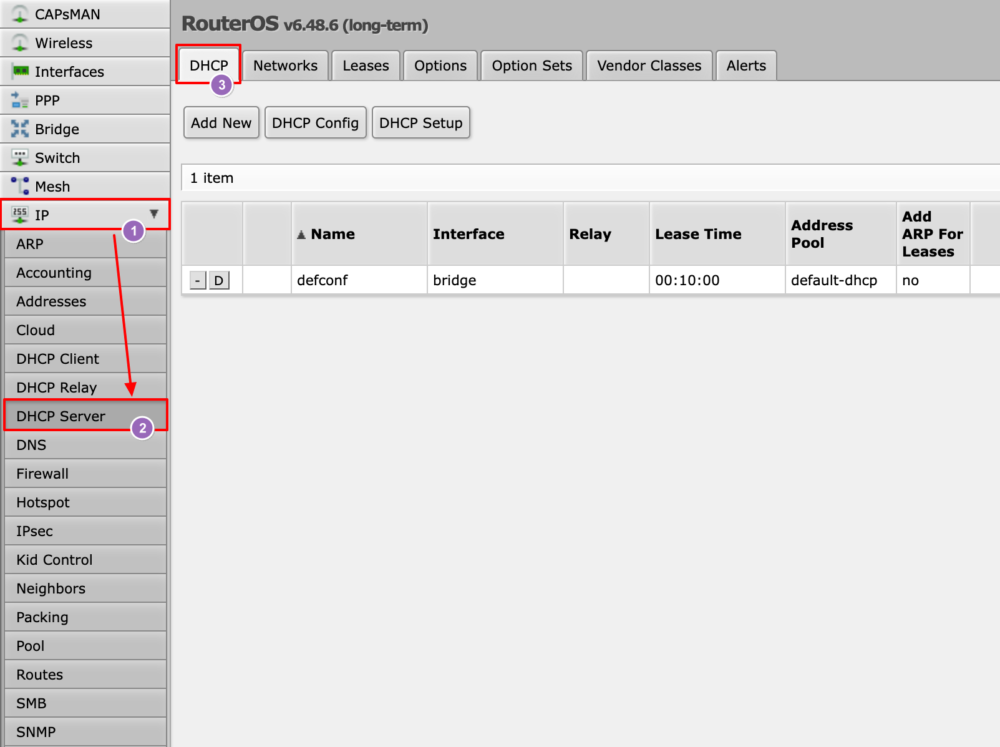
預設會有一個 DHCP Server
- defconf:綁在 bridge 上,使用 default-dhcp 這個 Pool
在側邊欄點選 IP -> DHCP Server,上方列切到 Networks 分頁
預設會有一筆網段
- 192.168.88.0/24,Gateway: 192.168.88.1,DNS: 192.168.88.1
在側邊欄點選 IP -> DNS 頁面
預設值
- Servers: 空白(由 WAN 的 DHCP Client 動態帶入)
- Allow Remote Requests: 打勾(路由器本身就是 DNS 轉發器)
在側邊欄點選 IP -> Firewall,上方列切到 NAT 分頁
預設會有一條 masquerade 規則
- Chain: srcnat
- Out. Interface List: WAN
- Action: masquerade
- 作用:讓內網能透過 WAN 出去上網(出去前把來源 IP 換成 WAN IP)
在側邊欄點選 IP -> Firewall,上方列切到 Filter Rules 分頁
預設會有一組基本防火牆規則(放行已建立連線、擋掉 WAN 進來的未授權連線等)
在側邊欄點選 IP > Routes 頁面
預設會有一條 Default Route (0.0.0.0/0)
- 由 ether1 (WAN) 的 DHCP Client 自動取得,指向 ISP 的 Gateway
註:本篇重點在 VLAN 與內網設定,
WAN 上網(DHCP Client、NAT masquerade、Default Route、防火牆)這些預設就已設定好,
正常情況下不需要更動,VLAN 設好後可以直接沿用。
Step 2: 設定 VLAN 介面
這邊是 VLAN 介面基本資料設定,
你把它想成是一種 Type 是 VLAN 的特殊介面,
介面就會命名,定義 VLAN ID 與套用到哪個 bridge
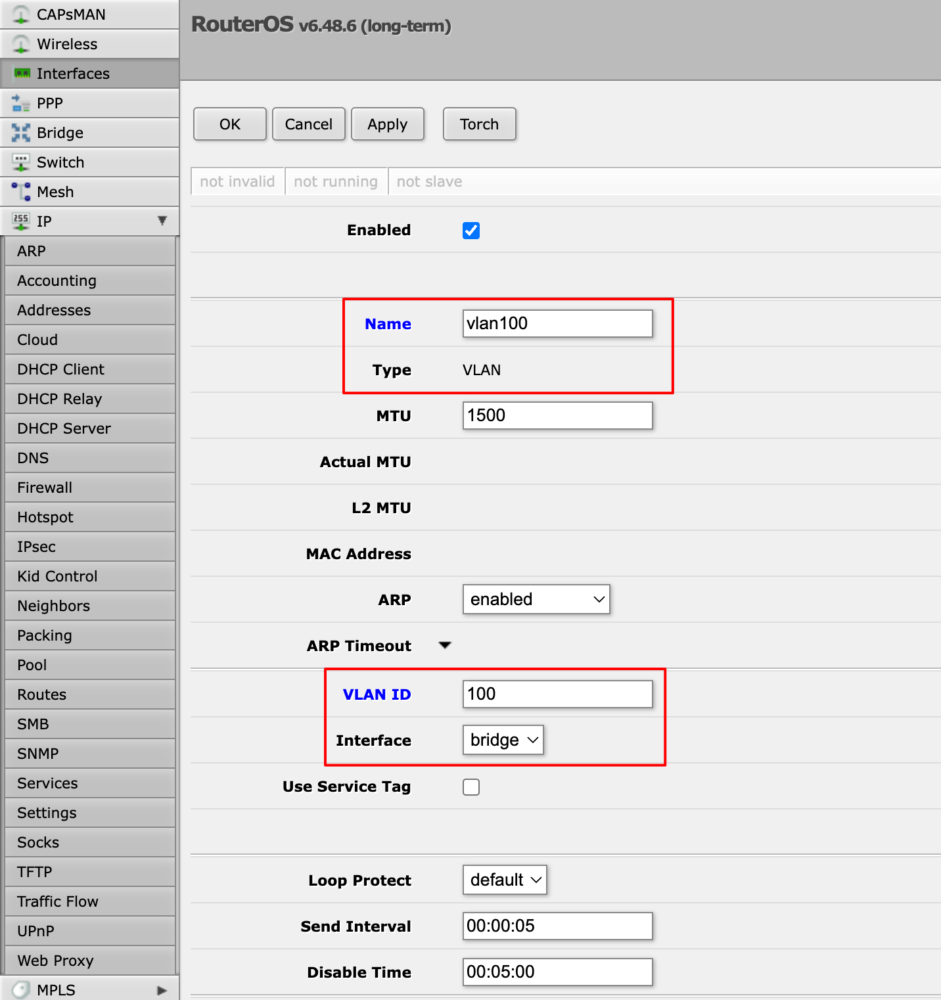
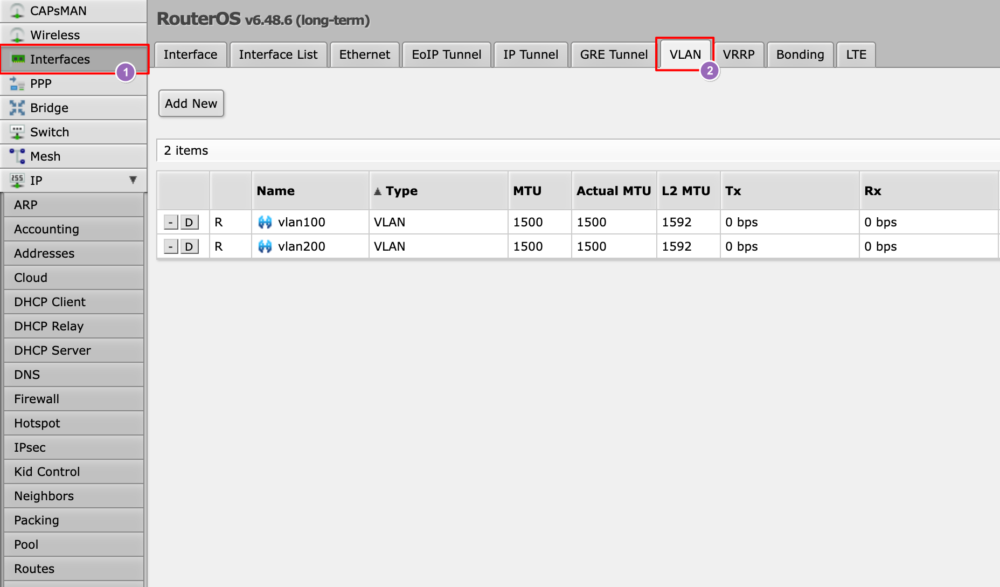
在側邊欄點選 Interfaces,上方列切到 VLAN 分頁

按下 Add New 按鈕新增 第一個 VLAN 介面
- Name: vlan100
- Type: VLAN
- VLAN ID: 100
- Interface: bridge
按下 Add New 按鈕新增 第二個 VLAN 介面
- Name: vlan200
- Type: VLAN
- VLAN ID: 200
- Interface: bridge
做完長這個樣子
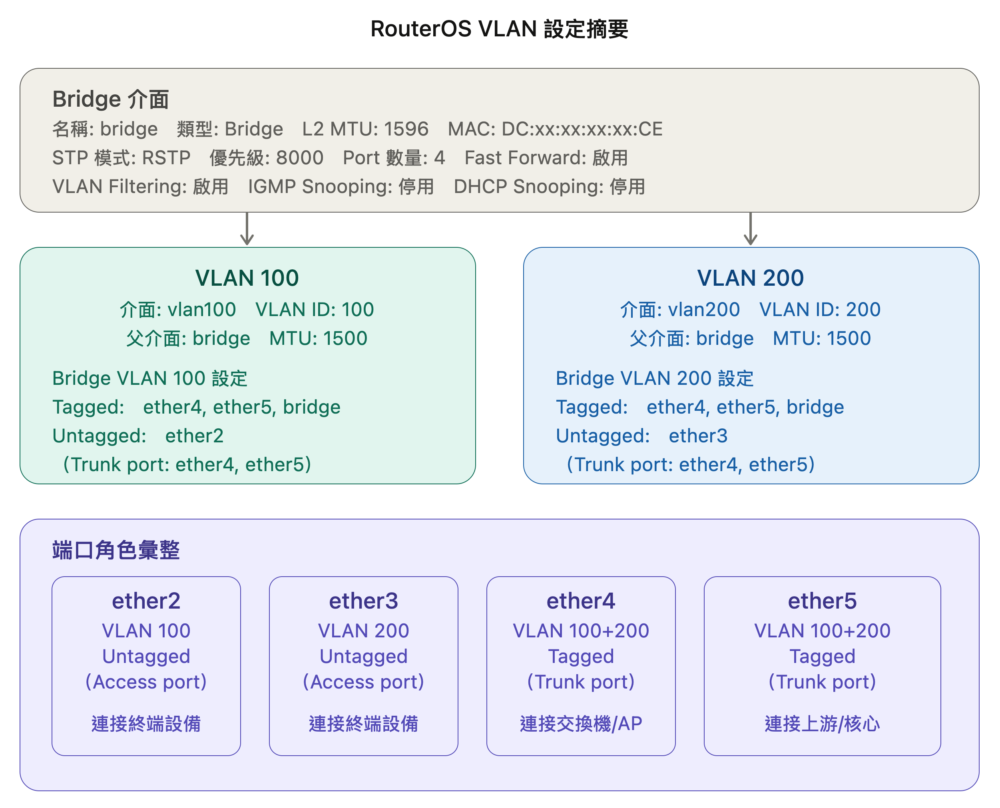
Step 3: 設定 VLAN 與實體埠 Tag/Untag 相關設定
這邊是設定 VLAN 與介面綁定,VLAN Tag/Untag 相關設定
(VLAN UnTaging 有二處要設定,這裡是第一處)
在側邊欄點選 Bridge,上方列切到 VLANs 分頁
按下 Add New 按鈕新增第一個 VLAN
- Bridge: bridge (不修改)
- VLAN IDs: 100
- Tagged: ether5, ether4, bridge
- Untagged: ether2
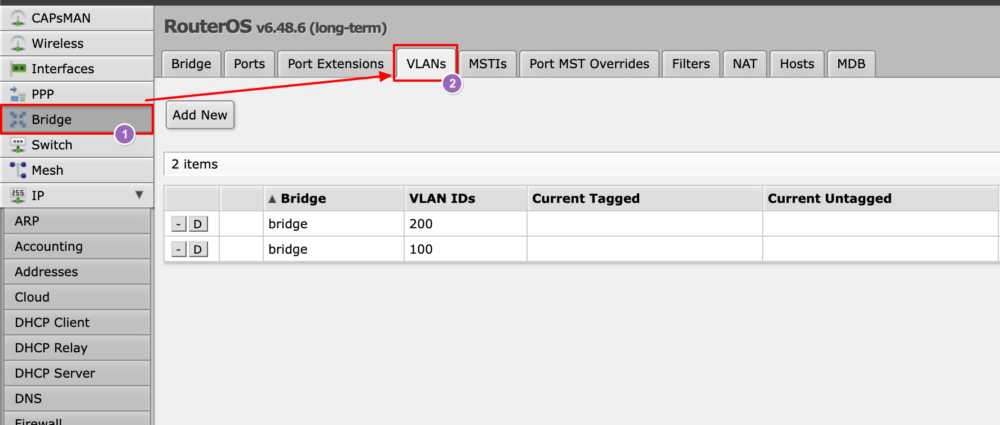
按下 Add New 按鈕新增第二個 VLAN
- Bridge: bridge (不修改)
- VLAN IDs: 200
- Tagged: ether5, ether4, bridge
- Untagged: ether3
⚠️ 注意:Tagged 的部分,要另外加上 bridge,這點很重要
設定完長這樣

Step 4: 設定實體埠的 PVID
(VLAN UnTaging 有二處要設定,這裡是第二處)
在側邊欄點選 Bridge,上方列切到 Ports 分頁
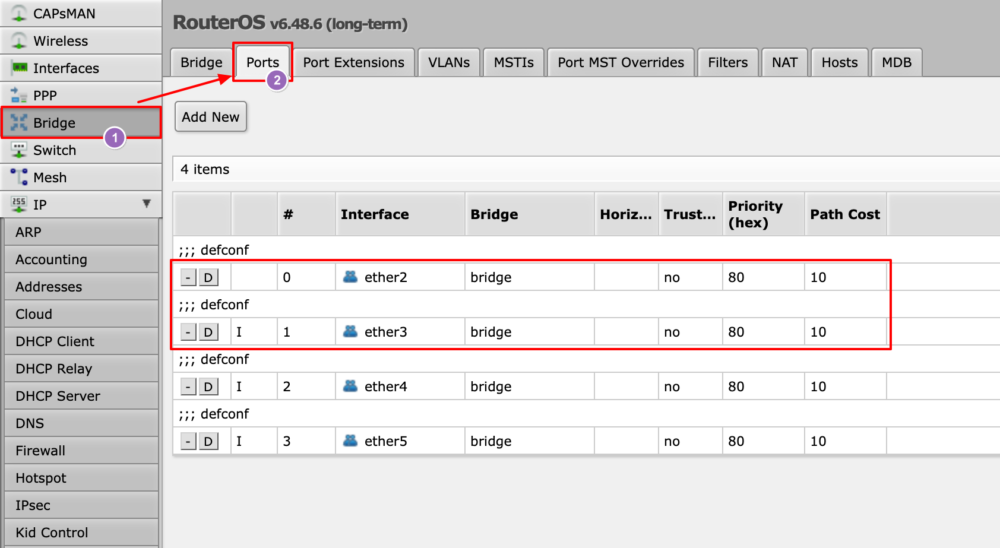
依序點入 ether2, ether3 來做設定
- ether2 設定 PVID:
100 - ether3 設定 PVID:
200
設定要 Untagged (下車) 的那個 VLAN ID,
VLAN Trunking port 請保持 PVID: 1
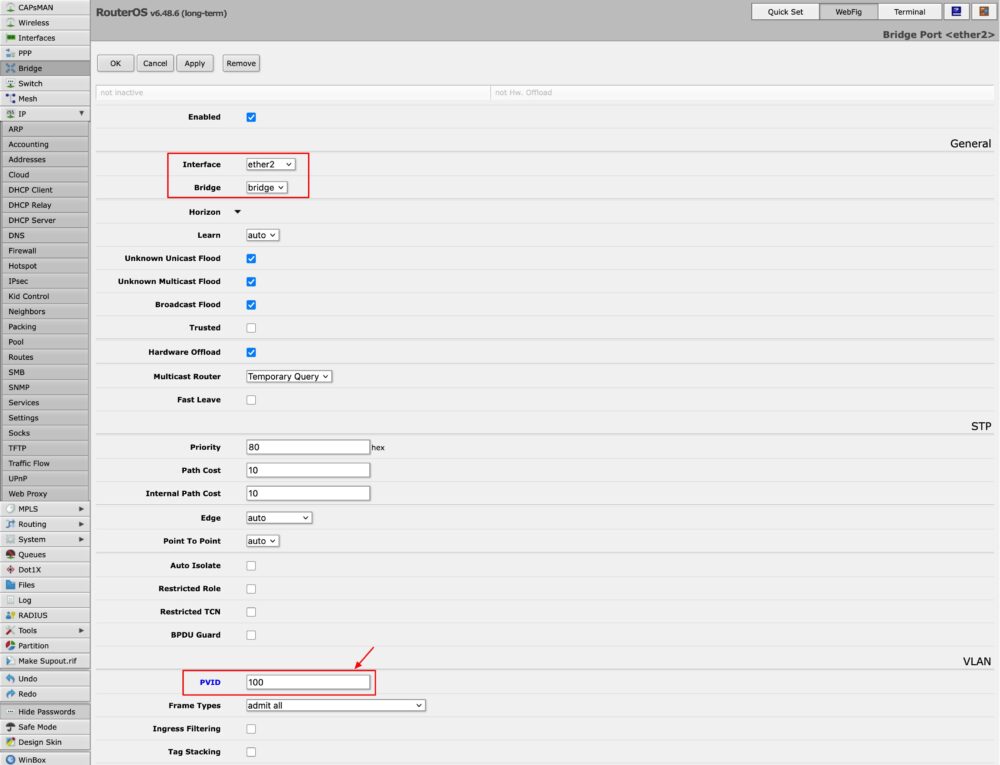
按 OK 後存檔
這邊一個重點,
你欲 VLAN UnTag 的實體埠,一定要設定 PVID 成對應的 VLAN ID
VLAN Trunking port 請保持 PVID: 1
如果沒有設定好 PVID,最後真正套用VLAN時 可能會失去連線
(因為他不知道要 Untag 到哪裡)
Step 5: 將 VLAN 加入進 Interface List 裡
在側邊欄點選 Interfaces,上方列切到 Interface List 分頁
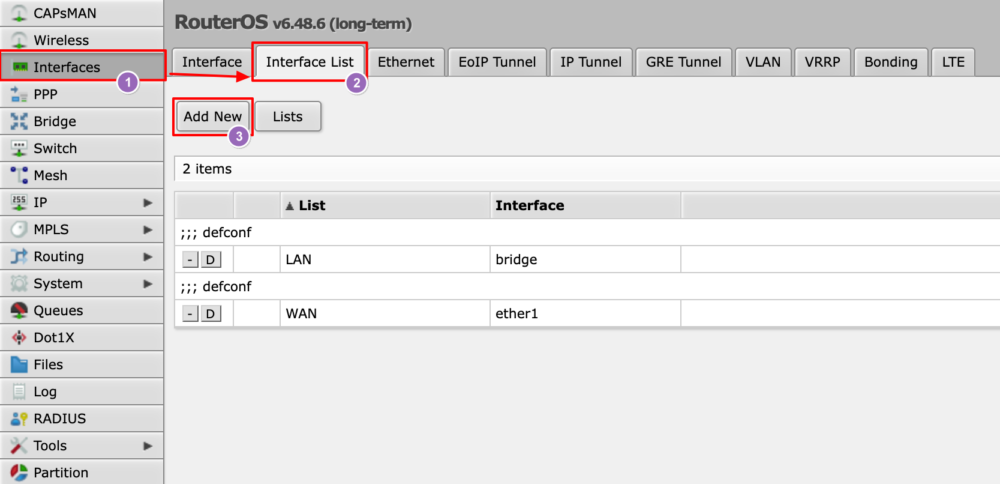
按下 Add New 按鈕新增
- List: LAN
- Interface: vlan100
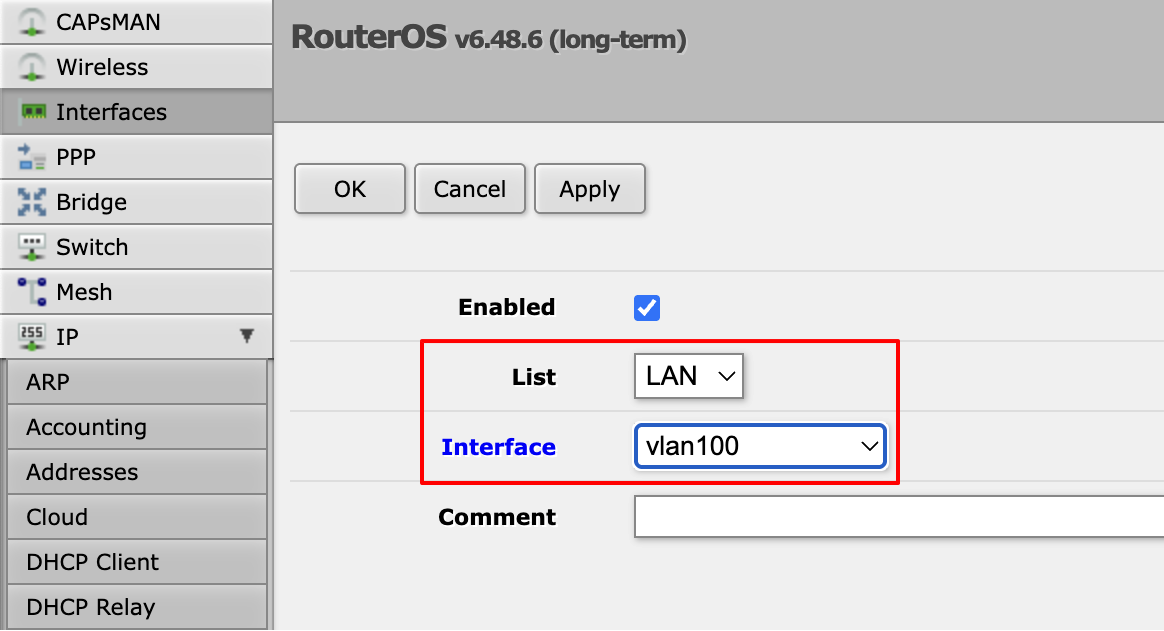
按下 Add New 按鈕新增
- List: LAN
- Interface: vlan200
⚠️ 注意:這裡很重要,將新建的 vlan100 與 vlan200 加入至 LAN 的清單裡
因為這個 LAN 清單有綁定管理介面要開放在哪個介面
不然你到時候可能會進不去 WebUI 管理介面
Step 6: 設定 IP
這邊設定切開的 VLAN 的路由器 IP 與網段
在側邊欄點選 IP -> Addresses 頁面
按下 Add New 按鈕新增 第一個
- Address: 192.168.10.1/24
- Network: 192.168.10.0
- Interface: vlan100
按下 OK 套用
按下 Add New 按鈕新增第二個
- Address: 192.168.20.1/24
- Network: 192.168.20.0
- Interface: vlan200
按下 OK 套用
設定完的樣子
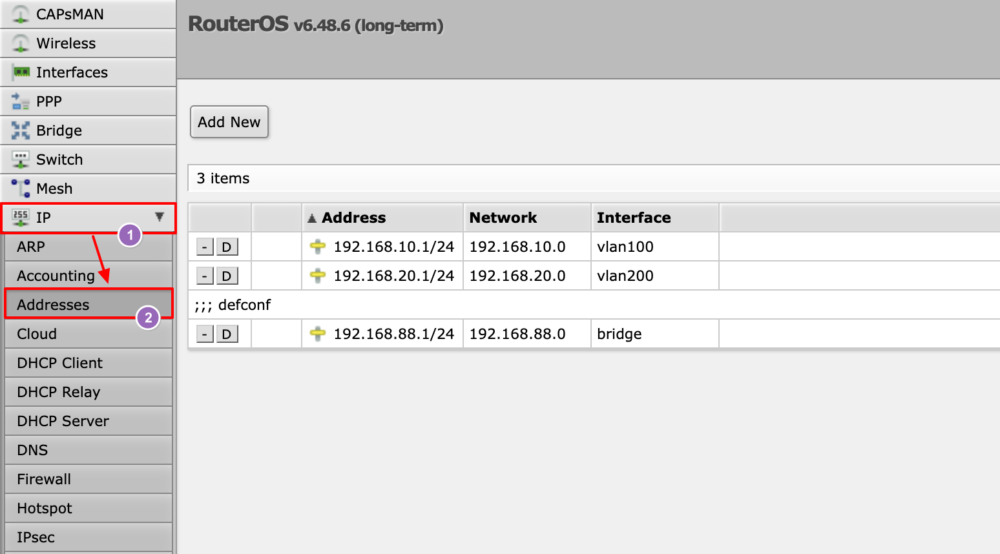
⚠️ 注意:須留意 Interface 不要選錯
舊的在整個流程還沒完成前不要刪除,不然會進入一個虛空狀態⚠️ 注意:如果你有插上 ADSL 會自動多一條 Dynamic (D) 規則,
千萬不要手癢把它刪掉,刪掉了你會無法上網
Step 7: 設定 DHCP Server
設定 DHCP Server 方法有二種,二種方法都會講,
第一種精靈式比較直覺,但管理上你還是要知道第二種手動做法
精靈式設定 DHCP Server
在側邊欄點選 IP -> DHCP Server,上方列切到 DHCP 分頁
按 DHCP Setup 進入互動式新增
- DHCP Server Interface: vlan100 (選擇剛剛建立的 VLAN 介面)
然後按 Next
- DHCP Address Space: 192.168.10.0/24 (會自動帶入)
直接 Next
- Gateway for DHCP Network: 192.168.10.1 (會自動帶入)
直接 Next
- Addresses to Give Out: 192.168.10.2-192.168.10.254 (會自動帶入)
直接 Next
- DNS Servers: 8.8.8.8
填入 DNS 伺服器
然後按 Next
- Lease Time: 00:10:00 (保留預設即可)
直接 Next
這樣就設定好一筆了,接續設定第二筆
- DHCP Server Interface: vlan200
- DHCP Address Space: 192.168.20.0/24
- Gateway for DHCP Network: 192.168.20.1
- Addresses to Give Out: 192.168.20.2-192.168.20.254
- DNS Servers: 8.8.8.8
- Lease Time: 00:10:00
⚠️ 注意:注意舊的 DHCP 「先」不要刪除(因為你現在正在使用著),
不然會失去目前的連線
手動設定 DHCP Server
設定欲配發的 Pools
在側邊欄點選 IP > Pool ,上方列切到 Pools 分頁
按下 Add New 按鈕新增第一個
- Name: dhcp_pool1
- Addresses: 192.168.10.2-192.168.10.254
按下 Add New 按鈕新增第二個
- Name: dhcp_pool2
- Addresses: 192.168.20.2-192.168.20.254
這邊照著上述的網段寫就好,你可以預設設定最大,也可以依照需求再修改
設定欲發給內網電腦的 DNS
在側邊欄點選 IP > DHCP Server,上方列切到 Networks 分頁
按下 Add New 按鈕新增第一個
- Address: 192.168.10.0/24
- Gateway: 192.168.10.1
- DNS Servers: 8.8.8.8(或填路由器自己 192.168.10.1)
按下 Add New 按鈕新增第二個
- Address: 192.168.20.0/24
- Gateway: 192.168.20.1
- DNS Servers: 8.8.8.8(或填路由器自己 192.168.20.1)
這樣兩個網段的電腦透過 DHCP 拿 IP 時,就會同時拿到對應的 Gateway 和 DNS。
設定 DHCP
在側邊欄點選 IP > DHCP Server,上方列切到 DHCP 分頁
按下 Add New 按鈕新增第一個
- Enabled: 打勾
- Name: dhcp1
- Interface: vlan100
- Address Pool: dhcp_pool1 (選你剛剛建立的 Pool)
按下 Add New 按鈕新增第二個
- Enabled: 打勾
- Name: dhcp2
- Interface: vlan200
- Address Pool: dhcp_pool2 (選你剛剛建立的 Pool)
其餘設定不需更動
這樣就完成了 DHCP 的設定
DNS 設定
DNS 有兩個層面要分清楚:
一個是「路由器本身」要往哪裡查 DNS,
另一個是「發給內網電腦」的 DNS 要填什麼。
路由器本身的 DNS(IP > DNS)
在側邊欄點選 IP -> DNS
- Servers: 8.8.8.8, 1.1.1.1(可填多筆,用逗號分隔)
- Allow Remote Requests: 打勾
打勾 Allow Remote Requests 後,
路由器自己就會變成一台 DNS 轉發器 (DNS Resolver),
內網電腦可以把路由器的 IP(例如 192.168.10.1)當成 DNS 來用,
好處是路由器會幫忙做快取,查詢比較快。
備註:Allow Remote Requests 打勾後,記得防火牆要擋住 WAN 進來的 53 port,
不然會變成對外開放的 Open DNS Resolver,可能被人拿去當 DDoS 放大攻擊的跳板。
原廠防火牆規則預設已經擋掉 WAN 的未授權連線,沿用即可。
Step 8: 打開 VLAN Filtering
剛剛設定的這些還不是真正打開 VLAN 功能,只是先做預設定而已
所有實體埠就跟一般路由器一樣,最後的步驟就是要把 VLAN 的功能打開
在側邊欄點選 Interfaces,上方列切到 Interface 分頁
點到(預設產生的那個) bridge 做編輯
- VLAN Filtering: 打勾
按下 OK 時會馬上斷線,因為已經套用 VLAN 了
這時候不要緊張,重新 DHCP 做 renew,取得電腦新的 IP: 192.168.10.254 (假設)
重新登入 http://192.168.10.1
就可以測試了!
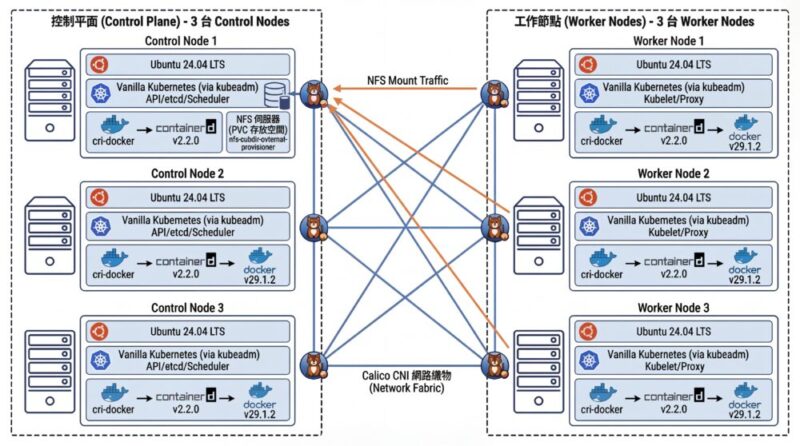
我們用一張圖回顧我們設定了什麼
Step 9: 測試
這個時候插上對應的實體埠,應該會看到你設定的對應的 IP
插上 Port 2,電腦會得到 IP: 192.168.10.254 (假設),可以正常上網
改插上 Port 3,電腦會得到 IP: 192.168.20.254 (假設),可以正常上網
Port 4, Port 5 是 Trunk Port 可以配合之前說的 OpenWRT 配置就可以上網
Step 10 (Optional): DHCP Static Lease(設定固定配發到的 IP)
預設 DHCP 是動態配發,同一台機器每次拿到的 IP 可能不一樣。
如果某台機器要長期固定 IP(例如 NAS、印表機,或等下要做 Port Forwarding 的目標),
就用 Static Lease 把它的 MAC 位址綁定一個固定 IP。
綁定的 IP 建議落在 DHCP 範圍內(192.168.10.2-192.168.10.254)即可,
RouterOS 會自動把它從動態配發中排除,不會發給別人。
在側邊欄點選 IP > DHCP Server,上方列切到 Leases 分頁
最簡單的做法:先讓目標機器正常連上拿到 IP,
在清單中找到它那筆(狀態為 dynamic),點選後按 Make Static 轉成固定,
之後再點進去修改,把 Address 改成你要的 IP 即可。
或者按下 Add New 按鈕手動新增:
- Address:
192.168.10.100(你要固定的 IP) - MAC Address:
AA:BB:CC:DD:EE:FF(目標機器的網卡 MAC) - Server:
dhcp1(對應該網段的 DHCP Server,vlan200 就選 dhcp2)
按下 OK 套用。
目標機器重新 DHCP renew(或重開機)後,就會固定拿到指定的 IP。
Step 11 (Optional): Port Forwarding
Port Forwarding(埠轉發 / NAT 通訊埠對應)是讓外網可以連到內網某台機器的服務,
例如把外網連到路由器 8080 port 的流量,轉送到內網某台 NAS 的 80 port。
原理是新增一條 dstnat 規則,
把「目的地是路由器 WAN IP + 指定 port」的封包,改寫目的地成內網某台機器。
在側邊欄點選 IP > Firewall,切到 NAT 分頁
按下 Add New 按鈕新增規則
General 分頁:
- Chain: dstnat
- Protocol: 6 (tcp)(依服務選 tcp 或 udp)
- Dst. Port: 8080(外網要連的 port)
- In. Interface List: WAN(只對 WAN 進來的流量生效)
Action 分頁:
- Action: dst-nat
- To Addresses: 192.168.10.100(內網目標機器的 IP)
- To Ports: 80(內網目標機器的服務 port)
按下 OK 套用。
舉例:上面這條規則的意思是
「外面的人連到 你的WAN_IP:8080,會被轉送到內網 192.168.10.100 的 80 port」。
注意一:建議把內網目標機器設成固定 IP(或在 DHCP 用 Static Lease 綁定),
不然 IP 變動後轉發就會失效。注意二:對外開 port 有安全風險,請確認該服務本身有做好權限與認證,
非必要不要直接把管理介面(如 SSH、WebFig)對外開放。注意三:如果你的 WAN 是 ISP 給的浮動 IP(且在 NAT 後面,俗稱 CGNAT),
即使設好 Port Forwarding 外面也連不進來,這種情況要另外申請固定 IP 或用內網穿透方案。
指令式設定
上面整套都是用 WebFig 圖形介面點選設定的,
如果你習慣指令(New Terminal 或 SSH 進去),可以直接貼上下面這整套指令完成設定,
速度快很多,也方便備份重現。
# Step 2: 建立 VLAN 介面
/interface vlan add name=vlan100 vlan-id=100 interface=bridge
/interface vlan add name=vlan200 vlan-id=200 interface=bridge

# Step 3: 設定 Bridge VLAN 的 Tagged / Untagged
/interface bridge vlan add bridge=bridge vlan-ids=100 tagged=bridge,ether4,ether5 untagged=ether2
/interface bridge vlan add bridge=bridge vlan-ids=200 tagged=bridge,ether4,ether5 untagged=ether3

# Step 4: 設定實體埠的 PVID(Trunk port 保持 pvid=1)
/interface bridge port set [find interface=ether2] pvid=100
/interface bridge port set [find interface=ether3] pvid=200

# Step 5: 把 VLAN 介面加入 LAN 清單(保留管理介面存取)
/interface list member add list=LAN interface=vlan100
/interface list member add list=LAN interface=vlan200

# Step 6: 設定路由器 IP
/ip address add address=192.168.10.1/24 interface=vlan100 network=192.168.10.0
/ip address add address=192.168.20.1/24 interface=vlan200 network=192.168.20.0

# Step 7: 設定 DHCP Pool / Server / Network(含 DNS)
/ip pool add name=dhcp_pool1 ranges=192.168.10.2-192.168.10.254
/ip pool add name=dhcp_pool2 ranges=192.168.20.2-192.168.20.254
/ip dhcp-server add name=dhcp1 interface=vlan100 address-pool=dhcp_pool1 disabled=no
/ip dhcp-server add name=dhcp2 interface=vlan200 address-pool=dhcp_pool2 disabled=no
/ip dhcp-server network add address=192.168.10.0/24 gateway=192.168.10.1 dns-server=8.8.8.8
/ip dhcp-server network add address=192.168.20.0/24 gateway=192.168.20.1 dns-server=8.8.8.8

# 路由器本身的 DNS 轉發
/ip dns set servers=8.8.8.8,1.1.1.1 allow-remote-requests=yes重點:vlan-filtering=yes 一定要放在最後一行執行,
順序跟圖形介面教學一樣,前面的預設定都做完了才真正打開 VLAN 功能,
否則中途打開很容易把自己的連線鎖在外面。
# Step 8: 最後才打開 VLAN Filtering(這行下去會馬上斷線,屬正常)
/interface bridge set bridge vlan-filtering=yes
以下是設定範例,請以你的需求修改,不能直接套用
# Step 10 (Optional): DHCP Static Lease 固定 IP 綁定範例
/ip dhcp-server lease add address=192.168.10.100 mac-address=AA:BB:CC:DD:EE:FF server=dhcp1

# Step 11 (Optional): Port Forwarding 範例
/ip firewall nat add chain=dstnat in-interface-list=WAN protocol=tcp dst-port=8080 action=dst-nat to-addresses=192.168.10.100 to-ports=80
參考資料
- How to configure VLAN in Mikrotik router 2022
https://www.youtube.com/watch?v=w7P4LRyqVyg