
會寫這一個主題,大概就是這步驟實在又多又複雜,
細節很多、然後軟體更新很快,步驟文章很容易失效
想必很有可能這篇沒多久就失效了,
至少可以給初學者一個概念,
就算其中步驟有變化,但一定只會變得更方便、更直覺
這種從頭開始、包含 GPU 的安裝,應該這個經驗不會太多人有。
不囉唆,我們開始吧
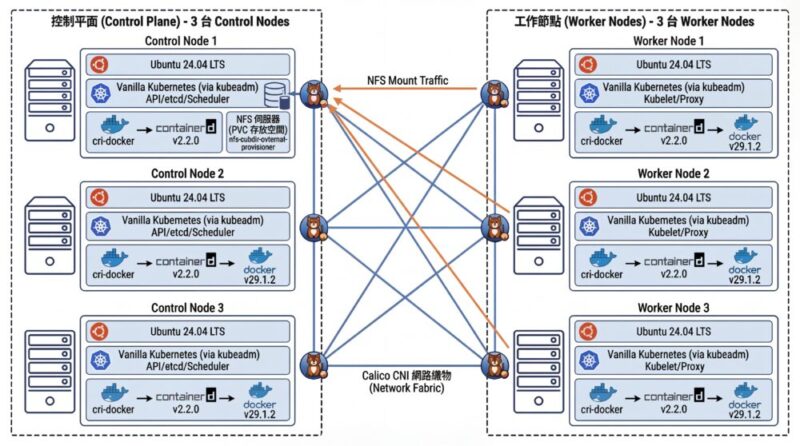
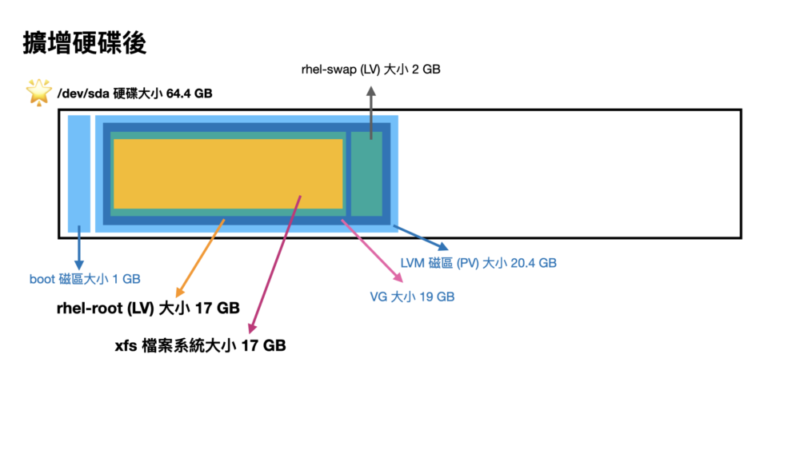
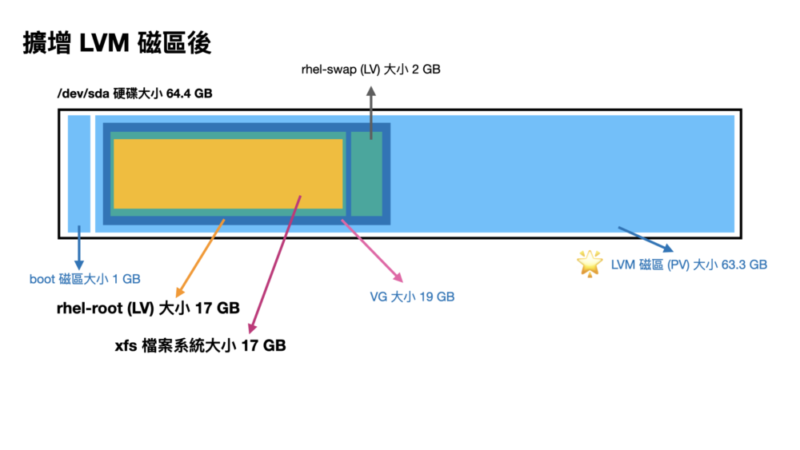
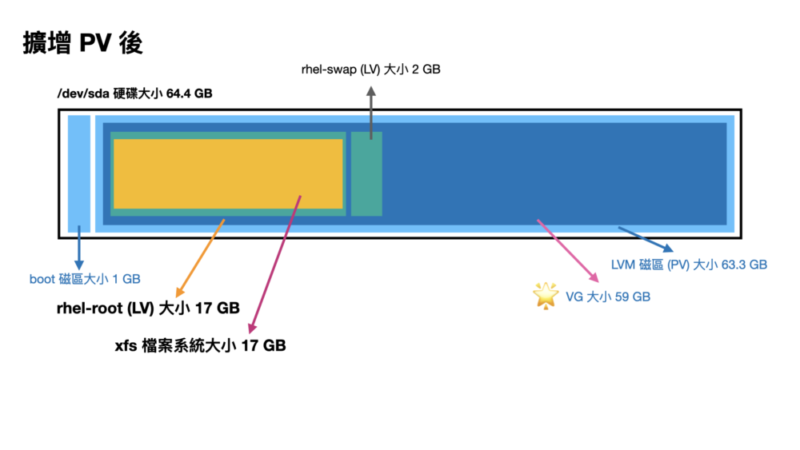
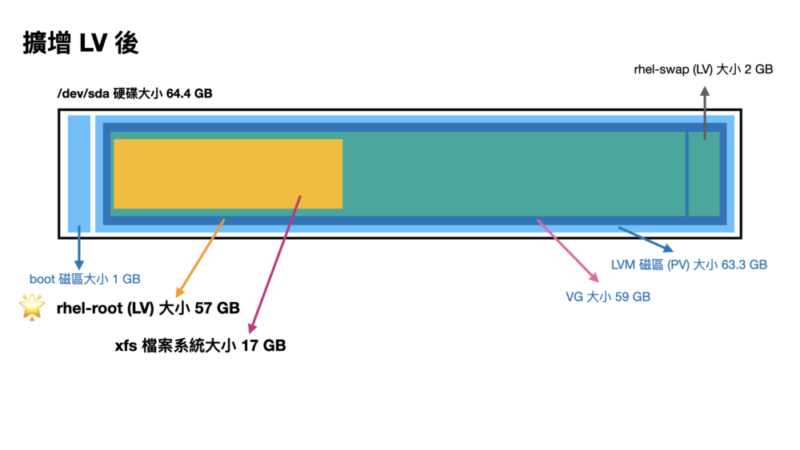
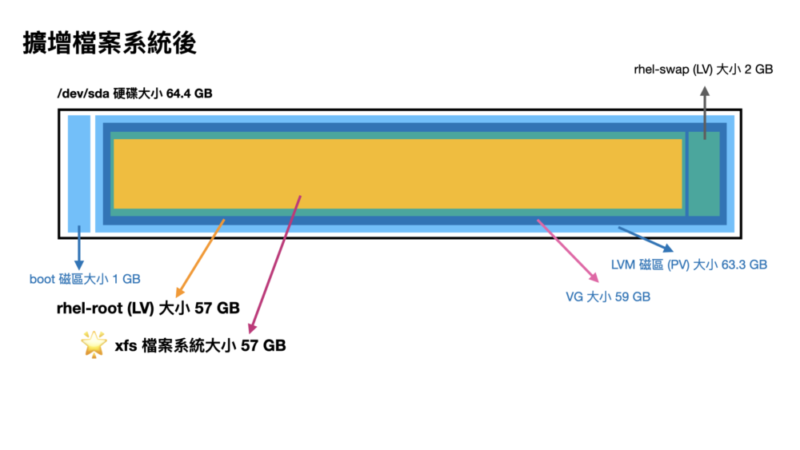
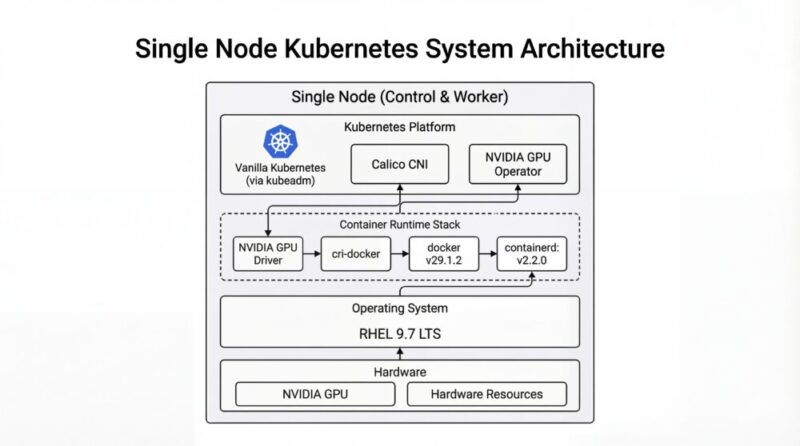
架構圖
關閉 Nouveau 驅動
在安裝 GPU 之前,需關閉 Nouveau 驅動,不然會安裝失敗
新增一個 /etc/modprobe.d/blacklist-nouveau.conf 檔案
(這檔案預設系統沒有,需要自行創立)
sudo vi /etc/modprobe.d/blacklist-nouveau.conf內容為
blacklist nouveau
options nouveau modeset=0
:wq 存檔
然後輸入以下指令,讓核心 Kernel 以重新載入 initramfs
sudo dracut --force查看 Nouveau 狀態
lsmod | grep -i nouveau安裝 NVIDIA 驅動
這邊使用 Redhat 系列做範例, Rocky Linux, Fedora 是同家族的,
理論上都可以使用
安裝 kernel-devel 套件
sudo yum install -y gcc kernel-devel-$(uname -r)到 NVIDIA 官網來下載驅動程式
https://www.nvidia.com/en-us/drivers/
打入你型號的 GPU 卡,就可以搜尋到 Linux 版本的驅動程式
筆者當時寫文的時候,拿到的檔名是 NVIDIA-Linux-x86_64-550.142.run
我們就執行該程式
chmod +x NVIDIA-Linux-x86_64-550.142.run
./NVIDIA-Linux-x86_64-550.142.run
他會跑一連串互動式安裝
- Nouveau 停用選項
Nouveau can usually be disabled by adding files to the modprobe configuration
  directories and rebuilding the initramfs.

  Would you like nvidia-installer to attempt to create these modprobe configuration
  files for you?
Nouveau 通常可以透過在 modprobe 設定目錄中新增檔案並重建 initramfs 來停用。
您希望 NVIDIA 安裝程式嘗試為您建立這些 modprobe 設定檔嗎?
這邊選擇 YES
- Nouveau 停用檔已建立
 One or more modprobe configuration files to disable Nouveau have been written.
  You will need to reboot your system and possibly rebuild the initramfs before
  these changes can take effect.  Note if you later wish to reenable Nouveau, you
  will need to delete these files:
  /usr/lib/modprobe.d/nvidia-installer-disable-nouveau.conf,
  /etc/modprobe.d/nvidia-installer-disable-nouveau.conf
NVIDIA 安裝程式已建立一個或多個 modprobe 設定檔來停用 Nouveau。
您需要重新啟動系統,並可能需要重建 initramfs,這些變更才會生效。
請注意,如果您之後希望重新啟用 Nouveau,需要刪除以下檔案:
- /usr/lib/modprobe.d/nvidia-installer-disable-nouveau.conf
- /etc/modprobe.d/nvidia-installer-disable-nouveau.conf
按 OK 繼續
- 警告:NVIDIA 安裝程式無法確定 X 函式庫路徑
WARNING: nvidia-installer was forced to guess the X library path '/usr/lib64' and X module path '/usr/lib64/xorg/modules'; these paths were not queryable from the system.  If X fails to find the NVIDIA X driver module,
please install the `pkg-config` utility and the X.Org SDK/development package for your distribution and reinstall the driver.
警告: NVIDIA 安裝程式猜測 X 函式庫路徑為
/usr/lib64且 X 模組路徑為/usr/lib64/xorg/modules;這些路徑無法從系統中查詢到。
如果 X 無法找到 NVIDIA X 驅動程式模組,請安裝 pkg-config 工具以及適用於您發行版的 X.Org SDK/開發套件,然後重新安裝驅動程式。
這個警告可以忽略
按 OK 繼續
- 安裝 NVIDIA 32 位元相容性函式庫?
Install NVIDIA's 32-bit compatibility libraries?您要安裝 NVIDIA 的 32 位元相容性函式庫嗎?
這邊選擇 NO
- 警告:未偵測到 Vulkan ICD 載入器
WARNING: This NVIDIA driver package includes Vulkan components, but no Vulkan ICD loader was detected on this system. The NVIDIA Vulkan ICD will not function without the loader. Most distributions package the Vulkan loader;
try installing the "vulkan-loader", "vulkan-icd-loader", or "libvulkan1" package.
這個 NVIDIA 驅動程式套件雖然包含了 Vulkan 元件,但系統並未偵測到 Vulkan ICD 載入器。如果沒有這個載入器,NVIDIA Vulkan ICD 將無法正常運作。
這邊選擇 OK
- 自動執行 nvidia-xconfig 更新 X 設定檔
Would you like to run the nvidia-xconfig utility to automatically update your X configuration file so that the NVIDIA X driver will be used when you restart X? Any pre-existing X configuration file will be backed up.您希望執行 nvidia-xconfig 工具來自動更新您的 X 設定檔嗎?這樣,當您重新啟動 X 時,就會使用 NVIDIA X 驅動程式。任何現有的 X 設定檔都會被備份。
這邊選擇 YES
- 完成
Installation of the NVIDIA Accelerated Graphics Driver for Linux-x86_64 (version: 550.142) is now complete.  Please update your xorg.conf file as appropriate; see the file /usr/share/doc/NVIDIA_GLX-1.0/README.txt for
details.
NVIDIA Linux-x86_64 加速顯示驅動程式(版本:550.142)已經安裝完成。
請您根據需求更新 xorg.conf 檔案;詳細資訊請參考 /usr/share/doc/NVIDIA_GLX-1.0/README.txt 這個檔案。
最後按 OK 完成安裝
顯示目前使用的顯示器
lshw -c video鎖定 Kernel 核心 (Optional)
因為 NVIDIA 驅動程式跟 Linux Kernel (核心,內核) 有強相關,
為避免 Linux Kernel 不小心被更新而導致 NVIDIA 驅動程式壞掉
導致一直要反覆安裝 NVIDIA 驅動程式修復環境問題
可以用 yum versionlock 鎖定 Kernel 版本,讓它不被自動更新
若無安裝 yum versionlock 可以用這指令安裝
sudo yum install python3-dnf-plugin-versionlock用 yum versionlock 鎖定 Kernel 版本
sudo yum versionlock kernel kernel-devel kernel-core kernel-modules kernel-modules-core kernel-headers kernel-tools kernel-tools-libs安裝 nvidia-container-toolkit (nvidia-ctk)
註:nvidia-docker 已經 Deprecated 了,它已經用 nvidia-container-toolkit 取代了
有些舊文就不要參考了
nvidia-container-toolkit 文件
https://docs.nvidia.com/datacenter/cloud-native/container-toolkit/latest/install-guide.html
加入 yum repo 路徑
curl -s -L https://nvidia.github.io/libnvidia-container/stable/rpm/nvidia-container-toolkit.repo | \
sudo tee /etc/yum.repos.d/nvidia-container-toolkit.repo
安裝 nvidia-container-toolkit
sudo yum install -y nvidia-container-toolkit裝完會得到 nvidia-ctk 指令
使用 nvidia-ctk 指令來設定 docker
sudo nvidia-ctk runtime configure --runtime=docker它會直接修改 /etc/docker/daemon.json 檔案,加上 NVIDIA Container Runtime 支援
重開 Docker daemon
sudo systemctl restart docker使用 nvidia-ctk 指令來設定 containerd (用於 K8s)
sudo nvidia-ctk runtime configure --runtime=containerd重開 containerd daemon
sudo systemctl restart containerd執行測試程式
這邊範例會開一個 ubuntu image 然後把 gpu 掛進去容器 (所有的 GPU)
並在容器裡面嘗試呼叫 nvidia-smi 指令
sudo docker run --rm --runtime=nvidia --gpus all ubuntu nvidia-smi成功的話會看到 GPU 顯卡的資訊
安裝 CUDA Toolkit
CUDA Toolkit Installer
Installation Instructions:
wget https://developer.download.nvidia.com/compute/cuda/12.6.2/local_installers/cuda-repo-rhel9-12-6-local-12.6.2_560.35.03-1.x86_64.rpm
sudo rpm -i cuda-repo-rhel9-12-6-local-12.6.2_560.35.03-1.x86_64.rpm
sudo dnf clean all
sudo dnf -y install cuda-toolkit-12-6
到目前為止,docker 就已經可以取用 GPU 了
docker 測試
測試一:docker 跑一個測試容器
這邊「隨意的」跑一個一個容器,甚至沒有 nvidia 相關指令都沒關係
像是最原始標準乾淨的 alpine image
docker run --rm --runtime=nvidia --gpus all alpine:3.22.0 nvidia-smi這邊範例直接跑一個 nvidia-smi 指令,
這很明顯標準 alpine image 是沒有這個指令的
重點在於這二個參數 --runtime=nvidia --gpus all
說明如下:
--runtime=nvidia把 NVIDIA 相關基礎驅動程式放進去容器
包含nvidia-smi等相關指令--gpus all是使用全部的
若正常執行的話,會得到 GPU 卡的資料
若無法正常執行,可能依序排查:
主機上是否可以執行 nvidia-smi?
若不行,請檢查 Kernel 與 NVIDIA 驅動程式是否有正確安裝
註:NVIDIA 驅動程式 跟 Linux Kernel (核心) 有強關聯,安裝時要注意。
建議要鎖定 Kernel 版本,避免 Kernel 不小心被更新,然後 NVIDIA 驅動程式壞掉,
導致一直要反覆安裝 NVIDIA 驅動程式修復環境問題
方法詳見上方 [鎖定 Kernel 核心]
若主機上可以執行 nvidia-smi,但 container 不能執行 nvidia-smi,
理應是 nvidia-container-toolkit 的問題
測試二:docker 跑 vectoradd 測試容器
如果覺得這個測試太無聊,可以跑一個 VectorAdd image
他會用 GPU 反覆的開始跑向量加總,真的讓 GPU 有負載,
你可以藉由此來確定 GPU 是否運作正常
sudo docker run --rm --runtime=nvidia --gpus all nvcr.io/nvidia/k8s/cuda-sample:vectoradd-cuda11.6.0-ubi8執行紀錄
# sudo docker run --rm --runtime=nvidia --gpus all nvcr.io/nvidia/k8s/cuda-sample:vectoradd-cuda11.6.0-ubi8
[Vector addition of 50000 elements]
Copy input data from the host memory to the CUDA device
CUDA kernel launch with 196 blocks of 256 threads
Copy output data from the CUDA device to the host memory
Test PASSED
Done
安裝 Kubernetes (K8s)
這段的步驟就跟標準 Kubernetes (K8s) 很接近,
完整可參考這裡
這邊快速節錄
關閉 Swap
用 sed 指令找尋 swap 片段,並加上註解
sudo sed -i '/ swap /s/^/#/g' /etc/fstab暫時關閉 Swap
sudo swapoff -a使用 grubby 指令確認開機參數是否還有 Swap
sudo grubby --info DEFAULT可能會得到類似的結果(這邊以 RockyLinux 9.5 為例)
index=0
kernel="/boot/vmlinuz-5.14.0-503.14.1.el9_5.x86_64"
args="ro crashkernel=1G-4G:192M,4G-64G:256M,64G-:512M resume=/dev/mapper/rl_rk8--ctrl-swap
rd.lvm.lv=rl_rk8-ctrl/root rd.lvm.lv=rl_rk8-ctrl/swap"
root="/dev/mapper/rl_rk8--ctrl-root"
initrd="/boot/initramfs-5.14.0-503.14.1.el9_5.x86_64.img"
title="Rocky Linux (5.14.0-503.14.1.el9_5.x86_64) 9.5 (Blue Onyx)"
id="11732e333bc94575b1636210b0a72f03-5.14.0-503.14.1.el9_5.x86_64"
這邊看到 resume=/dev/mapper/rl_rk8--ctrl-swap 跟 rd.lvm.lv=rl_rk8-ctrl/swap 就是殘留的 swap 參數,
(Swap 磁區名稱有可能跟我的不同,請依照實際情況調整)
一樣使用 grubby 指令移除
sudo grubby --update-kernel=ALL --remove-args="resume=/dev/mapper/rl_rk8--ctrl-swap rd.lvm.lv=rl_rk8-ctrl/swap"雖然要移除前後這二個 swap 指令,但
rd.lvm.lv=rl_rk8-ctrl/root 這個參數是要保留的,
如果誤刪除會「無法開機」要注意。
安裝 kubelet、kubeadm、kubectl 三兄弟
安裝文件:
https://kubernetes.io/docs/setup/production-environment/tools/kubeadm/install-kubeadm/
小弟整理的安裝指令
sudo setenforce 0 && \
sudo sed -i 's/^SELINUX=enforcing$/SELINUX=permissive/' /etc/selinux/config && \
cat <<EOF | sudo tee /etc/yum.repos.d/kubernetes.repo
[kubernetes]
name=Kubernetes
baseurl=https://pkgs.k8s.io/core:/stable:/v1.34/rpm/
enabled=1
gpgcheck=1
gpgkey=https://pkgs.k8s.io/core:/stable:/v1.34/rpm/repodata/repomd.xml.key
exclude=kubelet kubeadm kubectl cri-tools kubernetes-cni
EOF && \
sudo yum install -y yum-plugin-versionlock && \
sudo yum install -y kubelet-1.28.2 kubeadm-1.34.2 kubectl-1.34.2 --disableexcludes=kubernetes && \
sudo yum versionlock kubectl kubeadm kubelet && \
sudo systemctl enable --now kubelet
(科技發展迅速,整理的安裝文件有可能會過時,如果有更新版,請參考官方文件)
<每台都做> 手動編譯安裝 Container Runtime Interface (CRI) – cri-dockerd
這步驟不分角色,三台都要裝
https://kubernetes.io/docs/setup/production-environment/container-runtimes/
我們用 Docker Engine 推薦的 cri-dockerd
從官網手動安裝 Golang
若是 RHEL 9.4 (RockyLinux 9.4) 一樣沒有對應的 rpm 可以裝
然後新版 cri-dockerd 又要求新版 Golang(1.22.0 以上)才能編譯
但 RHEL 9.4 的 golang 套件沒這麼新,才到 go1.21.13 而已,但官網最新版是 1.23.2
所以我們需要岔題一下手動安裝 Golang
到 Golang 的官網下載最新版本的 Golang 例如 1.23.2
wget https://go.dev/dl/go1.23.2.linux-amd64.tar.gz解壓縮 go1.23.2.linux-amd64.tar.gz 檔案,會得到 go 資料夾,把他搬到對應位置
tar zxvf go1.23.2.linux-amd64.tar.gz
sudo mv go /usr/lib/golang
然後建立捷徑
sudo ln -s /usr/lib/golang/bin/go /usr/bin/go使用 go version 來確認版本
go version執行紀錄
$ go version
go version go1.23.2 linux/amd64
手動編譯安裝 cri-dockerd
若是 RHEL 9.4 (RockyLinux 9.4) 沒有對應的 rpm 可以裝
所以用手動編譯的方式進行
以下是官方文件提供的步驟
https://github.com/mirantis/cri-dockerd#build-and-install
先安裝必要套件
sudo yum install -y make go如果 yum 給的 golang 版本不夠新,需要手動安裝 golang,步驟在上方
用 git clone 最新的版本
git clone https://github.com/Mirantis/cri-dockerd.git編譯它 (compile)
cd cri-dockerd && \
make cri-dockerd
安裝
cd cri-dockerd && \
mkdir -p /usr/local/bin && \
install -o root -g root -m 0755 cri-dockerd /usr/local/bin/cri-dockerd && \
install packaging/systemd/* /etc/systemd/system && \
sed -i -e 's,/usr/bin/cri-dockerd,/usr/local/bin/cri-dockerd,' /etc/systemd/system/cri-docker.service
然後請 systemctl 重新載入 daemon
最後啟動服務
sudo systemctl daemon-reload && \
sudo systemctl enable --now cri-docker
裝完就會有 unix:///var/run/cri-dockerd.sock
複製虛擬機 (VM)
這邊步驟就是將單純的將 虛擬機 (VM) 複製二份成三台,並全部啟動。
以下分別闡述複製完要做的事情
重新產生 Machine-id
用以下指令重新產生 Machine-id
sudo rm /etc/machine-id && \
sudo systemd-machine-id-setup
修改 Hostname (主機名稱)
sudo vi /etc/hostname分別改成對應的主機名稱
重新設定 ssh,產生全新的 known-host
sudo rm -f /etc/ssh/ssh_host_* && sudo ssh-keygen -A(這個部分的指令跟 Ubuntu 不一樣)
<每台都做> 設定主機對應
叢集的三台機器做出來,還不知道彼此,
這邊用 /etc/hosts 檔案來讓主機們各自找到彼此
sudo vi /etc/hosts根據每台主機的 IP 位址與主機名稱
192.168.1.100   k8s-ctrl
192.168.1.101   k8s-node1
192.168.1.102   k8s-node2
IP 位址在前,主機名稱在後,用 tab 分隔。
先整理好內容,再各自寫在每一台上面,每一台主機都會看到同一份資料。
<每台都做> 設定網路雜項值
這邊設定網路連線轉發 IPv4 位址並讓 iptables 查看橋接器的流量
用文件提供的指令操作,等等一句一句解釋:
cat <<EOF | sudo tee /etc/modules-load.d/k8s.conf
overlay
br_netfilter
EOF
請 Kubernetes (K8s) 引用載入 br_netfilter, overlay 二個核心模組
sudo modprobe overlay && \
sudo modprobe br_netfilter
啟用 br_netfilter, overlay 二個核心模組
cat <<EOF | sudo tee /etc/sysctl.d/k8s.conf
net.bridge.bridge-nf-call-iptables  = 1
net.bridge.bridge-nf-call-ip6tables = 1
net.ipv4.ip_forward                 = 1
EOF
設定轉發 IPv4 位址,讓 iptables 查看橋接器的流量
sudo sysctl --system再不起重新啟動電腦情況下,套用設定值
設定 Control plane node(控制平台)
利用 kubeadm init 指令來初始化,並代入這些參數:
sudo kubeadm init \
    --kubernetes-version 1.34.2 \
    --control-plane-endpoint=192.168.1.100 \
    --apiserver-advertise-address=192.168.1.100 \
    --node-name k8s-ctrl \
    --apiserver-bind-port=6443 \
    --pod-network-cidr=10.244.0.0/16 \
    --cri-socket unix:///var/run/cri-dockerd.sock
如果沒意外的話,完成之後會看到
Your Kubernetes control-plane has initialized successfully!然後依照步驟,
若是 root 使用者,
在 .bash_profile 或者 .zsh_profile 設定環境變數
export KUBECONFIG=/etc/kubernetes/admin.conf若是一般使用者,請依照指令依序設定
mkdir -p $HOME/.kube && \
sudo cp -i /etc/kubernetes/admin.conf $HOME/.kube/config && \
sudo chown $(id -u):$(id -g) $HOME/.kube/config
註:加入 token 是有期限的,如果隔太久沒有整個步驟做完,
或者忘記了、被洗掉了,可以用指令重新生成加入指令
kubeadm token create --print-join-command\<Control plane 做> 安裝 Helm 套件管理程式
安裝文件
https://helm.sh/docs/intro/install/
從執行檔直接複製
wget https://get.helm.sh/helm-v3.13.1-linux-amd64.tar.gz
tar zxvf helm-v3.13.1-linux-amd64.tar.gz
cp linux-amd64/helm /usr/local/bin/helm
(科技發展迅速,整理的安裝文件有可能會過時,如果有更新版,請參考官方文件)
也可從 Script 安裝
curl -fsSL -o get_helm.sh https://raw.githubusercontent.com/helm/helm/main/scripts/get-helm-3 && \
chmod 700 get_helm.sh && \
./get_helm.sh
(科技發展迅速,整理的安裝文件有可能會過時,如果有更新版,請參考官方文件)
二者效果相同,擇一安裝即可。
設定 Worker node
用指令重新生成加入指令
kubeadm token create --print-join-command出現 kubeadm join 指令之後,加上指明 cri-socket 就可以執行了
意指加上這行
--cri-socket unix:///var/run/cri-dockerd.sock變成這樣
sudo kubeadm join 192.168.1.100:6443
    --token cxxxxs.c4xxxxxxxxxxxxd0 \
    --discovery-token-ca-cert-hash sha256:103d7xxxxxxxxxxxxxxxxxxxxxxxxxxxxxxxxxxxxxxxxxxxxxxxxxxxxxx5b1b6 \
    --cri-socket unix:///var/run/cri-dockerd.sock
這樣就加入叢集了
設定 Calico CNI 網路
參考文件
https://docs.tigera.io/calico/latest/getting-started/kubernetes/quickstart
註:這邊 Calico CNI 也不停的一直在更新版本,步驟會略有一些差異,這邊本就文字記錄,
請時時刻刻查詢官方文件,實際以官方文件撰寫的為主
根據文件,第一步要建立 tigera-operator.yaml 的內容
kubectl create -f https://raw.githubusercontent.com/projectcalico/calico/v3.29.2/manifests/tigera-operator.yaml要注意 calico 的版本號
另一個要注意,這指令一定要使用 kubectl create,不能使用 kubectl apply 指令替代
不然會有錯誤
第二步要建立 custom-resources.yaml 的內容
這邊我們修改一下,先把檔案抓下來
wget https://raw.githubusercontent.com/projectcalico/calico/v3.29.2/manifests/custom-resources.yaml然後修改 custom-resources.yaml 的內容
vi custom-resources.yamlapiVersion: operator.tigera.io/v1
kind: Installation
metadata:
name: default
spec:
# Configures Calico networking.
calicoNetwork:
ipPools:
- name: default-ipv4-ippool
blockSize: 26
cidr: 10.244.0.0/16
encapsulation: VXLANCrossSubnet
natOutgoing: Enabled
nodeSelector: all()
---
apiVersion: operator.tigera.io/v1
kind: APIServer
metadata:
name: default
spec: {}將 cidr 的值,原本是 192.168.0.0/16,改成我們使用 --pod-network-cidr 參數的值:10.244.0.0/16
其實也只是因為我們外面主機已經使用 192.168.0.0/16 的網段了,所以內部 K8s 跑的網段改成跟主機不一樣的 10.244.0.0/16
然後執行建立指令
kubectl create -f custom-resources.yaml設定 Control node 兼 Worker node (Optional)
如果你需要 Control node 兼 Worker node 校長兼撞鐘,
你可以使用這個指令移除 taint,讓 control-plane 也能跑 Pod
(如有需求再使用)
kubectl taint nodes --all node-role.kubernetes.io/control-plane:NoSchedule-安裝 gpu-operator
這邊是 GPU 的重點了,我們要安裝 gpu-operator,
讓 GPU 支援進入每一個 K8s node
註:舊版文件會教你安裝
k8s-device-plugin元件,現直接使用gpu-operator元件即可
因為gpu-operator裡面已經包含了k8s-device-plugin元件
別的文件會教你安裝DCGM-Exporter元件,而它也一併納入gpu-operator元件裡了
GPU 切割分享方式有四種:
- Time slicing (分時多工)
- MPS (Multi-Process Service)
- MIG (Multi-Instance GPU)
- vGPU
這次使用 Time slicing(分時多工) 的方式來共享 GPU
加入 helm repo
helm repo add gpu-operator https://helm.ngc.nvidia.com/nvidia && \
helm repo update
顯示 helm charts 參數
helm show values gpu-operator/gpu-operator --version 24.6.2 > gpu-values.yamlhelm 安裝 gpu-operator
helm install gpu gpu-operator/gpu-operator -n gpu-operator --version 24.6.2 -f gpu-values.yamlgpu-values.yaml 基本上不需要改什麼東西,除非你有其他需求
其他指令
helm 更新 gpu-operator
helm upgrade gpu-operator gpu-operator/gpu-operator -n gpu --version 24.6.2 -f gpu-values.yamlhelm 刪除 gpu-operator
helm uninstall gpu-operator -n gpu-operatorhelm 下載 chart (如果有離線需求的話)
helm pull gpu-operator/gpu-operator --version 24.6.2顯示 helm charts 參數 (離線檔案)
helm show values gpu-operator-24.6.2.tgz --version 24.6.2 > gpu-values.yamlhelm 安裝 gpu-operator (離線檔案)
helm install gpu gpu-operator-24.6.2.tgz -n gpu --version 24.6.2 -f gpu-values.yamlGPU 確認 Compute Mode (運算模式)
注意,GPU 的 Compute Mode (運算模式) 是不受上述的 nvidia-container-toolkit, gpu-operator 影響的
是在 NVIDIA GPU 裡獨立運作的模式
模式有四種:
- O: Default (Compute shared mode)
預設,一次可以執行多個程式 - 1: Exclusive Thread
(deprecated) 作用與 Exclusive Process 相同 - 2: Prohibited
禁止在該卡執行任何計算程式 - 3: Exclusive Process
獨佔模式,該卡只能一次執行一個程式
通常設定在 DEFAULT 但一些特殊情況會「被」設定成別的
例如:使用 MPS (Multi-Process Service) 模式,
Compute Mode 會被設定成 EXCLUSIVE_PROCESS
但 EXCLUSIVE_PROCESS 在 Time slicing 運作模式底下,
無法將多個程式掛在同一張卡上,造成問題。
設定第一張卡的 Compute Mode 為 Default
通常預設為這個模式,在 Docker、在 K8s 使用 Time slicing(分時多工)
也是依賴這個模式
nvidia-smi -i 0 -c DEFAULT設定第一張卡的 Compute Mode 為 Exclusive Process
nvidia-smi -i 0 -c EXCLUSIVE_PROCESS如果你在 K8s 使用 MPS (Multi-Process Service) 模式,
因為 MPS 是一個服務程式獨佔整張 GPU 再軟體切割,
gpu-operator 會幫你切成這個模式(但不會幫你切回去)
那就先這樣啦!祝安裝愉快!