
在當今的雲端時代,Kubernetes(簡稱 K8s)作為 Open source 的 container (容器) 編排平台,已經成為許多企業和開發者的首選。它為應用程式的部署、擴展和管理提供了一個強大且靈活的解決方案。
本篇文章將詳細介紹如何在地端 (On-premise, self-host) 伺服器上搭建 Kubernetes 環境,我們將介紹所有必要的步驟,包括環境設置、安裝必要的套件、建立節點與部署應用程式。這將是一個完整的實錄,讓讀者能夠透過這篇文章深入瞭解 K8s 的建置與運作。
為何會再次寫這篇文章?
後來發現 RedHat ( RHEL / RockyLinux ) 的指令跟 Ubuntu 有一些差異,
遇到的情況也略為不同,我覺得蠻值得再寫一次的。
當然,還是推薦使用 虛擬機 (Virtual machine, VM) 來建置,
你可以用你喜歡的虛擬機程式來架設,例如 VMWare Workstation, VirtualBox 都可以,我是使用 Promox VE 裡面的 VM 功能來完成。
如果有看過前一篇的話,這個方式安裝方式為 Bare-metal (裸金屬、裸機)的安裝方式。
這個也叫做 Vanilla Kubernetes (翻譯:單純的 Kubernetes 安裝)。
安裝地圖
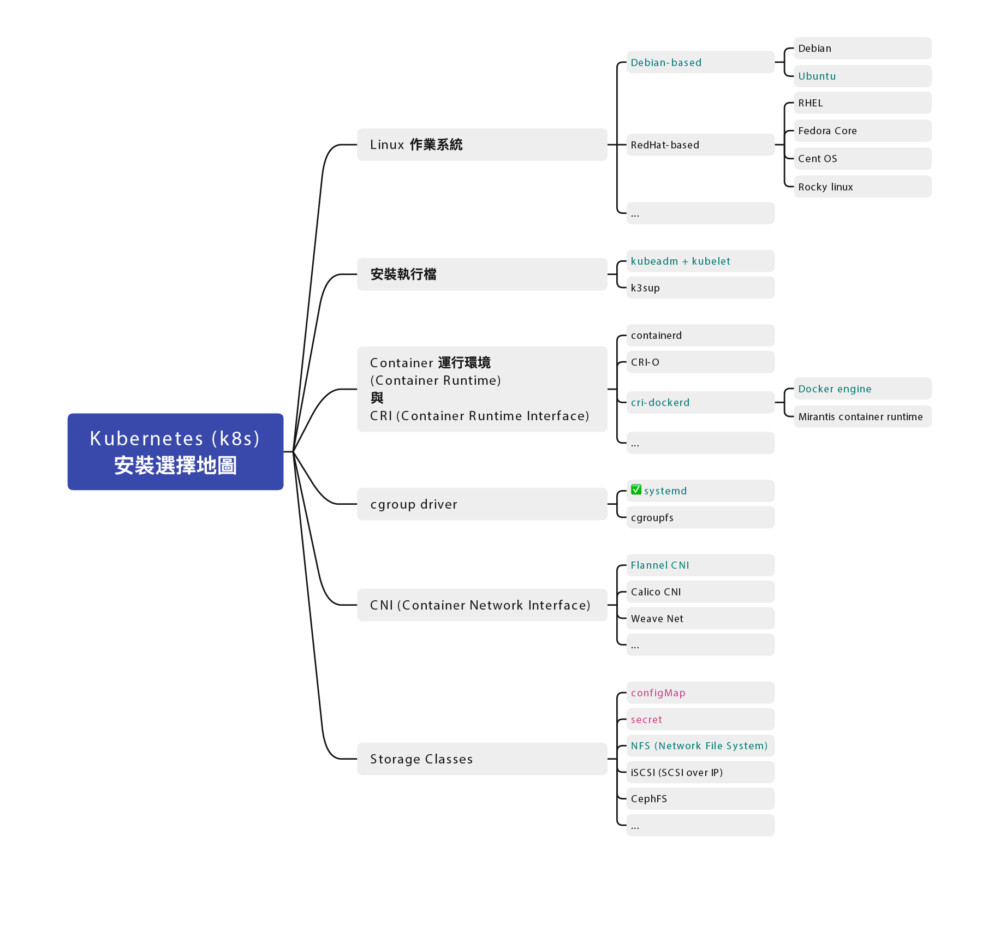
Docker 跟 Kubernetes (K8s) 發展至今,百家爭鳴,門派也很多,
安裝部署方式也不盡相同,為了避免初學者混肴,
先幫你預先選好各種所需要的元件:
示範的作業系統
-
RockyLinux 9.2 對應到 RHEL (Redhat Enterprise Linux) 9.2
服務們
-
kubelet
-
Container 運行環境 (Container Runtime):docker
-
cgroup drivers: 確認為
systemd(cgroup drivers v2) -
CRI (Container Runtime Interface):使用
cri-dockerd -
CNI (Container Network Interface):使用
Flannel
指令們
- kubectl
- kubeadm
這篇主要關注在如何架設 Kubernetes 叢集,
除此之外,你還需要一個配合的共用儲存空間,叢集都可以存取到的儲存空間(檔案伺服器)
可以用 TrueNAS 架設一個。
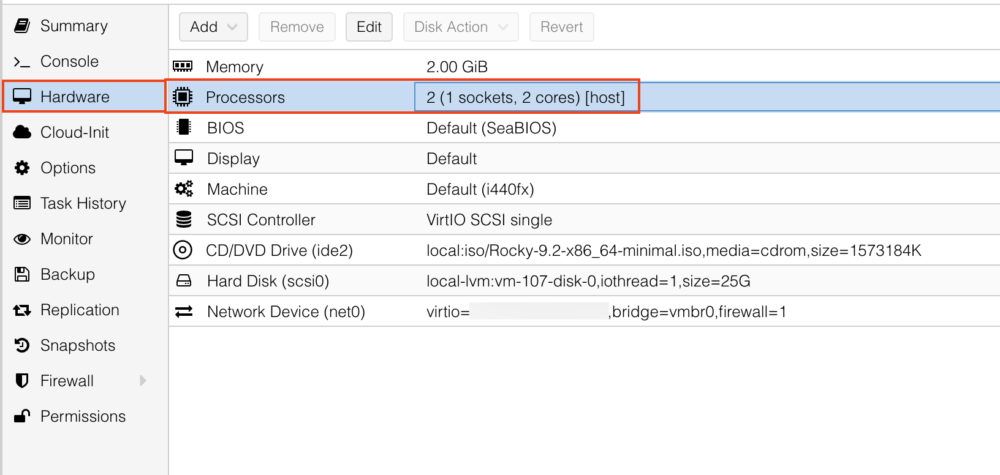
虛擬機硬體建置
這邊是我 虛擬機 (VM) 的硬體部分建置設定
- 2 CPU
- 4GB Ram
- 8GB Disk 以上,建議 10GB 較穩定
註1:經過測試,不要用 Proxmox VE 裡的 LXC Container 功能架設,
會有非常多的問題,包含權限切不乾淨等。
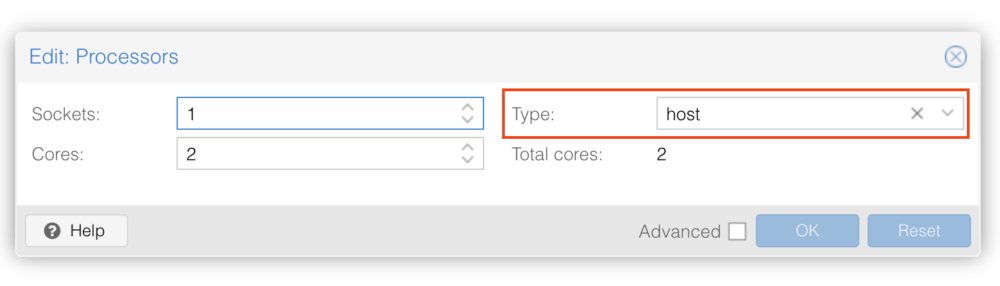
註2:使用 Proxmox VE 預設參數會遇到 Kernel panic 問題,
進入虛擬機 Hardware > Processors 選項,將 Type 改為 host 就會正常。
到時候要建立三台 VM,一台 Control Node 跟二台 Worker Node ,這是最小叢集的配置。
可以先安裝一個母版,到時候用複製 VM 的方式來達成。
虛擬機作業系統 – RockyLinux
示範使用的 RedHat 版本為社群版的 RockyLinux 9.2
使用 minimal 最小安裝
安裝細節就不贅述。
<每台都做> 關掉 swap
這步驟不分角色,三台都要做
https://kubernetes.io/docs/setup/production-environment/tools/kubeadm/install-kubeadm/
根據 kubeadm 的安裝文件,他有特別指示
MUST disable swap in order for the kubelet to work properly.
必須要關掉 swap 才能正確運作。
(K8s 新版 1.28 更新後,可以在有限制的情況下使用 swap,個人還是建議把它關掉)
所以我們用以下步驟永久關閉 Swap
- 用
sed指令找尋 swap 片段,並加上註解
sudo sed -i '/ swap /s/^/#/g' /etc/fstab- 然後重新載入磁區
sudo mount -a暫時關閉 swap 可以用 swapoff 指令
sudo swapoff -a⭐️ 後記:調整 vm.swappiness 的值為零只能降低 swap 使用優先權,並不能完全關閉 swap 故移除該指令
sudo sysctl -w vm.swappiness=0⭐️ 注意:如果您把 swap 磁區完全刪除的話,注意 GRUB 開機參數中是否殘留 swap 參數。
可用 grubby 指令來查看目前的開機參數
sudo grubby --info DEFAULT可能會得到類似的結果(這邊以 RockyLinux 9.5 為例)
index=0
kernel="/boot/vmlinuz-5.14.0-503.14.1.el9_5.x86_64"
args="ro crashkernel=1G-4G:192M,4G-64G:256M,64G-:512M resume=/dev/mapper/rl_rk8--ctrl-swap
rd.lvm.lv=rl_rk8-ctrl/root rd.lvm.lv=rl_rk8-ctrl/swap"
root="/dev/mapper/rl_rk8--ctrl-root"
initrd="/boot/initramfs-5.14.0-503.14.1.el9_5.x86_64.img"
title="Rocky Linux (5.14.0-503.14.1.el9_5.x86_64) 9.5 (Blue Onyx)"
id="11732e333bc94575b1636210b0a72f03-5.14.0-503.14.1.el9_5.x86_64"
這邊看到 resume=/dev/mapper/rl_rk8--ctrl-swap 跟 rd.lvm.lv=rl_rk8-ctrl/swap 就是殘留的 swap 參數,( swap 磁區名稱有可能跟我的不同,請依照實際情況調整)
一樣使用 grubby 指令移除
sudo grubby --update-kernel=ALL --remove-args="resume=/dev/mapper/rl_rk8--ctrl-swap rd.lvm.lv=rl_rk8-ctrl/swap"雖然要移除前後這二個 swap 指令,但
rd.lvm.lv=rl_rk8-ctrl/root 這個參數是要保留的,
如果誤刪除會「無法開機」要注意。
如果來不及移除該參數,已經進入救援模式 (rescue mode) 的話,也不要著急,
重新開機,在 GRUB 開機選單中,按 e 做臨時開機參數修改,找到上述二個參數刪除後,
按下 F10 繼續開機,就可以執行上述的 grubby 指令了。
確認 swap
可以用以下指令查看 swap
free或者
cat /proc/swaps應該要找不到 swap 才正確
<每台都做> 安裝 Docker
Docker 不分角色,三台都要裝
安裝文件:
https://docs.docker.com/engine/install/centos/
https://docs.docker.com/engine/install/rhel/
小弟整理的一鍵安裝指令
(科技發展迅速,整理的安裝文件有可能會過時,如果有更新版,請參考官方文件)
sudo yum install -y yum-utils && \
sudo yum-config-manager --add-repo https://download.docker.com/linux/rhel/docker-ce.repo && \
sudo yum install -y docker-ce docker-ce-cli containerd.io docker-buildx-plugin docker-compose-plugin
(這個部分的指令跟 Ubuntu 不一樣)
修改 daemon.json 讓跳開預設網段
(如果沒有該檔案請自行新增之)
sudo vi /etc/docker/daemon.json內容為
{
  "log-driver": "json-file",
  "log-opts": {
    "tag": "{{.Name}}",
    "max-size": "2m",
    "max-file": "2"
  }
}
設定預設開機啟動,並立即啟動
sudo systemctl enable --now docker驗證 Docker
可用 systemctl 指令查看是否有正常執行
sudo systemctl status docker看看是否有 Running
可以用 docker ps 查看目前所有運行中的 container
docker ps是否能夠正常顯示列表,若是初次安裝,列表是空的很正常。
Docker 版本
留下當時截稿的 Docker 版本給大家參考
# docker version
Client: Docker Engine - Community
 Version:           24.0.6
 API version:       1.43
 Go version:        go1.20.7
 Git commit:        ed223bc
 Built:             Mon Sep  4 12:33:18 2023
 OS/Arch:           linux/amd64
 Context:           default

Server: Docker Engine - Community
 Engine:
  Version:          24.0.6
  API version:      1.43 (minimum version 1.12)
  Go version:       go1.20.7
  Git commit:       1a79695
  Built:            Mon Sep  4 12:31:49 2023
  OS/Arch:          linux/amd64
  Experimental:     false
 containerd:
  Version:          1.6.24
  GitCommit:        61f9fd88f79f081d64d6fa3bb1a0dc71ec870523
 runc:
  Version:          1.1.9
  GitCommit:        v1.1.9-0-gccaecfc
 docker-init:
  Version:          0.19.0
  GitCommit:        de40ad0
<每台都做> 安裝 kubelet、kubeadm、kubectl 三兄弟
安裝文件:
https://kubernetes.io/docs/setup/production-environment/tools/kubeadm/install-kubeadm/
小弟整理的安裝指令
sudo setenforce 0 && \
sudo sed -i 's/^SELINUX=enforcing$/SELINUX=permissive/' /etc/selinux/config && \
cat <<EOF | sudo tee /etc/yum.repos.d/kubernetes.repo
[kubernetes]
name=Kubernetes
baseurl=https://pkgs.k8s.io/core:/stable:/v1.28/rpm/
enabled=1
gpgcheck=1
gpgkey=https://pkgs.k8s.io/core:/stable:/v1.28/rpm/repodata/repomd.xml.key
exclude=kubelet kubeadm kubectl cri-tools kubernetes-cni
EOF && \
sudo yum install -y yum-plugin-versionlock && \
sudo yum install -y kubelet-1.28.2 kubeadm-1.28.2 kubectl-1.28.2 --disableexcludes=kubernetes && \
sudo yum versionlock kubectl kubeadm kubelet && \
sudo systemctl enable --now kubelet
(科技發展迅速,整理的安裝文件有可能會過時,如果有更新版,請參考官方文件)
(這個部分跟 Ubuntu 不一樣)
目前安裝的版本是 kubelet v1.28.2
⭐️ 後記:因為有遇到雷,
不小心升級了 kubelet & kubeadm & kubectl 但 image 沒有升級,
所以一鍵安裝指令有小修改,加上 yum-plugin-versionlock 套件,與使用 yum versionlock 的擴充指令來鎖住版本(跟官網不一樣)
sudo yum install -y yum-plugin-versionlock && \
sudo yum install -y kubelet-1.28.2 kubeadm-1.28.2 kubectl-1.28.2
sudo yum versionlock kubectl kubeadm kubelet
解除版本鎖定也很簡單
sudo yum versionlock delete kubelet-1.28.2 kubeadm-1.28.2 kubectl-1.28.2就跟以前一樣了。
<每台都做> 手動編譯安裝 Container Runtime Interface (CRI) – cri-dockerd
這步驟不分角色,三台都要裝
https://kubernetes.io/docs/setup/production-environment/container-runtimes/
我們用 Docker Engine 推薦的 cri-dockerd
用 rpm 檔案安裝
若是 RHEL 7.9 (CentOS 7-2009) 可以使用 cri-dockerd-0.3.6.20231018204925.877dc6a4-0.el7.x86_64.rpm若是 RHEL 8.8 (RockyLinux 8.8) 可以使用 cri-dockerd-0.3.6.20231018204925.877dc6a4-0.el8.x86_64.rpm
wget https://github.com/Mirantis/cri-dockerd/releases/download/v0.3.6/cri-dockerd-0.3.6.20231018204925.877dc6a4-0.el8.x86_64.rpm
sudo rpm -ivh cri-dockerd-0.3.6.20231018204925.877dc6a4-0.el8.x86_64.rpm
若是 RHEL 9.2 (RockyLinux 9.2) 沒有對應的 rpm 可以裝
所以用手動編譯的方式進行
從官網手動安裝 Golang
若是 RHEL 9.4 (RockyLinux 9.4) 一樣沒有對應的 rpm 可以裝
然後新版 cri-dockerd 又要求新版 Golang(1.22.0 以上)才能編譯
但 RHEL 9.4 的 golang 套件沒這麼新,才到 go1.21.13 而已,但官網最新版是 1.23.2
所以我們需要岔題一下手動安裝 Golang
到 Golang 的官網下載最新版本的 Golang 例如 1.23.2
wget https://go.dev/dl/go1.23.2.linux-amd64.tar.gz解壓縮 go1.23.2.linux-amd64.tar.gz 檔案,會得到 go 資料夾,把他搬到對應位置
tar zxvf go1.23.2.linux-amd64.tar.gz
sudo mv go /usr/lib/golang
然後建立捷徑
sudo ln -s /usr/lib/golang/bin/go /usr/bin/go使用 go version 來確認版本
go version執行紀錄
$ go version
go version go1.23.2 linux/amd64
手動編譯安裝 cri-dockerd
若是 RHEL 9.2 (RockyLinux 9.2), RHEL 9.4 (RockyLinux 9.4) 沒有對應的 rpm 可以裝
所以用手動編譯的方式進行
以下是官方文件提供的步驟
https://github.com/mirantis/cri-dockerd#build-and-install
先安裝必要套件
sudo yum install -y make go如果 yum 給的 golang 版本不夠新,需要手動安裝 golang,步驟在上方
用 git clone 最新的版本
git clone https://github.com/Mirantis/cri-dockerd.git編譯它 (compile)
cd cri-dockerd && \
make cri-dockerd
安裝
cd cri-dockerd && \
mkdir -p /usr/local/bin && \
install -o root -g root -m 0755 cri-dockerd /usr/local/bin/cri-dockerd && \
install packaging/systemd/* /etc/systemd/system && \
sed -i -e 's,/usr/bin/cri-dockerd,/usr/local/bin/cri-dockerd,' /etc/systemd/system/cri-docker.service
然後請 systemctl 重新載入 daemon
最後啟動服務
sudo systemctl daemon-reload && \
sudo systemctl enable --now cri-docker
如果是服務更新版本,需要重啟服務
sudo systemctl restart cri-docker驗證 cri-docker
可用 systemctl 指令確認是否有正常運行
sudo systemctl status cri-docker確認有 Running
確認版本號
cri-dockerd --version執行結果
$ cri-dockerd --version
cri-dockerd 0.3.12-16-gebd9de06 (ebd9de06)
裝完就會有 unix:///var/run/cri-dockerd.sock
這邊補充,其實有網友發了 Pull request,但一直沒過
https://github.com/Mirantis/cri-dockerd/pull/394
也有網友詢問 RHEL 9.4 與 Ubuntu 24.04 的做法
RHEL 9.4
https://github.com/Mirantis/cri-dockerd/issues/368
Ubuntu 24.04
https://github.com/Mirantis/cri-dockerd/issues/361
複製虛擬機 (VM)
這邊步驟就是將單純的將 虛擬機 (VM) 複製二份成三台,並全部啟動。
以下分別闡述複製完要做的事情
重新產生 Machine-id
用以下指令重新產生 Machine-id
sudo rm /etc/machine-id && \
sudo systemd-machine-id-setup
修改 Hostname (主機名稱)
sudo vi /etc/hostname分別改成對應的主機名稱
重新設定 ssh,產生全新的 known-host
sudo rm -f /etc/ssh/ssh_host_* && sudo ssh-keygen -A(這個部分的指令跟 Ubuntu 不一樣)
確認 Machine-id
sudo cat /sys/class/dmi/id/product_uuid確認 Hostname
hostname確認網卡 Mac address 位址
ip link如果是有 DHCP 的話,可以用路由器 dhcp static lease (固定分配 IP)
然後可以用 dhclient 指令重新取 DHCP 的 IP
sudo dhclient -r用 verbose 來看細節
sudo dhclient -v註:RockyLinux 9.2 預設沒有安裝 dhclient 指令
需要另外用 yum 安裝
sudo yum install -y dhcp-client<每台都做> 設定主機對應
叢集的三台機器做出來,還不知道彼此,
這邊用 /etc/hosts 檔案來讓主機們各自找到彼此
sudo vi /etc/hosts根據每台主機的 IP 位址與主機名稱
192.168.1.100   k8s-ctrl
192.168.1.101   k8s-node1
192.168.1.102   k8s-node2
IP 位址在前,主機名稱在後,用 tab 分隔。
先整理好內容,再各自寫在每一台上面,每一台主機都會看到同一份資料。
確認 cgroup drivers 為 systemd
(這整個段落可以跳過,因為 cgroup drivers 預設已經是 systemd 了)
直接講結論,目前最新使用的是 systemd (cgroup Version: 2)
查看 docker 的 cgroup
docker info | grep -i cgroup執行結果
# docker info | grep -i cgroup

 Cgroup Driver: systemd
 Cgroup Version: 2
  cgroupns
查看 kubelet 的 cgroup
sudo cat /var/lib/kubelet/config.yaml | grep cgroup執行結果
$ sudo cat /var/lib/kubelet/config.yaml | grep cgroup

cgroupDriver: systemd
可以確認是否為 systemd (cgroup Version: 2)
如果 docker 不為 systemd
可以在 daemon.json手動加上
sudo vi /etc/docker/daemon.json這個段落
 "exec-opts": [
    "native.cgroupdriver=systemd"
  ],
重啟 docker
sudo systemctl restart docker如果 kubelet 不為 systemd 就手動修改之
sudo vi /var/lib/kubelet/config.yaml重啟 kubelet
sudo systemctl restart kubelet<每台都做> 設定網路雜項值
這邊設定網路連線轉發 IPv4 位址並讓 iptables 查看橋接器的流量
用文件提供的指令操作,等等一句一句解釋:
cat <<EOF | sudo tee /etc/modules-load.d/k8s.conf
overlay
br_netfilter
EOF
請 Kubernetes (K8s) 引用載入 br_netfilter, overlay 二個核心模組
sudo modprobe overlay && \
sudo modprobe br_netfilter
啟用 br_netfilter, overlay 二個核心模組
cat <<EOF | sudo tee /etc/sysctl.d/k8s.conf
net.bridge.bridge-nf-call-iptables  = 1
net.bridge.bridge-nf-call-ip6tables = 1
net.ipv4.ip_forward                 = 1
EOF
設定轉發 IPv4 位址,讓 iptables 查看橋接器的流量
sudo sysctl --system再不起重新啟動電腦情況下,套用設定值
檢查驗證
檢查 br_netfilter, overlay 二個核心模組有沒有被正確載入可以用以下二個指令
lsmod | grep br_netfilter && \
lsmod | grep overlay
檢查
net.bridge.bridge-nf-call-iptablesnet.bridge.bridge-nf-call-ip6tablesnet.ipv4.ip_forward
這幾個系統變數是否有設定為 1,可以用 sysctl 指令來檢查:
sysctl net.bridge.bridge-nf-call-iptables net.bridge.bridge-nf-call-ip6tables net.ipv4.ip_forward設定 Control plane node(控制平台) (舊名 Master node)
終於要來設定 Control plane (控制平台) 了,如果有其他教學看到 Master node 的話,
別擔心,指的是同一件事情。
利用 kubeadm init 指令來初始化,並代入這些參數:
sudo kubeadm init \
    --kubernetes-version 1.28.2 \
    --control-plane-endpoint=192.168.1.100 \
    --apiserver-advertise-address=192.168.1.100 \
    --node-name k8s-ctrl \
    --apiserver-bind-port=6443 \
    --pod-network-cidr=10.244.0.0/16 \
    --cri-socket unix:///var/run/cri-dockerd.sock
參數說明
control-plane-endpoint
指明 Control plane (控制平台) 是哪個網址,這邊設定好目前這台 IP 位址即可,假設為 192.168.1.100
(這設定值可省略)apiserver-advertise-address
指明 API server 的廣播地址,預設就是 Control plane (控制平台) IP 位址,假設為 192.168.1.100
(這設定值可省略)node-name
指明 Control plane (控制平台) 的名字,這裡跟主機名稱一致即可。apiserver-bind-port
指明 Kubernetes API server 的連接埠 (port) 號,預設是 6443,可以依需求變更。pod-network-cidr
指明 pod 內部網路使用的網段,這邊因為配合 Flannel CNI,請保留10.244.0.0/16請不要修改。cri-socket
指明使用的 CRI 使用unix:///var/run/cri-dockerd.sock這設定值 請不要修改。
記錄一下運作的樣子
# kubeadm init \
    --control-plane-endpoint=192.168.1.100 \
    --apiserver-advertise-address=192.168.1.100 \
    --node-name k8s-ctrl \
    --apiserver-bind-port=6443 \
    --pod-network-cidr=10.244.0.0/16 \
    --cri-socket unix:///var/run/cri-dockerd.sock

[[init] Using Kubernetes version: v1.28.2
[preflight] Running pre-flight checks
        [WARNING Firewalld]: firewalld is active, please ensure ports [6443 10250] are open or your cluster may not function correctly
        [WARNING Service-Kubelet]: kubelet service is not enabled, please run 'systemctl enable kubelet.service'
[preflight] Pulling images required for setting up a Kubernetes cluster
[preflight] This might take a minute or two, depending on the speed of your internet connection
[preflight] You can also perform this action in beforehand using 'kubeadm config images pull'
W1019 08:18:09.599064    3875 checks.go:835] detected that the sandbox image "registry.k8s.io/pause:3.6" of the container runtime is inconsistent with that used by kubeadm. It is recommended that using "registry.k8s.io/pause:3.9" as the CRI sandbox image.
[certs] Using certificateDir folder "/etc/kubernetes/pki"
[certs] Generating "ca" certificate and key
[certs] Generating "apiserver" certificate and key
[certs] apiserver serving cert is signed for DNS names [kubernetes kubernetes.default kubernetes.default.svc kubernetes.default.svc.cluster.local rk8-ctrl] and IPs [10.96.0.1 192.168.1.100]
[certs] Generating "apiserver-kubelet-client" certificate and key
[certs] Generating "front-proxy-ca" certificate and key
[certs] Generating "front-proxy-client" certificate and key
[certs] Generating "etcd/ca" certificate and key
[certs] Generating "etcd/server" certificate and key
[certs] etcd/server serving cert is signed for DNS names [localhost rk8-ctrl] and IPs [192.168.1.100 127.0.0.1 ::1]
[certs] Generating "etcd/peer" certificate and key
[certs] etcd/peer serving cert is signed for DNS names [localhost rk8-ctrl] and IPs [192.168.1.100 127.0.0.1 ::1]
[certs] Generating "etcd/healthcheck-client" certificate and key
[certs] Generating "apiserver-etcd-client" certificate and key
[certs] Generating "sa" key and public key
[kubeconfig] Using kubeconfig folder "/etc/kubernetes"
[kubeconfig] Writing "admin.conf" kubeconfig file
[kubeconfig] Writing "kubelet.conf" kubeconfig file
[kubeconfig] Writing "controller-manager.conf" kubeconfig file
[kubeconfig] Writing "scheduler.conf" kubeconfig file
[etcd] Creating static Pod manifest for local etcd in "/etc/kubernetes/manifests"
[control-plane] Using manifest folder "/etc/kubernetes/manifests"
[control-plane] Creating static Pod manifest for "kube-apiserver"
[control-plane] Creating static Pod manifest for "kube-controller-manager"
[control-plane] Creating static Pod manifest for "kube-scheduler"
[kubelet-start] Writing kubelet environment file with flags to file "/var/lib/kubelet/kubeadm-flags.env"
[kubelet-start] Writing kubelet configuration to file "/var/lib/kubelet/config.yaml"
[kubelet-start] Starting the kubelet
[wait-control-plane] Waiting for the kubelet to boot up the control plane as static Pods from directory "/etc/kubernetes/manifests". This can take up to 4m0s
[apiclient] All control plane components are healthy after 6.504831 seconds
[upload-config] Storing the configuration used in ConfigMap "kubeadm-config" in the "kube-system" Namespace
[kubelet] Creating a ConfigMap "kubelet-config" in namespace kube-system with the configuration for the kubelets in the cluster
[upload-certs] Skipping phase. Please see --upload-certs
[mark-control-plane] Marking the node rk8-ctrl as control-plane by adding the labels: [node-role.kubernetes.io/control-plane node.kubernetes.io/exclude-from-external-load-balancers]
[mark-control-plane] Marking the node rk8-ctrl as control-plane by adding the taints [node-role.kubernetes.io/control-plane:NoSchedule]
[bootstrap-token] Using token: ktwf96.9mhdqldhpu3ema54
[bootstrap-token] Configuring bootstrap tokens, cluster-info ConfigMap, RBAC Roles
[bootstrap-token] Configured RBAC rules to allow Node Bootstrap tokens to get nodes
[bootstrap-token] Configured RBAC rules to allow Node Bootstrap tokens to post CSRs in order for nodes to get long term certificate credentials
[bootstrap-token] Configured RBAC rules to allow the csrapprover controller automatically approve CSRs from a Node Bootstrap Token
[bootstrap-token] Configured RBAC rules to allow certificate rotation for all node client certificates in the cluster
[bootstrap-token] Creating the "cluster-info" ConfigMap in the "kube-public" namespace
[kubelet-finalize] Updating "/etc/kubernetes/kubelet.conf" to point to a rotatable kubelet client certificate and key
[addons] Applied essential addon: CoreDNS
[addons] Applied essential addon: kube-proxy

Your Kubernetes control-plane has initialized successfully!

To start using your cluster, you need to run the following as a regular user:

  mkdir -p $HOME/.kube
  sudo cp -i /etc/kubernetes/admin.conf $HOME/.kube/config
  sudo chown $(id -u):$(id -g) $HOME/.kube/config

Alternatively, if you are the root user, you can run:

  export KUBECONFIG=/etc/kubernetes/admin.conf

You should now deploy a pod network to the cluster.
Run "kubectl apply -f [podnetwork].yaml" with one of the options listed at:
  https://kubernetes.io/docs/concepts/cluster-administration/addons/

You can now join any number of control-plane nodes by copying certificate authorities
and service account keys on each node and then running the following as root:

  kubeadm join 192.168.1.100:6443 --token cxxxxs.c4xxxxxxxxxxxxd0 \
        --discovery-token-ca-cert-hash sha256:103d7xxxxxxxxxxxxxxxxxxxxxxxxxxxxxxxxxxxxxxxxxxxxxxxxxxxxxx5b1b6 \
        --control-plane

Then you can join any number of worker nodes by running the following on each as root:

kubeadm join 192.168.1.100:6443 --token cxxxxs.c4xxxxxxxxxxxxd0 \
        --discovery-token-ca-cert-hash sha256:103d7xxxxxxxxxxxxxxxxxxxxxxxxxxxxxxxxxxxxxxxxxxxxxxxxxxxxxx5b1b6
開立防火牆 (TCP 6443, TCP 10250)
你會注意到這次有一些警告需要處理
警告訊息: firewalld 有啟動,請記得開 6443, 10250 連接埠 (port)
[WARNING Firewalld]: firewalld is active, please ensure ports [6443 10250] are open or your cluster may not function correctly我們就來做開防火牆這件事情
sudo firewall-cmd --permanent --zone=public --add-port=6443/tcp && \
sudo firewall-cmd --permanent --zone=public --add-port=10250/tcp
如果前述 Kubernetes API server 的連接埠 (port) 號有修改的話(也就是 --apiserver-bind-port 參數),
這邊也要同步修改。
記得重新載入它
sudo firewall-cmd --reload確認防火牆
sudo firewall-cmd --list-all-zones執行 kubelet 服務
有收到一個警告消息:kubelet 服務沒有啟動
[WARNING Service-Kubelet]: kubelet service is not enabled, please run 'systemctl enable kubelet.service'執行它即可消除
sudo systemctl enable kubelet.service && \
sudo systemctl start kubelet.service
設定 kubectrl 連結
如果沒意外的話,完成之後會看到
Your Kubernetes control-plane has initialized successfully!別太高興,設定還沒完,先把 kubeadm join 語句先存起來備用
kubeadm join 192.168.1.100:6443 --token cxxxxs.c4xxxxxxxxxxxxd0 \
        --discovery-token-ca-cert-hash sha256:103d7xxxxxxxxxxxxxxxxxxxxxxxxxxxxxxxxxxxxxxxxxxxxxxxxxxxxxx5b1b6
然後依照步驟,
若是 root 使用者,
在 .bash_profile 或者 .zsh_profile 設定環境變數
export KUBECONFIG=/etc/kubernetes/admin.conf若是一般使用者,請依照指令依序設定
mkdir -p $HOME/.kube && \
sudo cp -i /etc/kubernetes/admin.conf $HOME/.kube/config && \
sudo chown $(id -u):$(id -g) $HOME/.kube/config
註:加入 token 是有期限的,如果隔太久沒有整個步驟做完,
或者忘記了、被洗掉了,可以用指令重新生成加入指令
kubeadm token create --print-join-command\<Control plane 做> 安裝 Helm 套件管理程式
Helm 是 Kubernetes (K8s) 所使用的套件管理程式,
類似 apt-get 可以方便我們安裝元件,免去一點設定的雷
Helm 只要裝在 Control plane (舊名 Master node) 就可以了
安裝文件
https://helm.sh/docs/intro/install/
從執行檔直接複製
wget https://get.helm.sh/helm-v3.13.1-linux-amd64.tar.gz
tar zxvf helm-v3.13.1-linux-amd64.tar.gz
cp linux-amd64/helm /usr/local/bin/helm
(科技發展迅速,整理的安裝文件有可能會過時,如果有更新版,請參考官方文件)
也可從 Script 安裝
curl -fsSL -o get_helm.sh https://raw.githubusercontent.com/helm/helm/main/scripts/get-helm-3 && \
chmod 700 get_helm.sh && \
./get_helm.sh
(科技發展迅速,整理的安裝文件有可能會過時,如果有更新版,請參考官方文件)
二者效果相同,擇一安裝即可。
\<Control plane 做> 安裝 Flannel CNI
https://github.com/flannel-io/flannel
使用 Helm 安裝 Flannel,將之安裝在 kube-flannel 的 namespace,可用小弟整理之一鍵安裝指令
Flannel 只要在 Control plane (舊名 Master node) 上面下指令,就會部署到整個叢集。
可以使用以下整理之指令一鍵安裝
kubectl create ns kube-flannel && \
kubectl label --overwrite ns kube-flannel pod-security.kubernetes.io/enforce=privileged && \
helm repo add flannel https://flannel-io.github.io/flannel/ && \
helm install flannel --set podCidr="10.244.0.0/16" --namespace kube-flannel flannel/flannel
(科技發展迅速,整理的安裝文件有可能會過時,如果有更新版,請參考官方文件)
指令意思大致為:
- 建立一個 namespace (命名空間)名叫
kube-flannel - 給定
kube-flannel特權的權限 - 加入 repo 網址
- 用 helm 安裝 Flannel
設定 Worker node
這下終於可以設定 Worker node 了
還記得剛剛留下來的指令
kubeadm join 192.168.1.100:6443 --token cxxxxs.c4xxxxxxxxxxxxd0 \
    --discovery-token-ca-cert-hash sha256:103d7xxxxxxxxxxxxxxxxxxxxxxxxxxxxxxxxxxxxxxxxxxxxxxxxxxxxxx5b1b6
什麼?忘記了?
可以用指令重新生成加入指令
kubeadm token create --print-join-command出現 kubeadm join 指令之後,加上指明 cri-socket 就可以執行了
意指加上這行
--cri-socket unix:///var/run/cri-dockerd.sock變成這樣
sudo kubeadm join 192.168.1.100:6443
    --token cxxxxs.c4xxxxxxxxxxxxd0 \
    --discovery-token-ca-cert-hash sha256:103d7xxxxxxxxxxxxxxxxxxxxxxxxxxxxxxxxxxxxxxxxxxxxxxxxxxxxxx5b1b6 \
    --cri-socket unix:///var/run/cri-dockerd.sock
記錄一下運作情形
$ kubeadm join 192.168.1.100:6443
    --token cxxxxs.c4xxxxxxxxxxxxd0 \
    --discovery-token-ca-cert-hash sha256:103d7xxxxxxxxxxxxxxxxxxxxxxxxxxxxxxxxxxxxxxxxxxxxxxxxxxxxxx5b1b6 \
    --cri-socket unix:///var/run/cri-dockerd.sock

[preflight] Running pre-flight checks
[preflight] Reading configuration from the cluster...
[preflight] FYI: You can look at this config file with 'kubectl -n kube-system get cm kubeadm-config -o yaml'
[kubelet-start] Writing kubelet configuration to file "/var/lib/kubelet/config.yaml"
[kubelet-start] Writing kubelet environment file with flags to file "/var/lib/kubelet/kubeadm-flags.env"
[kubelet-start] Starting the kubelet
[kubelet-start] Waiting for the kubelet to perform the TLS Bootstrap...

This node has joined the cluster:
* Certificate signing request was sent to apiserver and a response was received.
* The Kubelet was informed of the new secure connection details.

Run 'kubectl get nodes' on the control-plane to see this node join the cluster.
這樣就加入叢集了
Troubleshoting
若你看到
[preflight] Running pre-flight checks然後卡住的話,可以加上 -v=5 得到更 verbose 的內容
$ kubeadm join 192.168.1.100:6443
    --token cxxxxs.c4xxxxxxxxxxxxd0 \
    --discovery-token-ca-cert-hash sha256:103d7xxxxxxxxxxxxxxxxxxxxxxxxxxxxxxxxxxxxxxxxxxxxxxxxxxxxxx5b1b6 \
    --cri-socket unix:///var/run/cri-dockerd.sock -v=5

I1019 08:29:40.569229    2362 join.go:412] [preflight] found NodeName empty; using OS hostname as NodeName
[preflight] Running pre-flight checks
I1019 08:29:40.569740    2362 preflight.go:93] [preflight] Running general checks
I1019 08:29:40.569938    2362 checks.go:280] validating the existence of file /etc/kubernetes/kubelet.conf
I1019 08:29:40.570190    2362 checks.go:280] validating the existence of file /etc/kubernetes/bootstrap-kubelet.conf
I1019 08:29:40.570330    2362 checks.go:104] validating the container runtime
I1019 08:29:40.628420    2362 checks.go:639] validating whether swap is enabled or not
I1019 08:29:40.628538    2362 checks.go:370] validating the presence of executable crictl
I1019 08:29:40.628603    2362 checks.go:370] validating the presence of executable conntrack
I1019 08:29:40.628770    2362 checks.go:370] validating the presence of executable ip
I1019 08:29:40.628809    2362 checks.go:370] validating the presence of executable iptables
I1019 08:29:40.628865    2362 checks.go:370] validating the presence of executable mount
I1019 08:29:40.628925    2362 checks.go:370] validating the presence of executable nsenter
I1019 08:29:40.628980    2362 checks.go:370] validating the presence of executable ebtables
I1019 08:29:40.629025    2362 checks.go:370] validating the presence of executable ethtool
I1019 08:29:40.629060    2362 checks.go:370] validating the presence of executable socat
I1019 08:29:40.629099    2362 checks.go:370] validating the presence of executable tc
I1019 08:29:40.629150    2362 checks.go:370] validating the presence of executable touch
I1019 08:29:40.629212    2362 checks.go:516] running all checks
I1019 08:29:40.639498    2362 checks.go:401] checking whether the given node name is valid and reachable using net.LookupHost
I1019 08:29:40.639703    2362 checks.go:605] validating kubelet version
I1019 08:29:40.704380    2362 checks.go:130] validating if the "kubelet" service is enabled and active
I1019 08:29:40.721619    2362 checks.go:203] validating availability of port 10250
I1019 08:29:40.722091    2362 checks.go:280] validating the existence of file /etc/kubernetes/pki/ca.crt
I1019 08:29:40.722136    2362 checks.go:430] validating if the connectivity type is via proxy or direct
I1019 08:29:40.722196    2362 checks.go:329] validating the contents of file /proc/sys/net/bridge/bridge-nf-call-iptables
I1019 08:29:40.722316    2362 checks.go:329] validating the contents of file /proc/sys/net/ipv4/ip_forward
I1019 08:29:40.722358    2362 join.go:529] [preflight] Discovering cluster-info
I1019 08:29:40.722412    2362 token.go:80] [discovery] Created cluster-info discovery client, requesting info from "192.168.1.100:6443"
I1019 08:29:40.723841    2362 token.go:217] [discovery] Failed to request cluster-info, will try again: Get "https://192.168.1.100:6443/api/v1/namespaces/kube-public/configmaps/cluster-info?timeout=10s": dial tcp 192.168.1.100:6443: connect: no route to host
你會看到類似問題字眼
[discovery] Failed to request cluster-info, will try again: Get "https://192.168.1.100:6443/api/v1/namespaces/kube-public/configmaps/cluster-info?timeout=10s": dial tcp 192.168.1.100:6443: connect: no route to host就是找不到 192.168.1.100:6443,除了 ping 會通之外,可能檢查防火牆有沒有正確開啟。
查看 kubelet Log
另外這二個指令,對於 kubelet 的啟動不了的問題,也會有一些方向
查看 kubelet 狀態
systemctl status kubelet查看 kubelet 的 Log
journalctl -xeu kubelet最後,一個小小經驗談,
--control-plane-endpoint 和 --apiserver-advertise-address 的 IP 可以再次確認是否有打錯字,這也會造成錯誤
重設整個叢集
如果整個叢集有其他問題,做爛了,可以用以下方法重新設定
進到每一台 node 裡面,利用 kubeadm reset 重置,記得代入 cri-socket
如下:
kubeadm reset -f --cri-socket unix:///var/run/cri-dockerd.sock記錄一下運作情形
$ kubeadm reset -f --cri-socket unix:///var/run/cri-dockerd.sock

[preflight] Running pre-flight checks
W1019 08:24:38.813576    2256 removeetcdmember.go:106] [reset] No kubeadm config, using etcd pod spec to get data directory
[reset] Deleted contents of the etcd data directory: /var/lib/etcd
[reset] Stopping the kubelet service
[reset] Unmounting mounted directories in "/var/lib/kubelet"
[reset] Deleting contents of directories: [/etc/kubernetes/manifests /var/lib/kubelet /etc/kubernetes/pki]
[reset] Deleting files: [/etc/kubernetes/admin.conf /etc/kubernetes/kubelet.conf /etc/kubernetes/bootstrap-kubelet.conf /etc/kubernetes/controller-manager.conf /etc/kubernetes/scheduler.conf]

The reset process does not clean CNI configuration. To do so, you must remove /etc/cni/net.d

The reset process does not reset or clean up iptables rules or IPVS tables.
If you wish to reset iptables, you must do so manually by using the "iptables" command.

If your cluster was setup to utilize IPVS, run ipvsadm --clear (or similar)
to reset your system's IPVS tables.

The reset process does not clean your kubeconfig files and you must remove them manually.
Please, check the contents of the $HOME/.kube/config file.
它會提示你,有些防火牆規則並不會完全刪掉
可以刪掉 cni 資料夾來重置
rm -rf /etc/cni/net.d對應文件:
https://kubernetes.io/docs/reference/setup-tools/kubeadm/kubeadm-reset/
\<Control plane 做> 測試檢查叢集
測試 Kubernetes 是否正常運作,
在 Control plane (控制平台) 裡可以用二個指令觀察一下:
取得所有的 Pods
用 kubectl get pods 指令取得 Pod,加上 -A 代表包含所有 namespace (命名空間)
以下指令就是取得所有的 Pods
$ kubectl get pods -A取得所有的 pods
$ kubectl get pods -A

NAMESPACE      NAME                               READY   STATUS    RESTARTS   AGE
kube-flannel   kube-flannel-ds-8rtvc              1/1     Running   0          30s
kube-flannel   kube-flannel-ds-9w2vw              1/1     Running   0          30s
kube-flannel   kube-flannel-ds-jdndp              1/1     Running   0          30s
kube-system    coredns-5d78c9869d-df989           1/1     Running   0          4m20s
kube-system    coredns-5d78c9869d-s8ftg           1/1     Running   0          4m19s
kube-system    etcd-k8s-ctrl                      1/1     Running   0          4m35s
kube-system    kube-apiserver-k8s-ctrl            1/1     Running   0          4m33s
kube-system    kube-controller-manager-k8s-ctrl   1/1     Running   0          4m35s
kube-system    kube-proxy-2qrjj                   1/1     Running   0          4m19s
kube-system    kube-proxy-bpk94                   1/1     Running   0          3m51s
kube-system    kube-proxy-mgrjn                   1/1     Running   0          3m57s
kube-system    kube-scheduler-k8s-ctrl            1/1     Running   0          4m36s
你應該要看到:
kube-flannel的若干個 Pod 為Running
(若是 Pending 或者 CrashLoopBackOff 可能要除錯)kube-system(K8s 核心元件) 的二個coredns的 Pod 為Running
(若是 Pending 或者 CrashLoopBackOff 可能要除錯)kube-system(K8s 核心元件) 的etcd為Runningkube-system(K8s 核心元件) 的kube-controller-manager的 Pod 為Runningkube-system(K8s 核心元件) 的kube-apiserver的 Pod 為Runningkube-system(K8s 核心元件) 的kube-scheduler的 Pod 為Runningkube-system(K8s 核心元件) 的若干個kube-proxy的 Pod 為Running
當然,放在 kube-system 裡面的 Pod 屬於系統保留的,請勿更動修改。
取得所有 nodes (主機節點)
你可以用 kubectl get nodes -A 指令來取得所有運作的 nodes
$ kubectl get nodes -A

NAME        STATUS   ROLES           AGE     VERSION
k8s-ctrl    Ready    control-plane   4m40s   v1.28.2
k8s-node1   Ready    <none>          3m59s   v1.28.2
k8s-node2   Ready    <none>          3m53s   v1.28.2
你應該要看到你的叢集,三台都是 Ready 的
Trobleshoting
若你可能看到這樣的錯誤
# kubectl get node -A

E1019 08:31:28.269393    5101 memcache.go:265] couldn't get current server API group list: Get "http://localhost:8080/api?timeout=32s": dial tcp [::1]:8080: connect: connection refused
E1019 08:31:28.270061    5101 memcache.go:265] couldn't get current server API group list: Get "http://localhost:8080/api?timeout=32s": dial tcp [::1]:8080: connect: connection refused
E1019 08:31:28.271897    5101 memcache.go:265] couldn't get current server API group list: Get "http://localhost:8080/api?timeout=32s": dial tcp [::1]:8080: connect: connection refused
E1019 08:31:28.272478    5101 memcache.go:265] couldn't get current server API group list: Get "http://localhost:8080/api?timeout=32s": dial tcp [::1]:8080: connect: connection refused
E1019 08:31:28.273617    5101 memcache.go:265] couldn't get current server API group list: Get "http://localhost:8080/api?timeout=32s": dial tcp [::1]:8080: connect: connection refused
The connection to the server localhost:8080 was refused - did you specify the right host or port?
有可能是
- 真的連不上,檢查防火牆 control panel 有沒有開
- 沒有設定好 kubectl 連線 config
- kubelet 沒有正確啟動
可以用以下指令查看每台 kubelet 的細節 log
journalctl -f -u kubelet最後貼一下所有看得到的 images
control panel
# docker image ls
REPOSITORY                                TAG       IMAGE ID       CREATED         SIZE
flannel/flannel                           v0.22.3   e23f7ca36333   4 weeks ago     70.2MB
registry.k8s.io/kube-apiserver            v1.28.2   cdcab12b2dd1   5 weeks ago     126MB
registry.k8s.io/kube-controller-manager   v1.28.2   55f13c92defb   5 weeks ago     122MB
registry.k8s.io/kube-proxy                v1.28.2   c120fed2beb8   5 weeks ago     73.1MB
registry.k8s.io/kube-scheduler            v1.28.2   7a5d9d67a13f   5 weeks ago     60.1MB
flannel/flannel-cni-plugin                v1.2.0    a55d1bad692b   2 months ago    8.04MB
registry.k8s.io/etcd                      3.5.9-0   73deb9a3f702   5 months ago    294MB
registry.k8s.io/coredns/coredns           v1.10.1   ead0a4a53df8   8 months ago    53.6MB
registry.k8s.io/pause                     3.9       e6f181688397   12 months ago   744kB
registry.k8s.io/pause                     3.6       6270bb605e12   2 years ago     683kB
worker node
# docker image ls
REPOSITORY                   TAG       IMAGE ID       CREATED        SIZE
flannel/flannel              v0.22.3   e23f7ca36333   4 weeks ago    70.2MB
registry.k8s.io/kube-proxy   v1.28.2   c120fed2beb8   5 weeks ago    73.1MB
flannel/flannel-cni-plugin   v1.2.0    a55d1bad692b   2 months ago   8.04MB
registry.k8s.io/pause        3.6       6270bb605e12   2 years ago    683kB
先預祝大家設定順利!
參考資料
- https://blog.gtwang.org/linux/centos-7-firewalld-command-setup-tutorial/
- https://forum.proxmox.com/threads/kernel-panic-when-creating-vms-centos-9-stream-iso.104656/page-2#post-485684
- https://forum.proxmox.com/threads/solved-kernel-panic-on-install-rocky-linux.119841/
- https://access.redhat.com/solutions/98873