在 Windows 環境下運行應用程式時,將其註冊為系統服務能大幅提升管理效率。
這篇文章將介紹 NSSM(Non-Sucking Service Manager)這個強大工具,
手把手教你如何快速建立 Windows 服務。
除了介紹 NSSM 與基礎的服務建立步驟,我們還會帶你瞭解 Windows 服務背後的權限原理,
探討如何安全地授予一般權限使用者開啟或關閉指定服務的權限,讓團隊協作更靈活,DevOps 流程更順暢。無論你是初學者或經驗豐富的系統管理員,這篇文章都能幫助你提升 Windows 服務管理的效率,讓你對 Windows 服務有更近一步的瞭解。
TL;DR
使用 NSSM (Non-Sucking Service Manager) 註冊服務
nssm 為了以後設定方便,使用指令來操作
假設我有一個 Windows 服務,名叫 MyService 你可以這麼做
(執行以下指令需使用 cmd 系統管理員權限)
nssm install "MyService" "C:\Java\bin\java.exe" "-jar C:\MyService\app.jar"
nssm set MyService AppDirectory "C:\MyService\"
nssm set MyService Description "This is my service"
- name: Windows Service testing
  hosts: jenkins
  gather_facts: no
  tasks:
    - name: Stop service
      ansible.windows.win_service:
        name: MyService
        state: stopped
    - name: Start service
      ansible.windows.win_service:
        name: MyService
        start_mode: delayed
        state: started
Nouveau can usually be disabled by adding files to the modprobe configuration
  directories and rebuilding the initramfs.

  Would you like nvidia-installer to attempt to create these modprobe configuration
  files for you?
 One or more modprobe configuration files to disable Nouveau have been written.
  You will need to reboot your system and possibly rebuild the initramfs before
  these changes can take effect.  Note if you later wish to reenable Nouveau, you
  will need to delete these files:
  /usr/lib/modprobe.d/nvidia-installer-disable-nouveau.conf,
  /etc/modprobe.d/nvidia-installer-disable-nouveau.conf
WARNING: nvidia-installer was forced to guess the X library path '/usr/lib64' and X module path '/usr/lib64/xorg/modules'; these paths were not queryable from the system.  If X fails to find the NVIDIA X driver module,
please install the `pkg-config` utility and the X.Org SDK/development package for your distribution and reinstall the driver.
警告: NVIDIA 安裝程式猜測 X 函式庫路徑為 /usr/lib64 且 X 模組路徑為 /usr/lib64/xorg/modules;這些路徑無法從系統中查詢到。
如果 X 無法找到 NVIDIA X 驅動程式模組,請安裝 pkg-config 工具以及適用於您發行版的 X.Org SDK/開發套件,然後重新安裝驅動程式。
這個警告可以忽略
按 OK 繼續
安裝 NVIDIA 32 位元相容性函式庫?
Install NVIDIA's 32-bit compatibility libraries?
您要安裝 NVIDIA 的 32 位元相容性函式庫嗎?
這邊選擇 NO
警告:未偵測到 Vulkan ICD 載入器
WARNING: This NVIDIA driver package includes Vulkan components, but no Vulkan ICD loader was detected on this system. The NVIDIA Vulkan ICD will not function without the loader. Most distributions package the Vulkan loader;
try installing the "vulkan-loader", "vulkan-icd-loader", or "libvulkan1" package.
Would you like to run the nvidia-xconfig utility to automatically update your X configuration file so that the NVIDIA X driver will be used when you restart X? Any pre-existing X configuration file will be backed up.
您希望執行 nvidia-xconfig 工具來自動更新您的 X 設定檔嗎?這樣,當您重新啟動 X 時,就會使用 NVIDIA X 驅動程式。任何現有的 X 設定檔都會被備份。
這邊選擇 YES
完成
Installation of the NVIDIA Accelerated Graphics Driver for Linux-x86_64 (version: 550.142) is now complete.  Please update your xorg.conf file as appropriate; see the file /usr/share/doc/NVIDIA_GLX-1.0/README.txt for
details.
sudo docker run --rm --runtime=nvidia --gpus all nvcr.io/nvidia/k8s/cuda-sample:vectoradd-cuda11.6.0-ubi8
執行紀錄
# sudo docker run --rm --runtime=nvidia --gpus all nvcr.io/nvidia/k8s/cuda-sample:vectoradd-cuda11.6.0-ubi8
[Vector addition of 50000 elements]
Copy input data from the host memory to the CUDA device
CUDA kernel launch with 196 blocks of 256 threads
Copy output data from the CUDA device to the host memory
Test PASSED
Done
# kubectl get node node
NAME                   STATUS     ROLES           AGE     VERSION
ubuntu2404-k8s-ctrl1   NotReady   control-plane   3m22s   v1.34.2
ubuntu2404-k8s-ctrl2   NotReady   control-plane   9s      v1.34.2
ubuntu2404-k8s-ctrl3   NotReady   control-plane   5s      v1.34.2
這邊因為還沒有設定 CNI,所以 STATUS 為 NotReady 是 正常現象
(叢集才設定一半,還沒設定網路,當然顯示 K8s 叢集不可用)
# kubeadm join 192.168.1.100:6443 --token kkxxxx.xxxxxxxxxxxxxdl2      --discovery-token-ca-cert-hash sha256:bdfxxxxxxxxxxxxxxxxxxxxxxxxxxxxxxxxxxxxxxxxxxxxxxxxxxxxxxxxxx19c         --control-plane --cri-socket unix:///var/run/cri-dockerd.sock

[preflight] Running pre-flight checks
[preflight] Reading configuration from the "kubeadm-config" ConfigMap in namespace "kube-system"...
[preflight] Use 'kubeadm init phase upload-config --config your-config.yaml' to re-upload it.
error execution phase preflight:
One or more conditions for hosting a new control plane instance is not satisfied.

[failure loading certificate for CA: couldn't load the certificate file /etc/kubernetes/pki/ca.crt: open /etc/kubernetes/pki/ca.crt: no such file or directory, failure loading key for service account: couldn't load the private key file /etc/kubernetes/pki/sa.key: open /etc/kubernetes/pki/sa.key: no such file or directory, failure loading certificate for front-proxy CA: couldn't load the certificate file /etc/kubernetes/pki/front-proxy-ca.crt: open /etc/kubernetes/pki/front-proxy-ca.crt: no such file or directory, failure loading certificate for etcd CA: couldn't load the certificate file /etc/kubernetes/pki/etcd/ca.crt: open /etc/kubernetes/pki/etcd/ca.crt: no such file or directory]

Please ensure that:
* The cluster has a stable controlPlaneEndpoint address.
* The certificates that must be shared among control plane instances are provided.

To see the stack trace of this error execute with --v=5 or higher
遇到這段
failure loading certificate for CA: couldn't load the certificate file
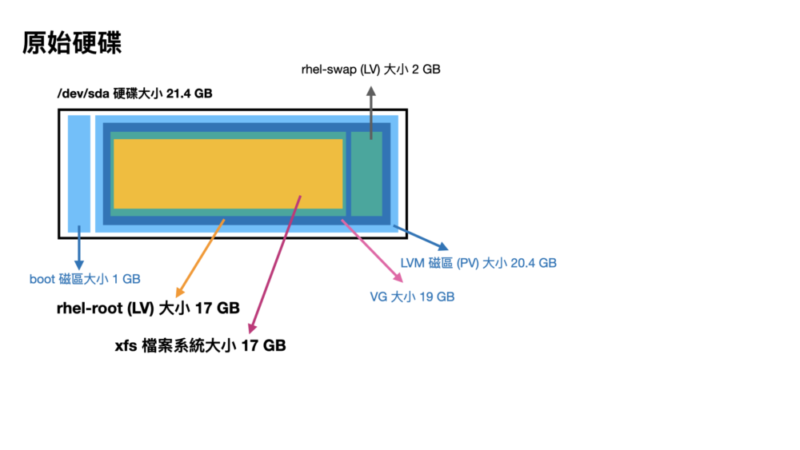
# vgdisplay -v
  --- Volume group ---
  VG Name               rhel
  System ID
  Format                lvm2
  Metadata Areas        1
  Metadata Sequence No  3
  VG Access             read/write
  VG Status             resizable
  MAX LV                0
  Cur LV                2
  Open LV               2
  Max PV                0
  Cur PV                1
  Act PV                1
  VG Size               <19.00 GiB                         ### VG 容量只有 19GB
  PE Size               4.00 MiB
  Total PE              4863
  Alloc PE / Size       4863 / <19.00 GiB
  Free  PE / Size       0 / 0
  VG UUID               edb3Hx-xxxx-xxxx-xxxx-xxxx-xxxx-iiOyAf

  --- Logical volume ---
  LV Path                /dev/rhel/swap
  LV Name                swap
  VG Name                rhel
  LV UUID                ocf2IU-xxxx-xxxx-xxxx-xxxx-xxxx-BoYp70
  LV Write Access        read/write
  LV Creation host, time uatgit, 2023-08-21 18:06:42 +0800
  LV Status              available
  # open                 2
  LV Size                2.00 GiB
  Current LE             512
  Segments               1
  Allocation             inherit
  Read ahead sectors     auto
  - currently set to     8192
  Block device           253:1

  --- Logical volume ---
  LV Path                /dev/rhel/root
  LV Name                root
  VG Name                rhel
  LV UUID                5mZgRT-xxxx-xxxx-xxxx-xxxx-xxxx-0KHlI7
  LV Write Access        read/write
  LV Creation host, time uatgit, 2023-08-21 18:06:42 +0800
  LV Status              available
  # open                 1
  LV Size                <17.00 GiB                        ### LV 容量只有 17GB,前面有 2GB 是 Swap
  Current LE             4351
  Segments               1
  Allocation             inherit
  Read ahead sectors     auto
  - currently set to     8192
  Block device           253:0

  --- Physical volumes ---
  PV Name               /dev/sda2
  PV UUID               86HkpN-xxxx-xxxx-xxxx-xxxx-xxxx-Z6DNv4
  PV Status             allocatable
  Total PE / Free PE    4863 / 0
# vgdisplay -v
  --- Volume group ---
  VG Name               rhel
  System ID
  Format                lvm2
  Metadata Areas        1
  Metadata Sequence No  3
  VG Access             read/write
  VG Status             resizable
  MAX LV                0
  Cur LV                2
  Open LV               2
  Max PV                0
  Cur PV                1
  Act PV                1
  VG Size               <19.00 GiB                         ### VG 容量還是沒變,只有 19GB
  PE Size               4.00 MiB
  Total PE              4863
  Alloc PE / Size       4863 / <19.00 GiB
  Free  PE / Size       0 / 0
  VG UUID               edb3Hx-xxxx-xxxx-xxxx-xxxx-xxxx-iiOyAf

  --- Logical volume ---
  LV Path                /dev/rhel/swap
  LV Name                swap
  VG Name                rhel
  LV UUID                ocf2IU-xxxx-xxxx-xxxx-xxxx-xxxx-BoYp70
  LV Write Access        read/write
  LV Creation host, time uatgit, 2023-08-21 18:06:42 +0800
  LV Status              available
  # open                 2
  LV Size                2.00 GiB
  Current LE             512
  Segments               1
  Allocation             inherit
  Read ahead sectors     auto
  - currently set to     8192
  Block device           253:1

  --- Logical volume ---
  LV Path                /dev/rhel/root
  LV Name                root
  VG Name                rhel
  LV UUID                5mZgRT-xxxx-xxxx-xxxx-xxxx-xxxx-0KHlI7
  LV Write Access        read/write
  LV Creation host, time uatgit, 2023-08-21 18:06:42 +0800
  LV Status              available
  # open                 1
  LV Size                <17.00 GiB                         ### LV 容量也沒變,只有 17GB
  Current LE             4351
  Segments               1
  Allocation             inherit
  Read ahead sectors     auto
  - currently set to     8192
  Block device           253:0

  --- Physical volumes ---
  PV Name               /dev/sda2
  PV UUID               86HkpN-xxxx-xxxx-xxxx-xxxx-xxxx-Z6DNv4
  PV Status             allocatable
  Total PE / Free PE    4863 / 0
# parted
GNU Parted 3.1
Using /dev/sda
Welcome to GNU Parted! Type 'help' to view a list of commands.
(parted)
你可以在 parted 裡面輸入需要的指令,打 quit 離開互動式介面
先打 print 印出磁區列表,
(parted) print
Model: VMware Virtual disk (scsi)
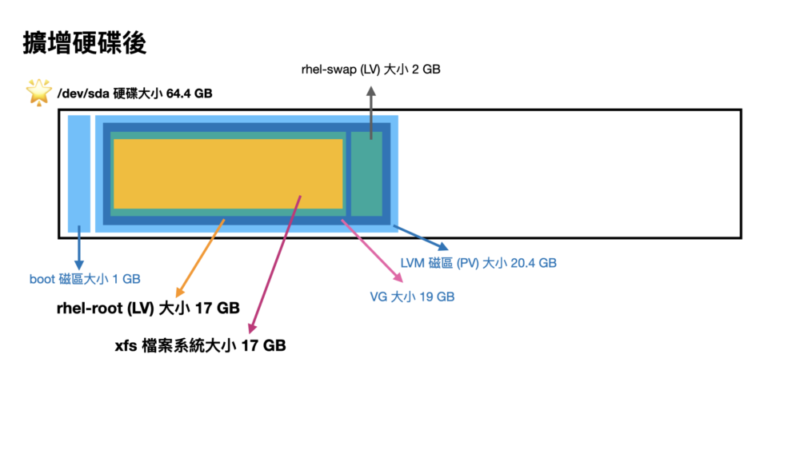
Disk /dev/sda: 64.4GB ### 可以看到硬碟大小變成 64.4GB 了
Sector size (logical/physical): 512B/512B
Partition Table: msdos
Disk Flags:
Number Start End Size Type File system Flags
1 1049kB 1075MB 1074MB primary xfs boot
2 1075MB 21.5GB 20.4GB primary lvm ### 但 LVM 磁區只有 20.4GB
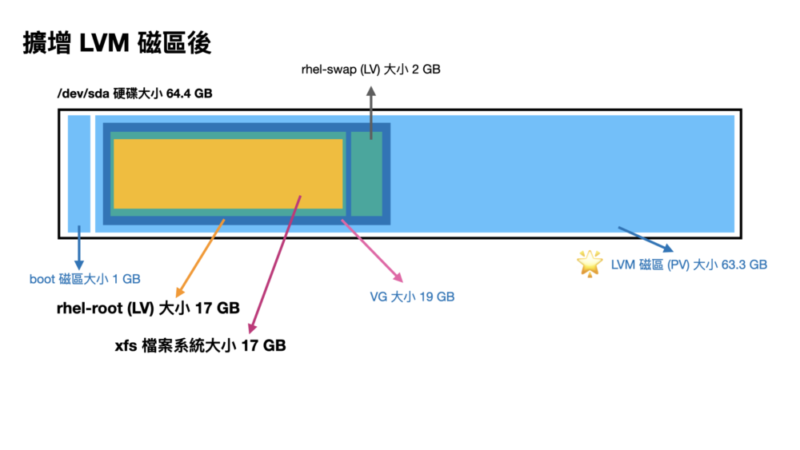
使用 resizepart 指令調整分割區大小
(parted) resizepart 2 100%
記得這個 2 要換成對應的數字
再印一次看看
(parted) print
Model: VMware Virtual disk (scsi)
Disk /dev/sda: 64.4GB
Sector size (logical/physical): 512B/512B
Partition Table: msdos
Disk Flags:

Number  Start   End     Size    Type     File system  Flags
 1      1049kB  1075MB  1074MB  primary  xfs          boot
 2      1075MB  64.4GB  63.3GB  primary               lvm    ### LVM 磁區擴增變成新的大小 63.3GB
打 quit 離開互動式介面
(parted) quit
Information: You may need to update /etc/fstab.
LVM 資訊看一下
# vgdisplay -v
  --- Volume group ---
  VG Name               rhel
  System ID
  Format                lvm2
  Metadata Areas        1
  Metadata Sequence No  3
  VG Access             read/write
  VG Status             resizable
  MAX LV                0
  Cur LV                2
  Open LV               2
  Max PV                0
  Cur PV                1
  Act PV                1
  VG Size               <19.00 GiB                         ### VG 容量還是沒變,只有 19GB
  PE Size               4.00 MiB
  Total PE              4863
  Alloc PE / Size       4863 / <19.00 GiB
  Free  PE / Size       0 / 0
  VG UUID               edb3Hx-xxxx-xxxx-xxxx-xxxx-xxxx-iiOyAf

  --- Logical volume ---
  LV Path                /dev/rhel/swap
  LV Name                swap
  VG Name                rhel
  LV UUID                ocf2IU-xxxx-xxxx-xxxx-xxxx-xxxx-BoYp70
  LV Write Access        read/write
  LV Creation host, time uatgit, 2023-08-21 18:06:42 +0800
  LV Status              available
  # open                 2
  LV Size                2.00 GiB
  Current LE             512
  Segments               1
  Allocation             inherit
  Read ahead sectors     auto
  - currently set to     8192
  Block device           253:1

  --- Logical volume ---
  LV Path                /dev/rhel/root
  LV Name                root
  VG Name                rhel
  LV UUID                5mZgRT-xxxx-xxxx-xxxx-xxxx-xxxx-0KHlI7
  LV Write Access        read/write
  LV Creation host, time uatgit, 2023-08-21 18:06:42 +0800
  LV Status              available
  # open                 1
  LV Size                <17.00 GiB                         ### LV 容量也沒變,只有 17GB
  Current LE             4351
  Segments               1
  Allocation             inherit
  Read ahead sectors     auto
  - currently set to     8192
  Block device           253:0

  --- Physical volumes ---
  PV Name               /dev/sda2
  PV UUID               86HkpN-xxxx-xxxx-xxxx-xxxx-xxxx-Z6DNv4
  PV Status             allocatable
  Total PE / Free PE    4863 / 0
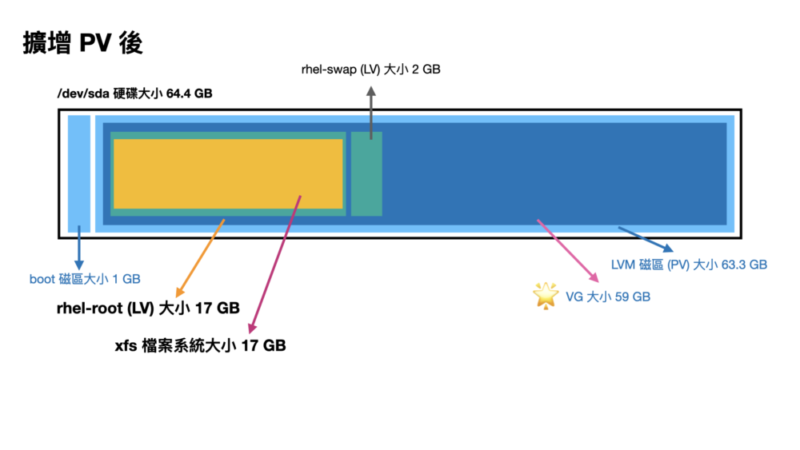
Step4. 擴增 PV
我們用 pvresize 調整 PV 的大小
# pvresize /dev/sda2
  Physical volume "/dev/sda2" changed
  1 physical volume(s) resized or updated / 0 physical volume(s) not resized
再次印一次 LVM 資訊看看
# vgdisplay -v
  --- Volume group ---
  VG Name               rhel
  System ID
  Format                lvm2
  Metadata Areas        1
  Metadata Sequence No  4
  VG Access             read/write
  VG Status             resizable
  MAX LV                0
  Cur LV                2
  Open LV               2
  Max PV                0
  Cur PV                1
  Act PV                1
  VG Size               <59.00 GiB                         ### VG 容量變大了 59GB
  PE Size               4.00 MiB
  Total PE              15103
  Alloc PE / Size       4863 / <19.00 GiB
  Free  PE / Size       10240 / 40.00 GiB                  ### 跑出了一些 PE 大小
  VG UUID               edb3Hx-xxxx-xxxx-xxxx-xxxx-xxxx-iiOyAf

  --- Logical volume ---
  LV Path                /dev/rhel/swap
  LV Name                swap
  VG Name                rhel
  LV UUID                ocf2IU-xxxx-xxxx-xxxx-xxxx-xxxx-BoYp70
  LV Write Access        read/write
  LV Creation host, time uatgit, 2023-08-21 18:06:42 +0800
  LV Status              available
  # open                 2
  LV Size                2.00 GiB
  Current LE             512
  Segments               1
  Allocation             inherit
  Read ahead sectors     auto
  - currently set to     8192
  Block device           253:1

  --- Logical volume ---
  LV Path                /dev/rhel/root
  LV Name                root
  VG Name                rhel
  LV UUID                5mZgRT-xxxx-xxxx-xxxx-xxxx-xxxx-0KHlI7
  LV Write Access        read/write
  LV Creation host, time uatgit, 2023-08-21 18:06:42 +0800
  LV Status              available
  # open                 1
  LV Size                <17.00 GiB                       ### LV 容量沒變,還是 17GB
  Current LE             4351
  Segments               1
  Allocation             inherit
  Read ahead sectors     auto
  - currently set to     8192
  Block device           253:0

  --- Physical volumes ---
  PV Name               /dev/sda2
  PV UUID               86HkpN-xxxx-xxxx-xxxx-xxxx-xxxx-Z6DNv4
  PV Status             allocatable
  Total PE / Free PE    15103 / 10240                  ### 跑出了一些 Free PE 出來(因為我們還沒調整)
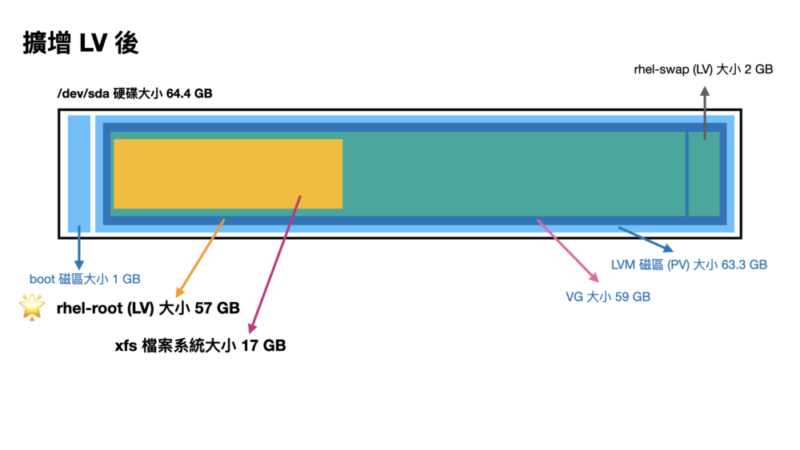
Step5. 擴增 LV
我們使用 lvextend 擴大 LV 大小
# lvextend -l +100%FREE /dev/rhel/root
  Size of logical volume rhel/root changed from <17.00 GiB (4351 extents) to <57.00 GiB (14591 extents).
  Logical volume rhel/root successfully resized.
再次印一次 LVM 資訊看看
# vgdisplay -v
  --- Volume group ---
  VG Name               rhel
  System ID
  Format                lvm2
  Metadata Areas        1
  Metadata Sequence No  5
  VG Access             read/write
  VG Status             resizable
  MAX LV                0
  Cur LV                2
  Open LV               2
  Max PV                0
  Cur PV                1
  Act PV                1
  VG Size               <59.00 GiB                         ### VG 容量沒問題 59GB
  PE Size               4.00 MiB
  Total PE              15103
  Alloc PE / Size       15103 / <59.00 GiB
  Free  PE / Size       0 / 0
  VG UUID               edb3Hx-xxxx-xxxx-xxxx-xxxx-xxxx-iiOyAf

  --- Logical volume ---
  LV Path                /dev/rhel/swap
  LV Name                swap
  VG Name                rhel
  LV UUID                ocf2IU-xxxx-xxxx-xxxx-xxxx-xxxx-BoYp70
  LV Write Access        read/write
  LV Creation host, time uatgit, 2023-08-21 18:06:42 +0800
  LV Status              available
  # open                 2
  LV Size                2.00 GiB
  Current LE             512
  Segments               1
  Allocation             inherit
  Read ahead sectors     auto
  - currently set to     8192
  Block device           253:1

  --- Logical volume ---
  LV Path                /dev/rhel/root
  LV Name                root
  VG Name                rhel
  LV UUID                5mZgRT-xxxx-xxxx-xxxx-xxxx-xxxx-0KHlI7
  LV Write Access        read/write
  LV Creation host, time uatgit, 2023-08-21 18:06:42 +0800
  LV Status              available
  # open                 1
  LV Size                <57.00 GiB                         ### LV 容量變大了 57GB
  Current LE             14591
  Segments               1
  Allocation             inherit
  Read ahead sectors     auto
  - currently set to     8192
  Block device           253:0

  --- Physical volumes ---
  PV Name               /dev/sda2
  PV UUID               86HkpN-xxxx-xxxx-xxxx-xxxx-xxxx-Z6DNv4
  PV Status             allocatable
  Total PE / Free PE    15103 / 0                           ### 沒有 Free PE 了
# kubeadm init \
    --control-plane-endpoint=192.168.1.100 \
    --apiserver-advertise-address=192.168.1.100 \
    --node-name k8s-ctrl \
    --apiserver-bind-port=6443 \
    --pod-network-cidr=10.244.0.0/16 \
    --cri-socket unix:///var/run/cri-dockerd.sock

[[init] Using Kubernetes version: v1.28.2
[preflight] Running pre-flight checks
        [WARNING Firewalld]: firewalld is active, please ensure ports [6443 10250] are open or your cluster may not function correctly
        [WARNING Service-Kubelet]: kubelet service is not enabled, please run 'systemctl enable kubelet.service'
[preflight] Pulling images required for setting up a Kubernetes cluster
[preflight] This might take a minute or two, depending on the speed of your internet connection
[preflight] You can also perform this action in beforehand using 'kubeadm config images pull'
W1019 08:18:09.599064    3875 checks.go:835] detected that the sandbox image "registry.k8s.io/pause:3.6" of the container runtime is inconsistent with that used by kubeadm. It is recommended that using "registry.k8s.io/pause:3.9" as the CRI sandbox image.
[certs] Using certificateDir folder "/etc/kubernetes/pki"
[certs] Generating "ca" certificate and key
[certs] Generating "apiserver" certificate and key
[certs] apiserver serving cert is signed for DNS names [kubernetes kubernetes.default kubernetes.default.svc kubernetes.default.svc.cluster.local rk8-ctrl] and IPs [10.96.0.1 192.168.1.100]
[certs] Generating "apiserver-kubelet-client" certificate and key
[certs] Generating "front-proxy-ca" certificate and key
[certs] Generating "front-proxy-client" certificate and key
[certs] Generating "etcd/ca" certificate and key
[certs] Generating "etcd/server" certificate and key
[certs] etcd/server serving cert is signed for DNS names [localhost rk8-ctrl] and IPs [192.168.1.100 127.0.0.1 ::1]
[certs] Generating "etcd/peer" certificate and key
[certs] etcd/peer serving cert is signed for DNS names [localhost rk8-ctrl] and IPs [192.168.1.100 127.0.0.1 ::1]
[certs] Generating "etcd/healthcheck-client" certificate and key
[certs] Generating "apiserver-etcd-client" certificate and key
[certs] Generating "sa" key and public key
[kubeconfig] Using kubeconfig folder "/etc/kubernetes"
[kubeconfig] Writing "admin.conf" kubeconfig file
[kubeconfig] Writing "kubelet.conf" kubeconfig file
[kubeconfig] Writing "controller-manager.conf" kubeconfig file
[kubeconfig] Writing "scheduler.conf" kubeconfig file
[etcd] Creating static Pod manifest for local etcd in "/etc/kubernetes/manifests"
[control-plane] Using manifest folder "/etc/kubernetes/manifests"
[control-plane] Creating static Pod manifest for "kube-apiserver"
[control-plane] Creating static Pod manifest for "kube-controller-manager"
[control-plane] Creating static Pod manifest for "kube-scheduler"
[kubelet-start] Writing kubelet environment file with flags to file "/var/lib/kubelet/kubeadm-flags.env"
[kubelet-start] Writing kubelet configuration to file "/var/lib/kubelet/config.yaml"
[kubelet-start] Starting the kubelet
[wait-control-plane] Waiting for the kubelet to boot up the control plane as static Pods from directory "/etc/kubernetes/manifests". This can take up to 4m0s
[apiclient] All control plane components are healthy after 6.504831 seconds
[upload-config] Storing the configuration used in ConfigMap "kubeadm-config" in the "kube-system" Namespace
[kubelet] Creating a ConfigMap "kubelet-config" in namespace kube-system with the configuration for the kubelets in the cluster
[upload-certs] Skipping phase. Please see --upload-certs
[mark-control-plane] Marking the node rk8-ctrl as control-plane by adding the labels: [node-role.kubernetes.io/control-plane node.kubernetes.io/exclude-from-external-load-balancers]
[mark-control-plane] Marking the node rk8-ctrl as control-plane by adding the taints [node-role.kubernetes.io/control-plane:NoSchedule]
[bootstrap-token] Using token: ktwf96.9mhdqldhpu3ema54
[bootstrap-token] Configuring bootstrap tokens, cluster-info ConfigMap, RBAC Roles
[bootstrap-token] Configured RBAC rules to allow Node Bootstrap tokens to get nodes
[bootstrap-token] Configured RBAC rules to allow Node Bootstrap tokens to post CSRs in order for nodes to get long term certificate credentials
[bootstrap-token] Configured RBAC rules to allow the csrapprover controller automatically approve CSRs from a Node Bootstrap Token
[bootstrap-token] Configured RBAC rules to allow certificate rotation for all node client certificates in the cluster
[bootstrap-token] Creating the "cluster-info" ConfigMap in the "kube-public" namespace
[kubelet-finalize] Updating "/etc/kubernetes/kubelet.conf" to point to a rotatable kubelet client certificate and key
[addons] Applied essential addon: CoreDNS
[addons] Applied essential addon: kube-proxy

Your Kubernetes control-plane has initialized successfully!

To start using your cluster, you need to run the following as a regular user:

  mkdir -p $HOME/.kube
  sudo cp -i /etc/kubernetes/admin.conf $HOME/.kube/config
  sudo chown $(id -u):$(id -g) $HOME/.kube/config

Alternatively, if you are the root user, you can run:

  export KUBECONFIG=/etc/kubernetes/admin.conf

You should now deploy a pod network to the cluster.
Run "kubectl apply -f [podnetwork].yaml" with one of the options listed at:
  https://kubernetes.io/docs/concepts/cluster-administration/addons/

You can now join any number of control-plane nodes by copying certificate authorities
and service account keys on each node and then running the following as root:

  kubeadm join 192.168.1.100:6443 --token cxxxxs.c4xxxxxxxxxxxxd0 \
        --discovery-token-ca-cert-hash sha256:103d7xxxxxxxxxxxxxxxxxxxxxxxxxxxxxxxxxxxxxxxxxxxxxxxxxxxxxx5b1b6 \
        --control-plane

Then you can join any number of worker nodes by running the following on each as root:

kubeadm join 192.168.1.100:6443 --token cxxxxs.c4xxxxxxxxxxxxd0 \
        --discovery-token-ca-cert-hash sha256:103d7xxxxxxxxxxxxxxxxxxxxxxxxxxxxxxxxxxxxxxxxxxxxxxxxxxxxxx5b1b6
開立防火牆 (TCP 6443, TCP 10250)
你會注意到這次有一些警告需要處理
警告訊息: firewalld 有啟動,請記得開 6443, 10250 連接埠 (port)
[WARNING Firewalld]: firewalld is active, please ensure ports [6443 10250] are open or your cluster may not function correctly
$ kubeadm join 192.168.1.100:6443
    --token cxxxxs.c4xxxxxxxxxxxxd0 \
    --discovery-token-ca-cert-hash sha256:103d7xxxxxxxxxxxxxxxxxxxxxxxxxxxxxxxxxxxxxxxxxxxxxxxxxxxxxx5b1b6 \
    --cri-socket unix:///var/run/cri-dockerd.sock

[preflight] Running pre-flight checks
[preflight] Reading configuration from the cluster...
[preflight] FYI: You can look at this config file with 'kubectl -n kube-system get cm kubeadm-config -o yaml'
[kubelet-start] Writing kubelet configuration to file "/var/lib/kubelet/config.yaml"
[kubelet-start] Writing kubelet environment file with flags to file "/var/lib/kubelet/kubeadm-flags.env"
[kubelet-start] Starting the kubelet
[kubelet-start] Waiting for the kubelet to perform the TLS Bootstrap...

This node has joined the cluster:
* Certificate signing request was sent to apiserver and a response was received.
* The Kubelet was informed of the new secure connection details.

Run 'kubectl get nodes' on the control-plane to see this node join the cluster.
這樣就加入叢集了
Troubleshoting
若你看到
[preflight] Running pre-flight checks
然後卡住的話,可以加上 -v=5 得到更 verbose 的內容
$ kubeadm join 192.168.1.100:6443
    --token cxxxxs.c4xxxxxxxxxxxxd0 \
    --discovery-token-ca-cert-hash sha256:103d7xxxxxxxxxxxxxxxxxxxxxxxxxxxxxxxxxxxxxxxxxxxxxxxxxxxxxx5b1b6 \
    --cri-socket unix:///var/run/cri-dockerd.sock -v=5

I1019 08:29:40.569229    2362 join.go:412] [preflight] found NodeName empty; using OS hostname as NodeName
[preflight] Running pre-flight checks
I1019 08:29:40.569740    2362 preflight.go:93] [preflight] Running general checks
I1019 08:29:40.569938    2362 checks.go:280] validating the existence of file /etc/kubernetes/kubelet.conf
I1019 08:29:40.570190    2362 checks.go:280] validating the existence of file /etc/kubernetes/bootstrap-kubelet.conf
I1019 08:29:40.570330    2362 checks.go:104] validating the container runtime
I1019 08:29:40.628420    2362 checks.go:639] validating whether swap is enabled or not
I1019 08:29:40.628538    2362 checks.go:370] validating the presence of executable crictl
I1019 08:29:40.628603    2362 checks.go:370] validating the presence of executable conntrack
I1019 08:29:40.628770    2362 checks.go:370] validating the presence of executable ip
I1019 08:29:40.628809    2362 checks.go:370] validating the presence of executable iptables
I1019 08:29:40.628865    2362 checks.go:370] validating the presence of executable mount
I1019 08:29:40.628925    2362 checks.go:370] validating the presence of executable nsenter
I1019 08:29:40.628980    2362 checks.go:370] validating the presence of executable ebtables
I1019 08:29:40.629025    2362 checks.go:370] validating the presence of executable ethtool
I1019 08:29:40.629060    2362 checks.go:370] validating the presence of executable socat
I1019 08:29:40.629099    2362 checks.go:370] validating the presence of executable tc
I1019 08:29:40.629150    2362 checks.go:370] validating the presence of executable touch
I1019 08:29:40.629212    2362 checks.go:516] running all checks
I1019 08:29:40.639498    2362 checks.go:401] checking whether the given node name is valid and reachable using net.LookupHost
I1019 08:29:40.639703    2362 checks.go:605] validating kubelet version
I1019 08:29:40.704380    2362 checks.go:130] validating if the "kubelet" service is enabled and active
I1019 08:29:40.721619    2362 checks.go:203] validating availability of port 10250
I1019 08:29:40.722091    2362 checks.go:280] validating the existence of file /etc/kubernetes/pki/ca.crt
I1019 08:29:40.722136    2362 checks.go:430] validating if the connectivity type is via proxy or direct
I1019 08:29:40.722196    2362 checks.go:329] validating the contents of file /proc/sys/net/bridge/bridge-nf-call-iptables
I1019 08:29:40.722316    2362 checks.go:329] validating the contents of file /proc/sys/net/ipv4/ip_forward
I1019 08:29:40.722358    2362 join.go:529] [preflight] Discovering cluster-info
I1019 08:29:40.722412    2362 token.go:80] [discovery] Created cluster-info discovery client, requesting info from "192.168.1.100:6443"
I1019 08:29:40.723841    2362 token.go:217] [discovery] Failed to request cluster-info, will try again: Get "https://192.168.1.100:6443/api/v1/namespaces/kube-public/configmaps/cluster-info?timeout=10s": dial tcp 192.168.1.100:6443: connect: no route to host
你會看到類似問題字眼
[discovery] Failed to request cluster-info, will try again: Get "https://192.168.1.100:6443/api/v1/namespaces/kube-public/configmaps/cluster-info?timeout=10s": dial tcp 192.168.1.100:6443: connect: no route to host
$ kubeadm reset -f --cri-socket unix:///var/run/cri-dockerd.sock

[preflight] Running pre-flight checks
W1019 08:24:38.813576    2256 removeetcdmember.go:106] [reset] No kubeadm config, using etcd pod spec to get data directory
[reset] Deleted contents of the etcd data directory: /var/lib/etcd
[reset] Stopping the kubelet service
[reset] Unmounting mounted directories in "/var/lib/kubelet"
[reset] Deleting contents of directories: [/etc/kubernetes/manifests /var/lib/kubelet /etc/kubernetes/pki]
[reset] Deleting files: [/etc/kubernetes/admin.conf /etc/kubernetes/kubelet.conf /etc/kubernetes/bootstrap-kubelet.conf /etc/kubernetes/controller-manager.conf /etc/kubernetes/scheduler.conf]

The reset process does not clean CNI configuration. To do so, you must remove /etc/cni/net.d

The reset process does not reset or clean up iptables rules or IPVS tables.
If you wish to reset iptables, you must do so manually by using the "iptables" command.

If your cluster was setup to utilize IPVS, run ipvsadm --clear (or similar)
to reset your system's IPVS tables.

The reset process does not clean your kubeconfig files and you must remove them manually.
Please, check the contents of the $HOME/.kube/config file.
kube-system (K8s 核心元件) 的 kube-controller-manager 的 Pod 為 Running
kube-system (K8s 核心元件) 的 kube-apiserver 的 Pod 為 Running
kube-system (K8s 核心元件) 的 kube-scheduler 的 Pod 為 Running
kube-system (K8s 核心元件) 的若干個 kube-proxy 的 Pod 為 Running
當然,放在 kube-system 裡面的 Pod 屬於系統保留的,請勿更動修改。
取得所有 nodes (主機節點)
你可以用 kubectl get nodes -A 指令來取得所有運作的 nodes
$ kubectl get nodes -A

NAME        STATUS   ROLES           AGE     VERSION
k8s-ctrl    Ready    control-plane   4m40s   v1.28.2
k8s-node1   Ready    <none>          3m59s   v1.28.2
k8s-node2   Ready    <none>          3m53s   v1.28.2
你應該要看到你的叢集,三台都是 Ready 的
Trobleshoting
若你可能看到這樣的錯誤
# kubectl get node -A

E1019 08:31:28.269393    5101 memcache.go:265] couldn't get current server API group list: Get "http://localhost:8080/api?timeout=32s": dial tcp [::1]:8080: connect: connection refused
E1019 08:31:28.270061    5101 memcache.go:265] couldn't get current server API group list: Get "http://localhost:8080/api?timeout=32s": dial tcp [::1]:8080: connect: connection refused
E1019 08:31:28.271897    5101 memcache.go:265] couldn't get current server API group list: Get "http://localhost:8080/api?timeout=32s": dial tcp [::1]:8080: connect: connection refused
E1019 08:31:28.272478    5101 memcache.go:265] couldn't get current server API group list: Get "http://localhost:8080/api?timeout=32s": dial tcp [::1]:8080: connect: connection refused
E1019 08:31:28.273617    5101 memcache.go:265] couldn't get current server API group list: Get "http://localhost:8080/api?timeout=32s": dial tcp [::1]:8080: connect: connection refused
The connection to the server localhost:8080 was refused - did you specify the right host or port?
有可能是
真的連不上,檢查防火牆 control panel 有沒有開
沒有設定好 kubectl 連線 config
kubelet 沒有正確啟動
可以用以下指令查看每台 kubelet 的細節 log
journalctl -f -u kubelet
最後貼一下所有看得到的 images
control panel
# docker image ls
REPOSITORY                                TAG       IMAGE ID       CREATED         SIZE
flannel/flannel                           v0.22.3   e23f7ca36333   4 weeks ago     70.2MB
registry.k8s.io/kube-apiserver            v1.28.2   cdcab12b2dd1   5 weeks ago     126MB
registry.k8s.io/kube-controller-manager   v1.28.2   55f13c92defb   5 weeks ago     122MB
registry.k8s.io/kube-proxy                v1.28.2   c120fed2beb8   5 weeks ago     73.1MB
registry.k8s.io/kube-scheduler            v1.28.2   7a5d9d67a13f   5 weeks ago     60.1MB
flannel/flannel-cni-plugin                v1.2.0    a55d1bad692b   2 months ago    8.04MB
registry.k8s.io/etcd                      3.5.9-0   73deb9a3f702   5 months ago    294MB
registry.k8s.io/coredns/coredns           v1.10.1   ead0a4a53df8   8 months ago    53.6MB
registry.k8s.io/pause                     3.9       e6f181688397   12 months ago   744kB
registry.k8s.io/pause                     3.6       6270bb605e12   2 years ago     683kB
worker node
# docker image ls
REPOSITORY                   TAG       IMAGE ID       CREATED        SIZE
flannel/flannel              v0.22.3   e23f7ca36333   4 weeks ago    70.2MB
registry.k8s.io/kube-proxy   v1.28.2   c120fed2beb8   5 weeks ago    73.1MB
flannel/flannel-cni-plugin   v1.2.0    a55d1bad692b   2 months ago   8.04MB
registry.k8s.io/pause        3.6       6270bb605e12   2 years ago    683kB
在 Kubernetes (K8s) 的微服務架構中,了解 Pod 之間的連線細節是至關重要的一環。透過這篇文章的例子,深度探討 Kubernetes 的工作原理,讓讀者不僅理解 Pod 與 Service 之間的基本關聯,還能掌握其背後的機制與細節。我們將從 Pod 的概念和建立開始,進一步講解 Service 的角色和功能,並討論如何實現兩者間的連線。希望通過這篇文章,讀者能夠更具信心地運用 Kubernetes,無論是管理現有的微服務,還是設計新的應用架構。我們將嘗試將這些概念以最簡潔明了的方式呈現,使初學者和專業人士都能從中獲益。本文章帶你深入淺出,一窺 Kubernetes 的核心,理解與掌握 Pod 連線的關鍵知識。