在 Linux 系統中,監控磁碟空間是系統管理員的日常任務之一。
當面臨需要增加磁碟空間的情況時,Linux 的 LVM(Logical Volume Manager)磁碟機制可能會讓初學者感到困惑。
但實際上,LVM 是一個強大的工具,它允許我們在不影響現有資料的情況下靈活地調整磁碟分區。
透過 LVM,我們可以動態地擴展或縮小邏輯卷的大小,輕鬆應對磁碟空間需求的變化。
本教學將詳細介紹如何使用 LVM 擴增 Linux 系統中的磁區,幫助您更有效地管理系統資源。
磁區擴增指令快速指南
以下提供相關磁區擴增指令,
磁碟有磁區,
LVM 磁區裡面有 PV 跟 LV,最後才是磁區,四者皆要配合才會擴增容量
查看磁碟用量
# df -h | less查看 VG LV 的容量
# vgdisplay -v雖然還有 vgdisplay 跟 lvdisplay 指令可以用,只是記一個指令比較方便
重新調整磁碟磁區,調整 LVM 那個 (注意磁區的數字)
# parted
(parted) print
(parted) resizepart 2 100%
(parted) quit
擴增 PV
# pvresize /dev/sda2擴增 LV
# lvextend -l +100%FREE /dev/rhel/root擴增磁區
# xfs_growfs /dev/rhel/root實際情境題
假設我們有一台 RHEL Linux 或者 Rocky Linux 系統,硬碟當初容量寫 20GB
如今想要擴增成為 60GB,我們該如何操作?
請看以下步驟
Step1. 查看硬碟容量
首先先用 df -h 查看容量
# df -h你會看到類似這樣的結果
# df -h
Filesystem             Size  Used Avail Use% Mounted on
devtmpfs               3.8G     0  3.8G   0% /dev
tmpfs                  3.9G     0  3.9G   0% /dev/shm
tmpfs                  3.9G  362M  3.5G  10% /run
tmpfs                  3.9G     0  3.9G   0% /sys/fs/cgroup
/dev/mapper/rhel-root   17G   14G  3.7G  79% /                ### 真的只有 17G
/dev/sda1             1014M  150M  865M  15% /boot
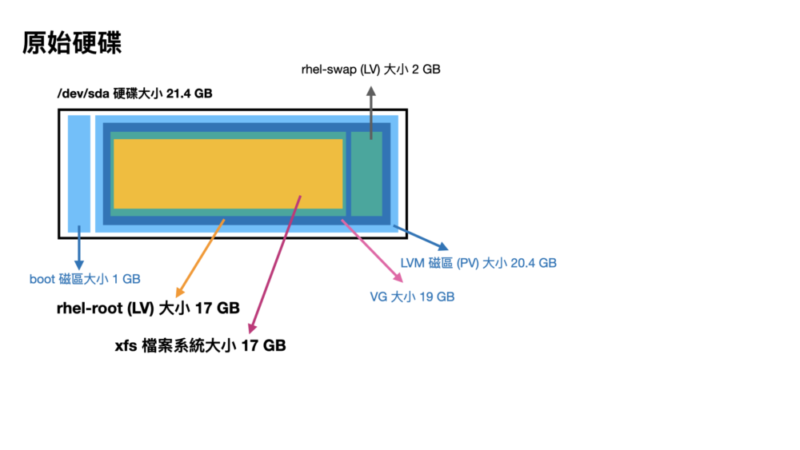
你可以看到 /dev/mapper/rhel-root 只有 17GB,而且可用容量只有 3.7GB,硬碟快滿了
用 vgdisplay -v 查看 LVM 的 Volume group (VG) 與 Logical volume (LV) 的狀態
# vgdisplay -v
  --- Volume group ---
  VG Name               rhel
  System ID
  Format                lvm2
  Metadata Areas        1
  Metadata Sequence No  3
  VG Access             read/write
  VG Status             resizable
  MAX LV                0
  Cur LV                2
  Open LV               2
  Max PV                0
  Cur PV                1
  Act PV                1
  VG Size               <19.00 GiB                         ### VG 容量只有 19GB
  PE Size               4.00 MiB
  Total PE              4863
  Alloc PE / Size       4863 / <19.00 GiB
  Free  PE / Size       0 / 0
  VG UUID               edb3Hx-xxxx-xxxx-xxxx-xxxx-xxxx-iiOyAf

  --- Logical volume ---
  LV Path                /dev/rhel/swap
  LV Name                swap
  VG Name                rhel
  LV UUID                ocf2IU-xxxx-xxxx-xxxx-xxxx-xxxx-BoYp70
  LV Write Access        read/write
  LV Creation host, time uatgit, 2023-08-21 18:06:42 +0800
  LV Status              available
  # open                 2
  LV Size                2.00 GiB
  Current LE             512
  Segments               1
  Allocation             inherit
  Read ahead sectors     auto
  - currently set to     8192
  Block device           253:1

  --- Logical volume ---
  LV Path                /dev/rhel/root
  LV Name                root
  VG Name                rhel
  LV UUID                5mZgRT-xxxx-xxxx-xxxx-xxxx-xxxx-0KHlI7
  LV Write Access        read/write
  LV Creation host, time uatgit, 2023-08-21 18:06:42 +0800
  LV Status              available
  # open                 1
  LV Size                <17.00 GiB                        ### LV 容量只有 17GB,前面有 2GB 是 Swap
  Current LE             4351
  Segments               1
  Allocation             inherit
  Read ahead sectors     auto
  - currently set to     8192
  Block device           253:0

  --- Physical volumes ---
  PV Name               /dev/sda2
  PV UUID               86HkpN-xxxx-xxxx-xxxx-xxxx-xxxx-Z6DNv4
  PV Status             allocatable
  Total PE / Free PE    4863 / 0
這邊列出一個示意圖:
Step2. 調整虛擬機(VM)硬碟大小
在 VMWare ESXi 或者 Promox VE 設定虛擬機(VM)硬碟大小(20GB -> 60GB)
虛擬機(VM) 重開機後我們觀察一下
這裡很重要,再次提醒
VM一定要重開機
VM一定要重開機
VM一定要重開機
很重要講三次,
因為硬碟大小是在開機時讀取的,不重開機是看不到變化的
用 fdisk -l 查看硬碟大小
# fdisk -l

Disk /dev/sda: 64.4 GB, 64424509440 bytes, 125829120 sectors                ### 可以看到硬碟大小變成 64.4GB 了
Units = sectors of 1 * 512 = 512 bytes
Sector size (logical/physical): 512 bytes / 512 bytes
I/O size (minimum/optimal): 512 bytes / 512 bytes
Disk label type: dos
Disk identifier: 0x000ca3fa

   Device Boot      Start         End      Blocks   Id  System
/dev/sda1   *        2048     2099199     1048576   83  Linux
/dev/sda2         2099200    41943039    19921920   8e  Linux LVM

Disk /dev/mapper/rhel-root: 18.2 GB, 18249416704 bytes, 35643392 sectors    ### 但掛載 root 的硬碟還是 18.2GB
Units = sectors of 1 * 512 = 512 bytes
Sector size (logical/physical): 512 bytes / 512 bytes
I/O size (minimum/optimal): 512 bytes / 512 bytes

Disk /dev/mapper/rhel-swap: 2147 MB, 2147483648 bytes, 4194304 sectors
Units = sectors of 1 * 512 = 512 bytes
Sector size (logical/physical): 512 bytes / 512 bytes
I/O size (minimum/optimal): 512 bytes / 512 bytes
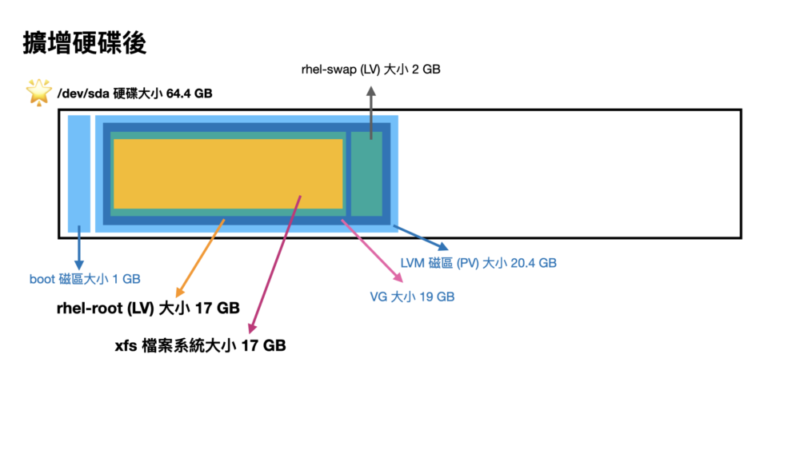
你會看到硬碟總容量大小變成 64.4GB 了
但是掛載的 /dev/mapper/rhel-root 還是 18.2GB,容量沒變
LVM 資訊也看一下
# vgdisplay -v
  --- Volume group ---
  VG Name               rhel
  System ID
  Format                lvm2
  Metadata Areas        1
  Metadata Sequence No  3
  VG Access             read/write
  VG Status             resizable
  MAX LV                0
  Cur LV                2
  Open LV               2
  Max PV                0
  Cur PV                1
  Act PV                1
  VG Size               <19.00 GiB                         ### VG 容量還是沒變,只有 19GB
  PE Size               4.00 MiB
  Total PE              4863
  Alloc PE / Size       4863 / <19.00 GiB
  Free  PE / Size       0 / 0
  VG UUID               edb3Hx-xxxx-xxxx-xxxx-xxxx-xxxx-iiOyAf

  --- Logical volume ---
  LV Path                /dev/rhel/swap
  LV Name                swap
  VG Name                rhel
  LV UUID                ocf2IU-xxxx-xxxx-xxxx-xxxx-xxxx-BoYp70
  LV Write Access        read/write
  LV Creation host, time uatgit, 2023-08-21 18:06:42 +0800
  LV Status              available
  # open                 2
  LV Size                2.00 GiB
  Current LE             512
  Segments               1
  Allocation             inherit
  Read ahead sectors     auto
  - currently set to     8192
  Block device           253:1

  --- Logical volume ---
  LV Path                /dev/rhel/root
  LV Name                root
  VG Name                rhel
  LV UUID                5mZgRT-xxxx-xxxx-xxxx-xxxx-xxxx-0KHlI7
  LV Write Access        read/write
  LV Creation host, time uatgit, 2023-08-21 18:06:42 +0800
  LV Status              available
  # open                 1
  LV Size                <17.00 GiB                         ### LV 容量也沒變,只有 17GB
  Current LE             4351
  Segments               1
  Allocation             inherit
  Read ahead sectors     auto
  - currently set to     8192
  Block device           253:0

  --- Physical volumes ---
  PV Name               /dev/sda2
  PV UUID               86HkpN-xxxx-xxxx-xxxx-xxxx-xxxx-Z6DNv4
  PV Status             allocatable
  Total PE / Free PE    4863 / 0
你也會發現 df -h 還是沒變
# df -h
Filesystem             Size  Used Avail Use% Mounted on
devtmpfs               3.8G     0  3.8G   0% /dev
tmpfs                  3.9G     0  3.9G   0% /dev/shm
tmpfs                  3.9G   12M  3.8G   1% /run
tmpfs                  3.9G     0  3.9G   0% /sys/fs/cgroup
/dev/mapper/rhel-root   17G   15G  2.5G  86% /                              ### 掛載 root 的磁區還是 17GB
/dev/sda1             1014M  150M  865M  15% /boot
你會發現
- 磁碟容量變大了
- LVM 的 VG 沒變大
- LVM 的 LV 也沒變大
- 檔案系統也沒變大
示意圖:
所以接下來我們要來做一些步驟來擴增硬碟容量
Step3. 擴增分割區
使用 parted 指令進入 gparted 互動式介面,將其調整變大
# parted
GNU Parted 3.1
Using /dev/sda
Welcome to GNU Parted! Type 'help' to view a list of commands.
(parted)
你可以在 parted 裡面輸入需要的指令,打 quit 離開互動式介面
先打 print 印出磁區列表,
(parted) print
Model: VMware Virtual disk (scsi)
Disk /dev/sda: 64.4GB                                        ### 可以看到硬碟大小變成 64.4GB 了
Sector size (logical/physical): 512B/512B
Partition Table: msdos
Disk Flags:

Number  Start   End     Size    Type     File system  Flags
 1      1049kB  1075MB  1074MB  primary  xfs          boot
 2      1075MB  21.5GB  20.4GB  primary               lvm    ### 但 LVM 磁區只有 20.4GB
使用 resizepart 指令調整分割區大小
(parted) resizepart 2 100%記得這個 2 要換成對應的數字
再印一次看看
(parted) print
Model: VMware Virtual disk (scsi)
Disk /dev/sda: 64.4GB
Sector size (logical/physical): 512B/512B
Partition Table: msdos
Disk Flags:

Number  Start   End     Size    Type     File system  Flags
 1      1049kB  1075MB  1074MB  primary  xfs          boot
 2      1075MB  64.4GB  63.3GB  primary               lvm    ### LVM 磁區擴增變成新的大小 63.3GB
打 quit 離開互動式介面
(parted) quit
Information: You may need to update /etc/fstab.
LVM 資訊看一下
# vgdisplay -v
  --- Volume group ---
  VG Name               rhel
  System ID
  Format                lvm2
  Metadata Areas        1
  Metadata Sequence No  3
  VG Access             read/write
  VG Status             resizable
  MAX LV                0
  Cur LV                2
  Open LV               2
  Max PV                0
  Cur PV                1
  Act PV                1
  VG Size               <19.00 GiB                         ### VG 容量還是沒變,只有 19GB
  PE Size               4.00 MiB
  Total PE              4863
  Alloc PE / Size       4863 / <19.00 GiB
  Free  PE / Size       0 / 0
  VG UUID               edb3Hx-xxxx-xxxx-xxxx-xxxx-xxxx-iiOyAf

  --- Logical volume ---
  LV Path                /dev/rhel/swap
  LV Name                swap
  VG Name                rhel
  LV UUID                ocf2IU-xxxx-xxxx-xxxx-xxxx-xxxx-BoYp70
  LV Write Access        read/write
  LV Creation host, time uatgit, 2023-08-21 18:06:42 +0800
  LV Status              available
  # open                 2
  LV Size                2.00 GiB
  Current LE             512
  Segments               1
  Allocation             inherit
  Read ahead sectors     auto
  - currently set to     8192
  Block device           253:1

  --- Logical volume ---
  LV Path                /dev/rhel/root
  LV Name                root
  VG Name                rhel
  LV UUID                5mZgRT-xxxx-xxxx-xxxx-xxxx-xxxx-0KHlI7
  LV Write Access        read/write
  LV Creation host, time uatgit, 2023-08-21 18:06:42 +0800
  LV Status              available
  # open                 1
  LV Size                <17.00 GiB                         ### LV 容量也沒變,只有 17GB
  Current LE             4351
  Segments               1
  Allocation             inherit
  Read ahead sectors     auto
  - currently set to     8192
  Block device           253:0

  --- Physical volumes ---
  PV Name               /dev/sda2
  PV UUID               86HkpN-xxxx-xxxx-xxxx-xxxx-xxxx-Z6DNv4
  PV Status             allocatable
  Total PE / Free PE    4863 / 0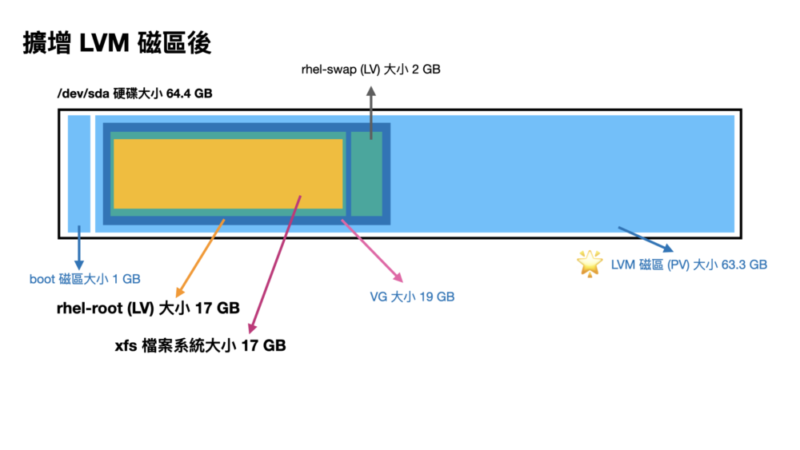
Step4. 擴增 PV
我們用 pvresize 調整 PV 的大小
# pvresize /dev/sda2
  Physical volume "/dev/sda2" changed
  1 physical volume(s) resized or updated / 0 physical volume(s) not resized
再次印一次 LVM 資訊看看
# vgdisplay -v
  --- Volume group ---
  VG Name               rhel
  System ID
  Format                lvm2
  Metadata Areas        1
  Metadata Sequence No  4
  VG Access             read/write
  VG Status             resizable
  MAX LV                0
  Cur LV                2
  Open LV               2
  Max PV                0
  Cur PV                1
  Act PV                1
  VG Size               <59.00 GiB                         ### VG 容量變大了 59GB
  PE Size               4.00 MiB
  Total PE              15103
  Alloc PE / Size       4863 / <19.00 GiB
  Free  PE / Size       10240 / 40.00 GiB                  ### 跑出了一些 PE 大小
  VG UUID               edb3Hx-xxxx-xxxx-xxxx-xxxx-xxxx-iiOyAf

  --- Logical volume ---
  LV Path                /dev/rhel/swap
  LV Name                swap
  VG Name                rhel
  LV UUID                ocf2IU-xxxx-xxxx-xxxx-xxxx-xxxx-BoYp70
  LV Write Access        read/write
  LV Creation host, time uatgit, 2023-08-21 18:06:42 +0800
  LV Status              available
  # open                 2
  LV Size                2.00 GiB
  Current LE             512
  Segments               1
  Allocation             inherit
  Read ahead sectors     auto
  - currently set to     8192
  Block device           253:1

  --- Logical volume ---
  LV Path                /dev/rhel/root
  LV Name                root
  VG Name                rhel
  LV UUID                5mZgRT-xxxx-xxxx-xxxx-xxxx-xxxx-0KHlI7
  LV Write Access        read/write
  LV Creation host, time uatgit, 2023-08-21 18:06:42 +0800
  LV Status              available
  # open                 1
  LV Size                <17.00 GiB                       ### LV 容量沒變,還是 17GB
  Current LE             4351
  Segments               1
  Allocation             inherit
  Read ahead sectors     auto
  - currently set to     8192
  Block device           253:0

  --- Physical volumes ---
  PV Name               /dev/sda2
  PV UUID               86HkpN-xxxx-xxxx-xxxx-xxxx-xxxx-Z6DNv4
  PV Status             allocatable
  Total PE / Free PE    15103 / 10240                  ### 跑出了一些 Free PE 出來(因為我們還沒調整)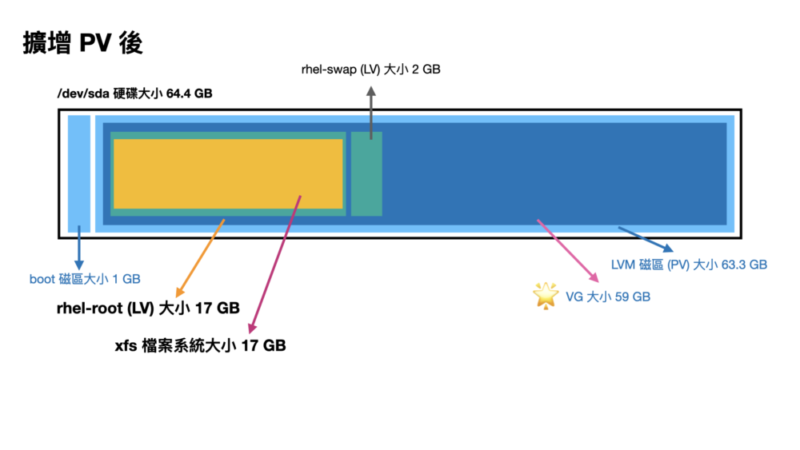
Step5. 擴增 LV
我們使用 lvextend 擴大 LV 大小
# lvextend -l +100%FREE /dev/rhel/root
  Size of logical volume rhel/root changed from <17.00 GiB (4351 extents) to <57.00 GiB (14591 extents).
  Logical volume rhel/root successfully resized.
再次印一次 LVM 資訊看看
# vgdisplay -v
  --- Volume group ---
  VG Name               rhel
  System ID
  Format                lvm2
  Metadata Areas        1
  Metadata Sequence No  5
  VG Access             read/write
  VG Status             resizable
  MAX LV                0
  Cur LV                2
  Open LV               2
  Max PV                0
  Cur PV                1
  Act PV                1
  VG Size               <59.00 GiB                         ### VG 容量沒問題 59GB
  PE Size               4.00 MiB
  Total PE              15103
  Alloc PE / Size       15103 / <59.00 GiB
  Free  PE / Size       0 / 0
  VG UUID               edb3Hx-xxxx-xxxx-xxxx-xxxx-xxxx-iiOyAf

  --- Logical volume ---
  LV Path                /dev/rhel/swap
  LV Name                swap
  VG Name                rhel
  LV UUID                ocf2IU-xxxx-xxxx-xxxx-xxxx-xxxx-BoYp70
  LV Write Access        read/write
  LV Creation host, time uatgit, 2023-08-21 18:06:42 +0800
  LV Status              available
  # open                 2
  LV Size                2.00 GiB
  Current LE             512
  Segments               1
  Allocation             inherit
  Read ahead sectors     auto
  - currently set to     8192
  Block device           253:1

  --- Logical volume ---
  LV Path                /dev/rhel/root
  LV Name                root
  VG Name                rhel
  LV UUID                5mZgRT-xxxx-xxxx-xxxx-xxxx-xxxx-0KHlI7
  LV Write Access        read/write
  LV Creation host, time uatgit, 2023-08-21 18:06:42 +0800
  LV Status              available
  # open                 1
  LV Size                <57.00 GiB                         ### LV 容量變大了 57GB
  Current LE             14591
  Segments               1
  Allocation             inherit
  Read ahead sectors     auto
  - currently set to     8192
  Block device           253:0

  --- Physical volumes ---
  PV Name               /dev/sda2
  PV UUID               86HkpN-xxxx-xxxx-xxxx-xxxx-xxxx-Z6DNv4
  PV Status             allocatable
  Total PE / Free PE    15103 / 0                           ### 沒有 Free PE 了
檔案系統看一下
# df -h
Filesystem             Size  Used Avail Use% Mounted on
devtmpfs               3.8G     0  3.8G   0% /dev
tmpfs                  3.9G     0  3.9G   0% /dev/shm
tmpfs                  3.9G   12M  3.8G   1% /run
tmpfs                  3.9G     0  3.9G   0% /sys/fs/cgroup
/dev/mapper/rhel-root   17G   15G  2.5G  86% /               ### 仍然沒變,還是 17G
/dev/sda1             1014M  150M  865M  15% /boot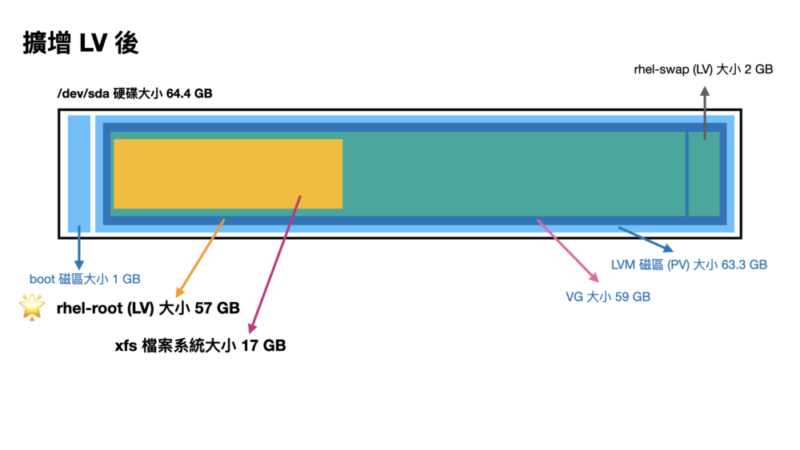
Step6. 擴增檔案系統
使用 xfs_growfs 來做線上容量擴增
(註:不要用 resizefs 指令)
# xfs_growfs /dev/rhel/root
meta-data=/dev/mapper/rhel-root  isize=512    agcount=4, agsize=1113856 blks
         =                       sectsz=512   attr=2, projid32bit=1
         =                       crc=1        finobt=0 spinodes=0
data     =                       bsize=4096   blocks=4455424, imaxpct=25
         =                       sunit=0      swidth=0 blks
naming   =version 2              bsize=4096   ascii-ci=0 ftype=1
log      =internal               bsize=4096   blocks=2560, version=2
         =                       sectsz=512   sunit=0 blks, lazy-count=1
realtime =none                   extsz=4096   blocks=0, rtextents=0
data blocks changed from 4455424 to 14941184
再次查看情況
# df -h
Filesystem             Size  Used Avail Use% Mounted on
devtmpfs               3.8G     0  3.8G   0% /dev
tmpfs                  3.9G     0  3.9G   0% /dev/shm
tmpfs                  3.9G   12M  3.8G   1% /run
tmpfs                  3.9G     0  3.9G   0% /sys/fs/cgroup
/dev/mapper/rhel-root   57G   15G   43G  26% /
/dev/sda1             1014M  150M  865M  15% /boot
應該就能完整看到系統了
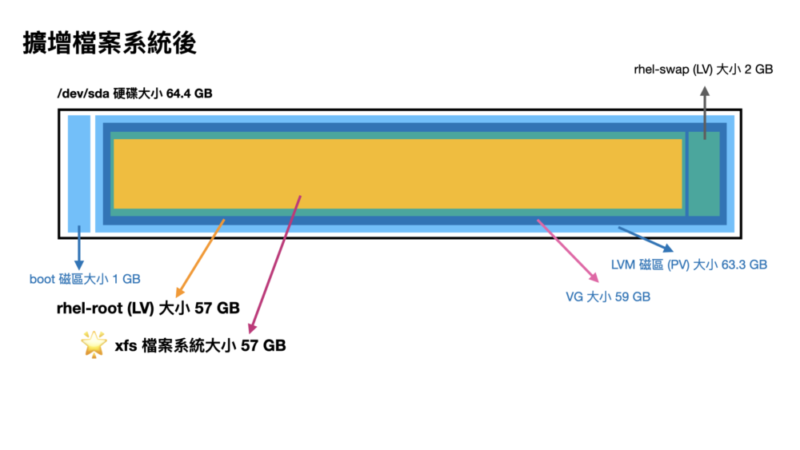
列出示意圖,讓大家容易瞭解
希望這個流程對 LVM 的操作與學習有幫助

