因為工作需要,研究了這塊,
為什麼會需要它?
這邊專注講 Android 平台的 In-app Billing (IAB),
要提到一下 App 內購的流程:
由使用者按下購買鈕,你的 Android 程式呼叫系統購買頁面
使用者在系統購買頁面做扣款事宜
你的 Android 程式收到購買狀態(成功/失敗/使用者取消) 並回傳 purchaseToken
如果購買成功,你的 Android 收到 purchaseToken 之後要 回傳給你的後端伺服器做驗證 並 啟用對應功能給使用者
最後這一步才是關鍵,後端伺服器確認了之後才會開啟對應功能給使用者嘛。
正常流程大致是這樣,但總有一些些例外。
例如:
(訂閱型商品常見)每月時間到了系統自動做扣款動作
使用者是在 GooglePlay 商店按的購買而不是在你 App 裡面按
Google 那邊刷使用者的卡刷失敗了
等等諸如此類,它並不是發生在你的 App 中,所以你的 App 沒辦法知道那時候訂的商品狀態更新了。
怎麼辦呢?
以前的傳統做法:在 你的 App 啟動時 或者 喚醒 的時候,向 Google 再次確認一次有沒有未處理的購買訂單。
如果訂單不同步怎麼辦?請使用者再次開一次 App 吧!訂單就同步了。
如果你只有一個 Android 平台,
總結來說,這個 App 內購伺服器通知就是為了解決訂單不同步的問題,
這個 App 內購伺服器通知叫做 Real-time Developer Notifications (RTDN)。
怎麼做?
在使用這個之前,必須先知道 Google 出的 Pub/Sub 模組。
Pub/Sub 模組
Pub/Sub 模組它是一個類似廣播模組,如果有需要的話,就設定註冊它,你就會收到來自程式的廣播通知。
其中 Subscription 分為 Pull 跟 Push 二種。
Pull : 為一個 Queue (佇列) ,幫你 Queue 住所有的訊息直到你打 API 去拉它, Push : 要指定一個 API endpoint 給它,網址就是填你的伺服器 API 位址,他會用文件定義的 API 格式,主動去呼叫你的伺服器。
官方文件說,一個 app 要獨立一個 Google Cloud project 這點要注意。
操作步驟
等等的步驟大致是,
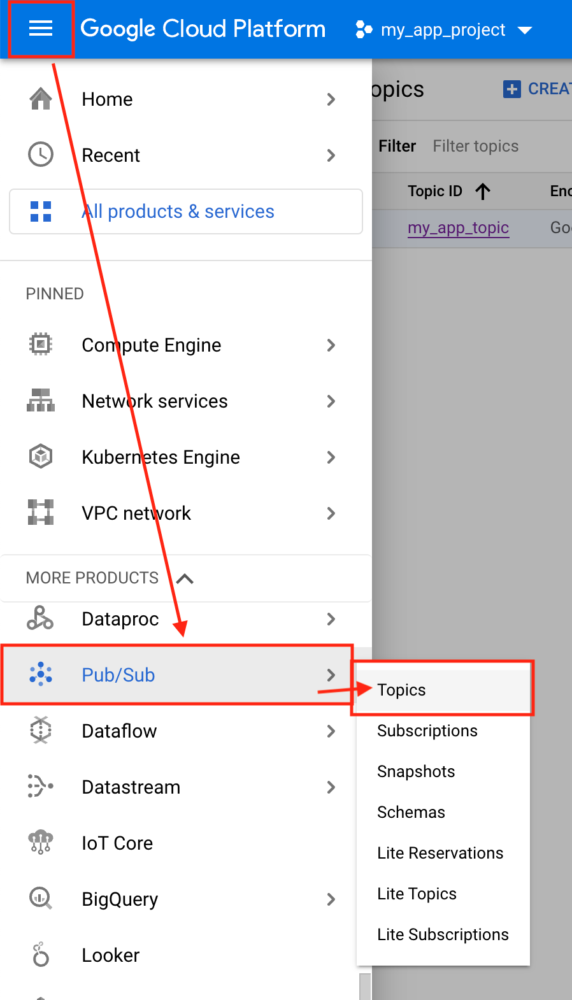
到 Google Cloud Console 新增一個 projectmy_app_project)
Step1. 建立 Topic
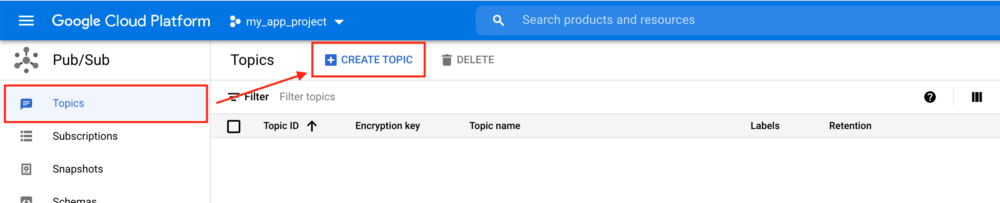
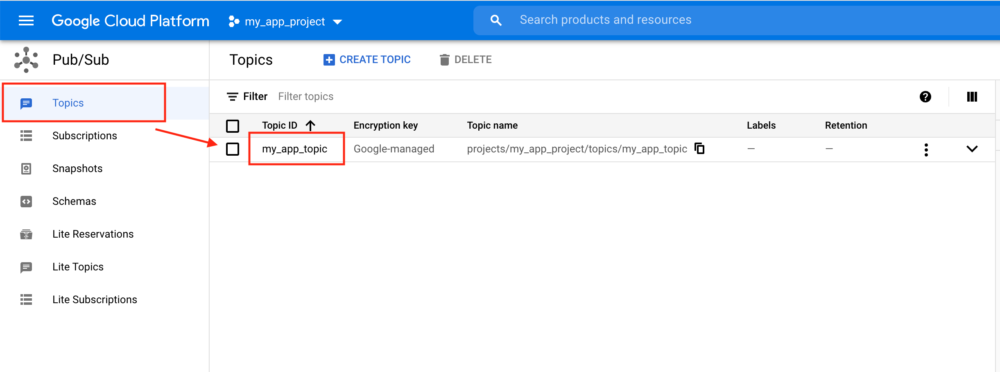
到 BigData > Pub/Sub 的頁籤中:https://console.cloud.google.com/cloudpubsub/topic/list
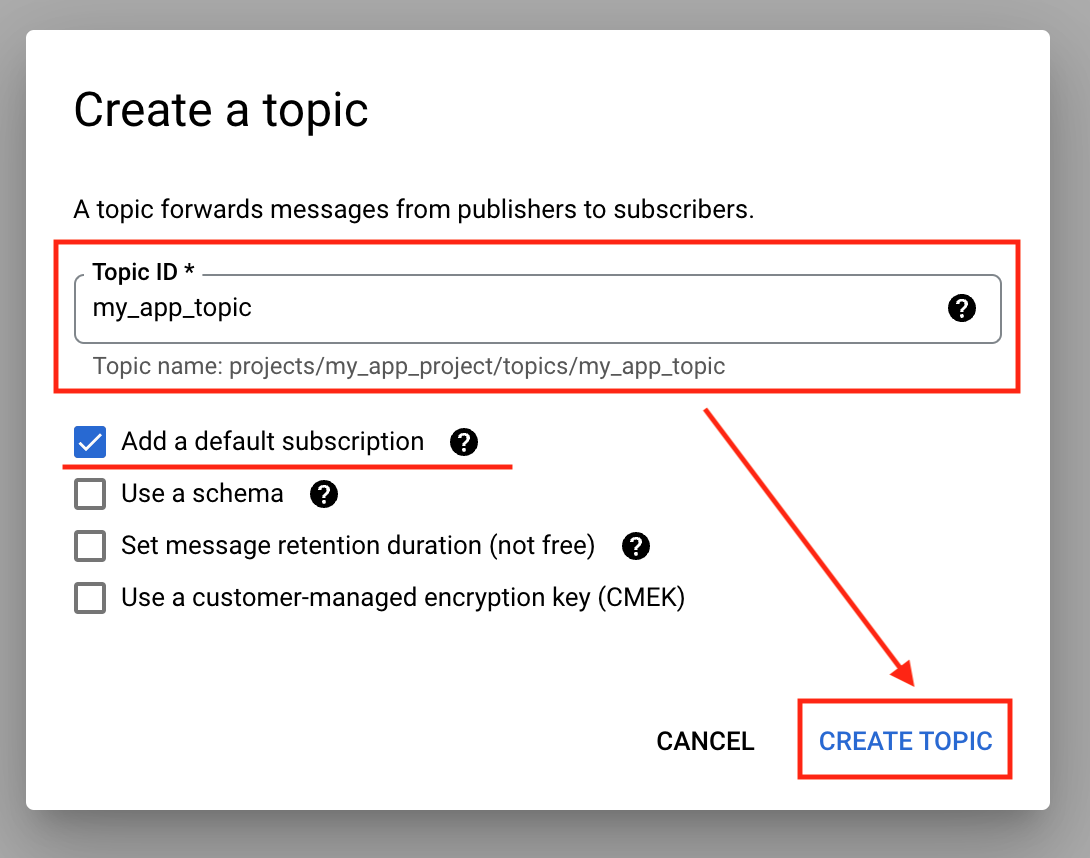
先建立一個 Topic,my_app_topic。
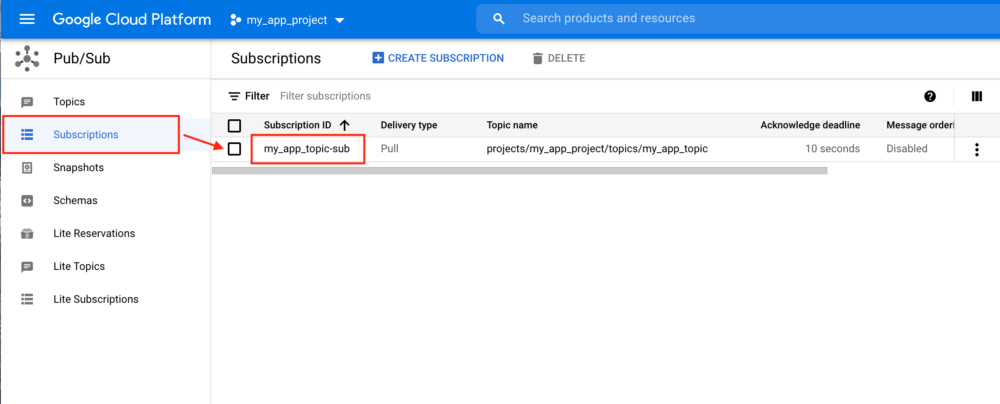
有勾 Add a default subscription 的話,它會自動幫你建立一個 Pull 的 Subscription 叫做 my_app_topic-sub,my_app_topic-sub 的 Pull Subscription 可以先留著,
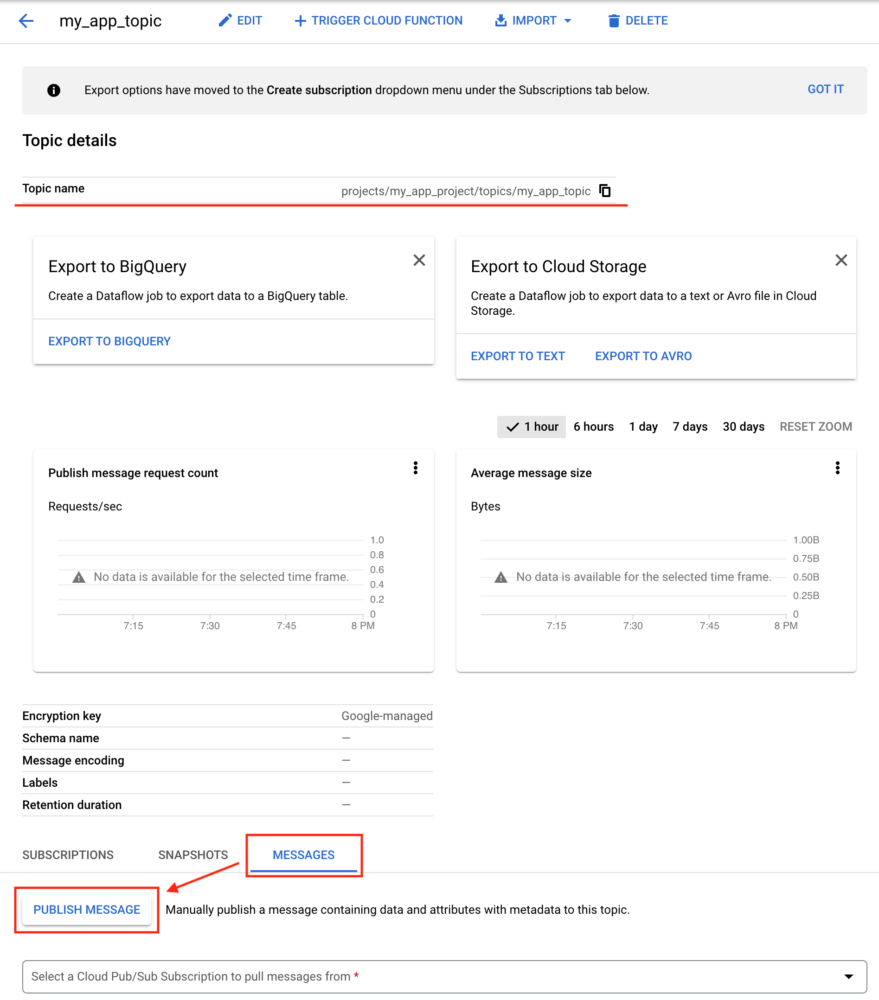
Step2. 測試發送訊息到 Topic
可以先試試看 Topic 發通知跟接收通知的感覺,
點開剛剛建立的 my_app_topic,
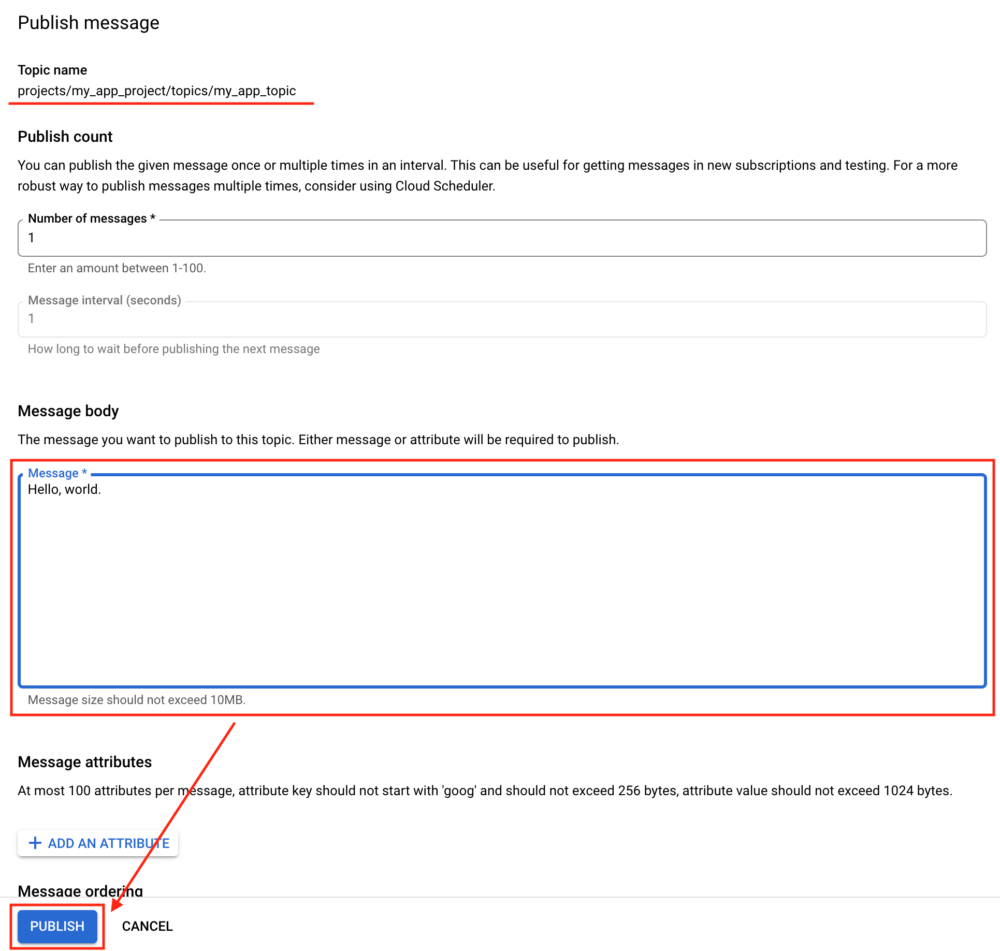
按下後看到發送測試訊息的畫面,可以在 Message body 的地方隨意打點字上去,
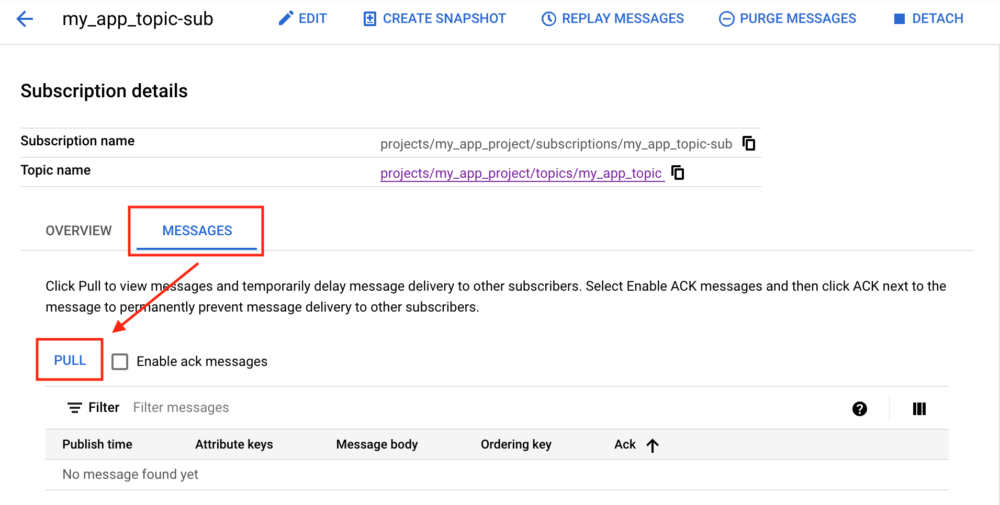
在 Pub/Sub > Subscription 頁籤中,點開自動建立的 my_app_topic-sub,
點開 MESSAGES 頁籤,看到列表是空白是正常的,
按下 PULL 更新通知,剛剛發送的訊息就會出現,如果沒有出現,可能要稍等個 1-2分鐘 再按一次(因為它發送跟接收是非同步的)。
Step3. 通知連接你的 app
這邊就是它文件寫的最奇妙的地方了,
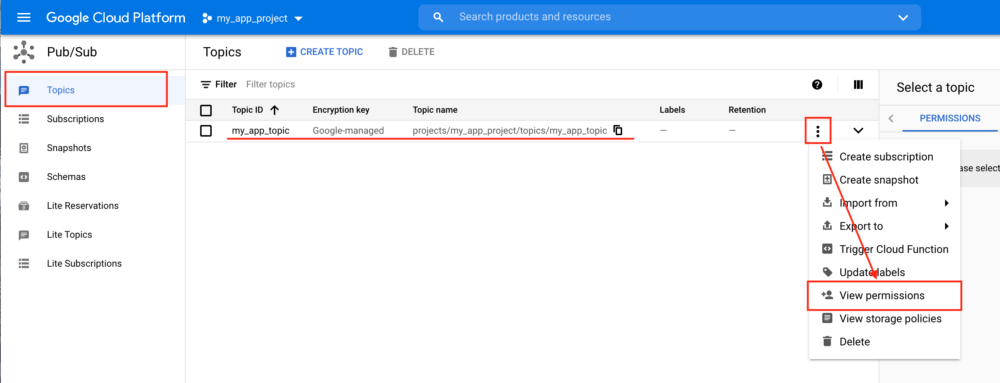
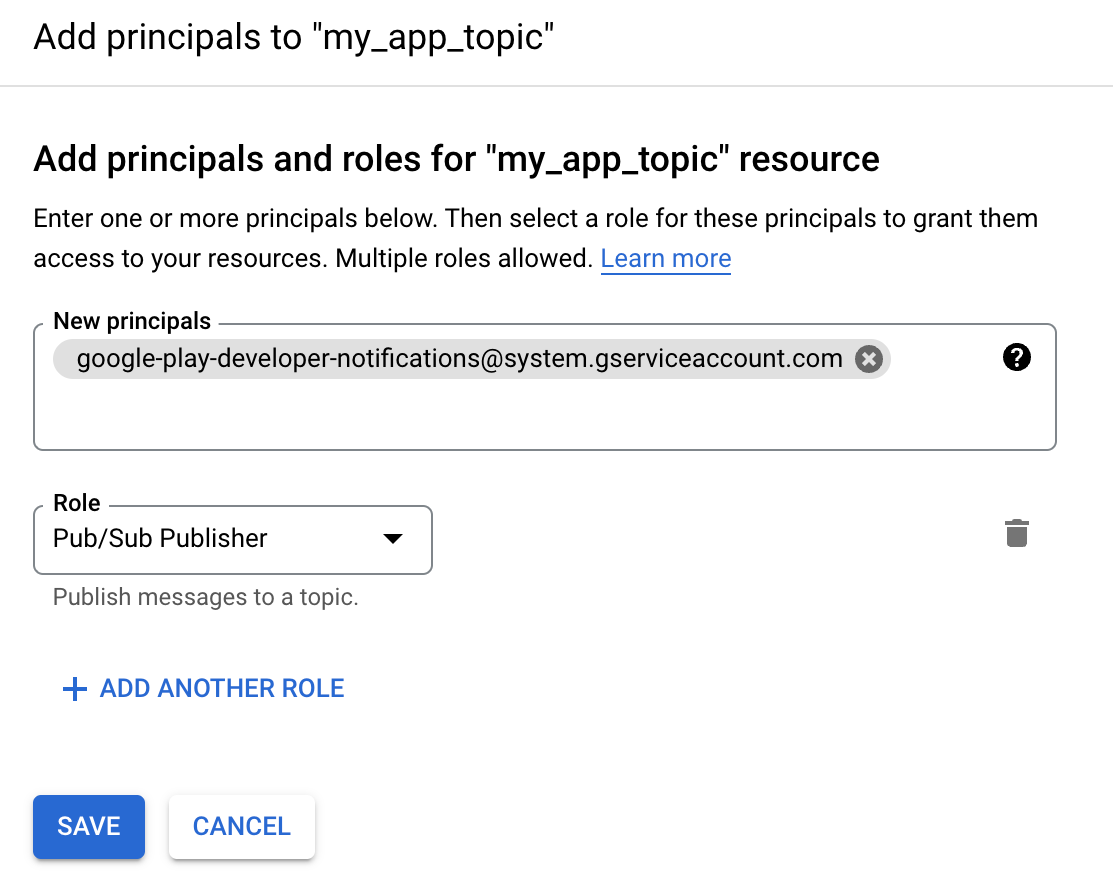
在 Pub/Sub > Topic 的頁籤列表中,按下三顆點點 > View premissions 按鈕,
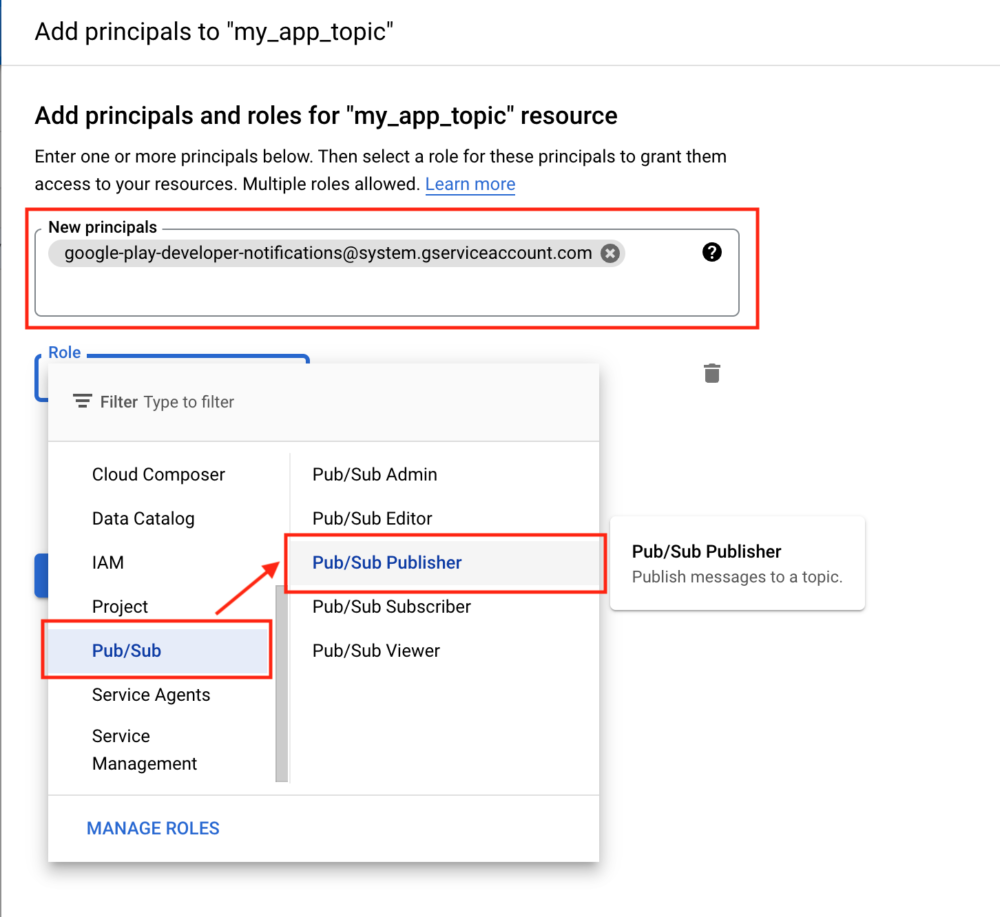
按下 ADD PRINCIPAL 按鈕,
在 New principals 的地方手動輸入 [email protected]
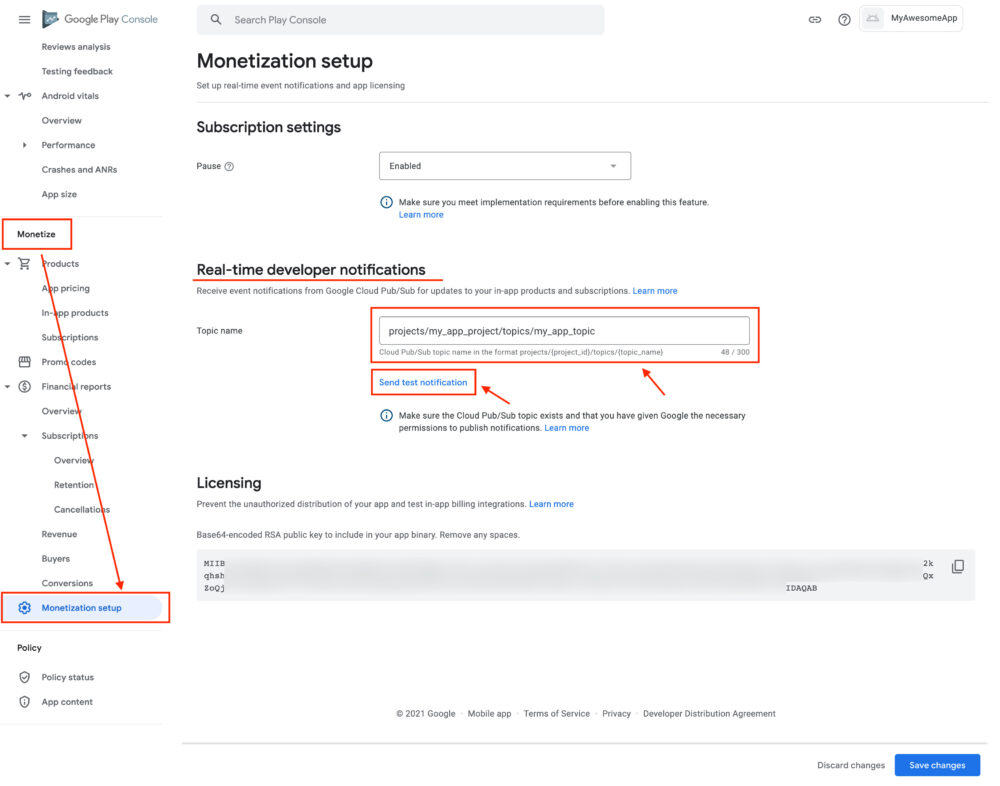
然後進入 Google play console,https://play.google.com/console
在 Monetization setup 的頁面中,按照格式 打入剛剛的 Topic 名字:
projects/my_app_project/topics/my_app_topic
(這邊要依照你實際情況來打,每個人不太一樣)
按下 Save changes 然後按下 Send test notification 試試。
Step4. 測試通知發送連接情況
在剛剛 Real-time developer notifications 區域,my_app_topic-sub,
{"version":"1.0","packageName":"com.myawesome.app","eventTimeMillis":"1638346194077","testNotification":{"version":"1.0"}}
實作伺服器接收端 (PHP)
接收端分成二個方式 Pull 跟 Push 的方式,二個擇一實作即可。
Pull 的方式
以下是 PHP 實作,https://cloud.google.com/pubsub/docs/reference/libraries#cloud-console
PHP 做法就是使用 composer 引用 cloud-pubsub 與 google/apiclient 套件。
$ composer require google/apiclient
$ composer require google/cloud-pubsub
或者手動在 composer.json 的 require 區域加上關聯
{
  "config": {
    // ....
  },
  "require": {
    "google/apiclient": "^2.7"
    "google/cloud-pubsub": "^1.34"
  }
}
再執行
$ composer update你可能需要建立一個 Service account 並給予 Pub/Sub Subscriber 權限credentials.json
credentials.json 文件大概長這樣:
{
  "type": "service_account",
  "project_id": "my_app_project",
  "private_key_id": "xxxxxxxxxxxxxxxxxxxxxxxxxxxxxxxxxxxxxxxx",
  "private_key": "-----BEGIN PRIVATE KEY-----\nMIIEvgIBA.......N4M8zLc\n-----END PRIVATE KEY-----\n",
  "client_email": "my-service-account@my_app_project.iam.gserviceaccount.com",
  "client_id": "xxxxxxxxxxxxxxxxxxxxx",
  "auth_uri": "https://accounts.google.com/o/oauth2/auth",
  "token_uri": "https://oauth2.googleapis.com/token",
  "auth_provider_x509_cert_url": "https://www.googleapis.com/oauth2/v1/certs",
  "client_x509_cert_url": "https://www.googleapis.com/robot/v1/metadata/x509/my-service-account%40my_app_project.iam.gserviceaccount.com"
}
將 credentials.json 放到伺服器能存取到的地方,假設是放在跟 PHP 相同的目錄PubSubClient 物件來抓取 Pull 的通知
<?php
require __DIR__ . '/vendor/autoload.php';

use Google\Cloud\PubSub\PubSubClient;

$pubSub = new PubSubClient([
    'keyFilePath' => __DIR__ . '/credentials.json',
    'projectId' => 'my_app_project'
]);

$subscription = $pubSub->subscription('my_app_topic-sub');

$messages = $subscription->pull();

foreach ($messages as $message) {
    echo $message->data();
}
這個範例就能跟網頁介面一樣,一次拉一些一次拉一些,拉到你想要的訊息,
你就可以得到類似這樣的一筆資料:
{
  "version": "1.0",
  "packageName": "com.myawesome.app",
  "eventTimeMillis": "1638375316338",
  "subscriptionNotification": {
    "version": "1.0",
    "notificationType": 13,
    "purchaseToken": "df................CnPIQ",
    "subscriptionId": "com.myawesome.app.one_month_subscription"
  }
}
這個是一個訂閱通知的範例,
根據文件,除了 subscriptionNotification(訂閱通知)之外,它還有 oneTimeProductNotification(單次購賣通知)
{
  "version":"1.0",
  "packageName":"com.myawesome.app",
  "eventTimeMillis":"1638375316338",
  "oneTimeProductNotification":
  {
    "version":"1.0",
    "notificationType":1,
    "purchaseToken":"fg................HBbID",
    "sku":"com.myawesome.app.coin"
  }
}
單次購買的 notificationType 與訂閱的 notificationType 定義不同,需注意。
Push 的方式(常用)
你要設計一個 API endpoint 給他,每當訂單狀態有變更時,Google 伺服器它會用 POST 把資料回傳給你
這邊分成二部分,有認證跟沒認證,先解釋乾淨版不需認證的方式。
格式參考如下:https://developer.android.com/google/play/billing/rtdn-reference
接收的文件路徑:https://cloud.google.com/pubsub/docs/push
你會收到來自 Google 伺服器經由 POST 打來的資料,類似這樣:
{
  "message": {
    "attributes": {
      "key": "value"
    },
    "data": "eyAidmVx................GlvbiB9",
    "messageId": "136969346945"
  },
  "subscription": "projects/my_app_project/subscriptions/mysubscription"
}
其中這個 data 欄位是一個 base64 編碼後的字串,解碼 data 欄位可以得到類似以下的資料:
{
  "version": "1.0",
  "packageName": "com.myawesome.app",
  "eventTimeMillis": "1638375316338",
  "subscriptionNotification": {
    "version": "1.0",
    "notificationType": 13,
    "purchaseToken": "df................CnPIQ",
    "subscriptionId": "com.myawesome.app.one_month_subscription"
  }
}
這個是一個訂閱通知的範例,
根據文件,除了 subscriptionNotification(訂閱通知)之外,它還有 oneTimeProductNotification(單次購賣通知)
{
  "version":"1.0",
  "packageName":"com.myawesome.app",
  "eventTimeMillis":"1638375316338",
  "oneTimeProductNotification":
  {
    "version":"1.0",
    "notificationType":1,
    "purchaseToken":"fg................HBbID",
    "sku":"com.myawesome.app.coin"
  }
}
單次購買的 notificationType 與訂閱的 notificationType 定義不同,需注意。
查找訂單細節(訂閱型資料)
伺服器訂購通知只給你很粗糙的內容,實際內容還需要你另外打 API 達成。
PHP 需 composer 引用 apiclient 套件
$ composer require google/apiclient或者手動在 composer.json 的 require 區域加上關聯
{
  "config": {
    // ....
  },
  "require": {
    "google/apiclient": "^2.7"
  }
}
再執行
$ composer update以下程式碼是一個抓取訂閱訂單的範例:$packageName, $subscriptionId 與 $purchaseToken。
$packageName = 'com.myawesome.app';
$subscriptionId = 'com.myawesome.app.one_month_subscription';
$purchaseToken = 'df................CnPIQ';

$client = new \Google_Client();
try {
    $client->setAuthConfig(dirname(__FILE__) . '/credentials.json');
} catch (\Google\Exception $e) {
    throw $e;
}
$client->addScope('https://www.googleapis.com/auth/androidpublisher');
$service = new \Google_Service_AndroidPublisher($client);
$purchase = $service->purchases_subscriptions->get($packageName, $subscriptionId, $purchaseToken);

var_dump($purchase);
大致的資料格式如下(引用官方文件):
{
  "kind": string,
  "startTimeMillis": string,
  "expiryTimeMillis": string,
  "autoResumeTimeMillis": string,
  "autoRenewing": boolean,
  "priceCurrencyCode": string,
  "priceAmountMicros": string,
  "introductoryPriceInfo": {
    object (IntroductoryPriceInfo)
  },
  "countryCode": string,
  "developerPayload": string,
  "paymentState": integer,
  "cancelReason": integer,
  "userCancellationTimeMillis": string,
  "cancelSurveyResult": {
    object (SubscriptionCancelSurveyResult)
  },
  "orderId": string,
  "linkedPurchaseToken": string,
  "purchaseType": integer,
  "priceChange": {
    object (SubscriptionPriceChange)
  },
  "profileName": string,
  "emailAddress": string,
  "givenName": string,
  "familyName": string,
  "profileId": string,
  "acknowledgementState": integer,
  "externalAccountId": string,
  "promotionType": integer,
  "promotionCode": string,
  "obfuscatedExternalAccountId": string,
  "obfuscatedExternalProfileId": string
}
REST 文件在這:https://developers.google.com/android-publisher/api-ref/rest/v3/purchases.subscriptions https://developers.google.com/resources/api-libraries/documentation/androidpublisher/v3/php/latest/class-Google_Service_AndroidPublisher_SubscriptionPurchase.html
基本上對應的資料格式會有對應的 Method 可以呼叫。
查找訂單細節(單次購買型資料)
伺服器訂購通知只給你很粗糙的內容,實際內容還需要你另外打 API 達成。
PHP 需 composer 引用 apiclient 套件
$ composer require google/apiclient或者手動在 composer.json 的 require 區域加上關聯
{
  "config": {
    // ....
  },
  "require": {
    "google/apiclient": "^2.7"
  }
}
再執行
$ composer update以下程式碼是一個抓取訂閱訂單的範例:$packageName, $sku 與 $purchaseToken
$packageName = 'com.myawesome.app';
$sku = 'com.myawesome.app.coin';
$purchaseToken = 'fg................HBbID';

$client = new \Google_Client();
try {
    $client->setAuthConfig(dirname(__FILE__) . '/credentials.json');
} catch (\Google\Exception $e) {
    throw $e;
}
$client->addScope('https://www.googleapis.com/auth/androidpublisher');
$service = new \Google_Service_AndroidPublisher($client);
$purchase = $service->purchases_products->get($packageName, $sku, $purchaseToken);

var_dump($purchase);
大致的資料格式如下(引用官方文件):
{
  "kind": string,
  "purchaseTimeMillis": string,
  "purchaseState": integer,
  "consumptionState": integer,
  "developerPayload": string,
  "orderId": string,
  "purchaseType": integer,
  "acknowledgementState": integer,
  "purchaseToken": string,
  "productId": string,
  "quantity": integer,
  "obfuscatedExternalAccountId": string,
  "obfuscatedExternalProfileId": string,
  "regionCode": string
}
REST 文件在這:https://developers.google.com/android-publisher/api-ref/rest/v3/purchases.products https://developers.google.com/resources/api-libraries/documentation/androidpublisher/v3/php/latest/class-Google_Service_AndroidPublisher_ProductPurchase.html
基本上對應的資料格式會有對應的 Method 可以呼叫。
回應 (Acknowledge) 訂單已處理(訂閱型)
有一個很重要的就是,伺服器處理完訂單要打 API 跟 Google 伺服器講:商品已送達。
不然它會認為沒有開對應功能給使用者,計時三天後,自動做退費,所以這功能很重要。
$packageName = 'com.myawesome.app';
$gpaOrderId = 'GPA.xxxx-xxxx-xxxx-xxxxx';
$purchaseToken = 'df................CnPIQ';

try {
  $client = new \Google_Client();
  $client->setAuthConfig(dirname(__FILE__) . '/credentials.json');
  $client->addScope('https://www.googleapis.com/auth/androidpublisher');
  $service = new \Google_Service_AndroidPublisher($client);

  $postBody = new Google_Service_AndroidPublisher_SubscriptionPurchasesAcknowledgeRequest();
  $postBody->setDeveloperPayload("");
  $response = $service->purchases_subscriptions->acknowledge($packageName, $gpaOrderId, $purchaseToken, $postBody);

  var_dump($response);
} catch (\Google\Exception $e) {
    throw $e;
}
以上是一個簡單範例。
回應 (Acknowledge) 訂單已處理(單次購買型)
伺服器處理完訂單要打 API 跟 Google 伺服器講:商品已送達。
不然它會認為沒有開對應功能給使用者,計時三天後,自動做退費,所以這功能很重要。
$packageName = 'com.myawesome.app';
$sku = 'com.myawesome.app.coin';
$purchaseToken = 'fg................HBbID';

try {
  $client = new \Google_Client();
  $client->setAuthConfig(dirname(__FILE__) . '/credentials.json');
  $client->addScope('https://www.googleapis.com/auth/androidpublisher');
  $service = new \Google_Service_AndroidPublisher($client);

  $postBody = new Google_Service_AndroidPublisher_ProductPurchasesAcknowledgeRequest();
  $postBody->setDeveloperPayload("");
  $response = $service->purchases_products->acknowledge($packageName, $sku, $purchaseToken, $postBody);

  var_dump($response);
} catch (\Google\Exception $e) {
    throw $e;
}
以上就是各種實作細節,細節很多,文件很長,可能要多看幾次。
參考資料