Spring boot 學習筆記 – 使用 Kotlin 做後端開發

學了這麼厲害的 Kotlin 可不可以拿它來開發後端(Backend),答案是當然可以的!
我們使用 Kotlin 跟 Gradle 來做開發
先做一個非常簡單的 API 再來慢慢進階

前端?後端?前台?後台?有差嗎?

在這邊簡單解釋一下 Web 技術這些詞彙的定義,大家也常常搞錯。

  • 前端 (Frontend):由後端 (Backend) 收到資料,透過瀏覽器渲染出來跟使用者互動的介面 (UI) 與程式都稱前端。

  • 後端 (Backend):也就是伺服器 (Server) 的部分,專門處理由使用者的要求,提供對應資料的程式。

  • 前台:大家比較通俗的講法,使用者看得到的操作得到的區域,如同舞台一般。

  • 後台:大家比較通俗的講法,通常是指管理者介面,如同舞台的後台。

那前台、後台跟前端、後端有關係嗎?
答案是:沒有什麼關係。
前台需要有前端(介面),也需要後端(伺服器程式)幫忙,後台也是。

工作上可以細分成:

  • 前台的前端
  • 前台的後端
  • 後台的前端
  • 後台的後端

分別有前端工程師與後端工程師負責開發。
今天的主題是後端開發的主題,所以沒有介面只有資料。

學習目標

  • 手把手製作一個 REST API
  • 熟悉 Spring boot 的 Annotation 寫法
  • 調整 404 頁面

準備開發環境

這邊有三種做法,好壞都不一

  • 直接推薦:InteliJ IDEA Ultimate 付費版
  • Visual studio code 外掛 Spring Initializr plug-ins
  • Spring Tools 4 for Eclipse (前身為 STS3)

💡 小提醒:這個需要付費版 InteliJ IDEA Ultimate, 免費的 Community 會無法正確 Compile,小弟已經親身試過了。

小弟建議使用 InteliJ,因為他的優異程式碼提示、搜尋與重構等功能好過其他的 IDE 編輯器

小提醒:因為 InteliJ IDEA 有可能會小改版,介面可能會稍微長的不太一樣,如果真有找不到選項、或者文章失效歡迎聯繫小弟我。

開新專案

新增SpringBoot專案

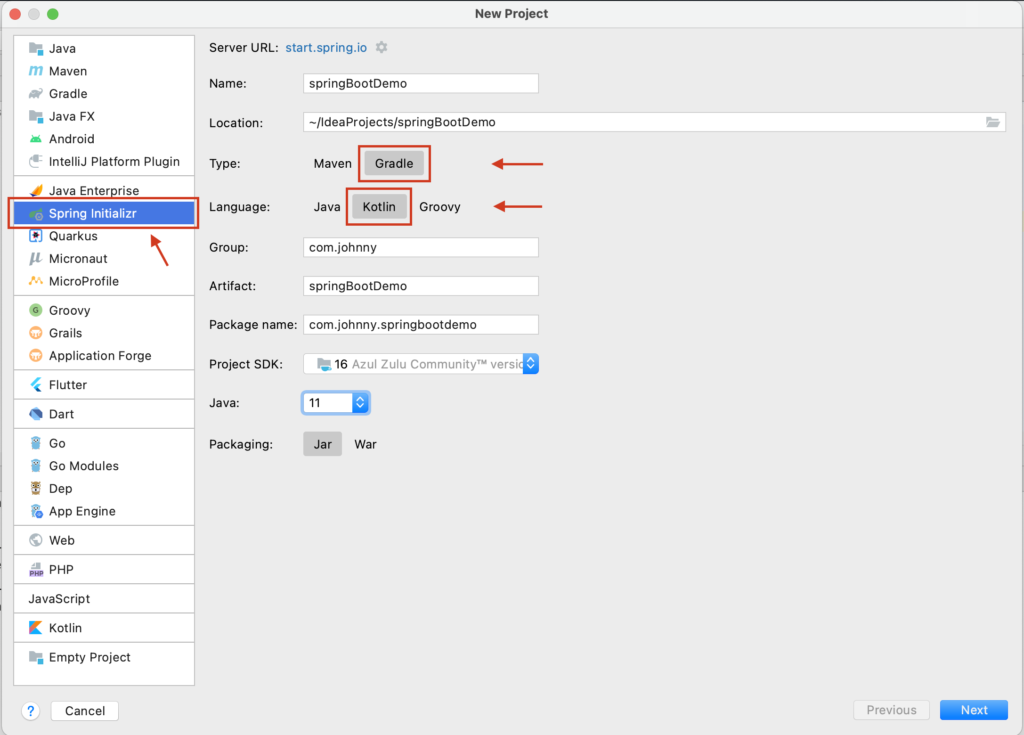
New Project,選擇 Spring Initializr

  • Group: <自己填>
  • Artifact: <自己填>
  • Type: Gradle Project (Generate a Gradle based project archive.)
  • Language: Kotlin
  • Packaging: Jar
  • Java Version: 11 (選更新的版本也可以)
  • Version: <自己填>
  • Name: <自己填>
  • Description: <自己填>
  • Package: <自己填>

然後按「Next」。

新增SpringBoot專案

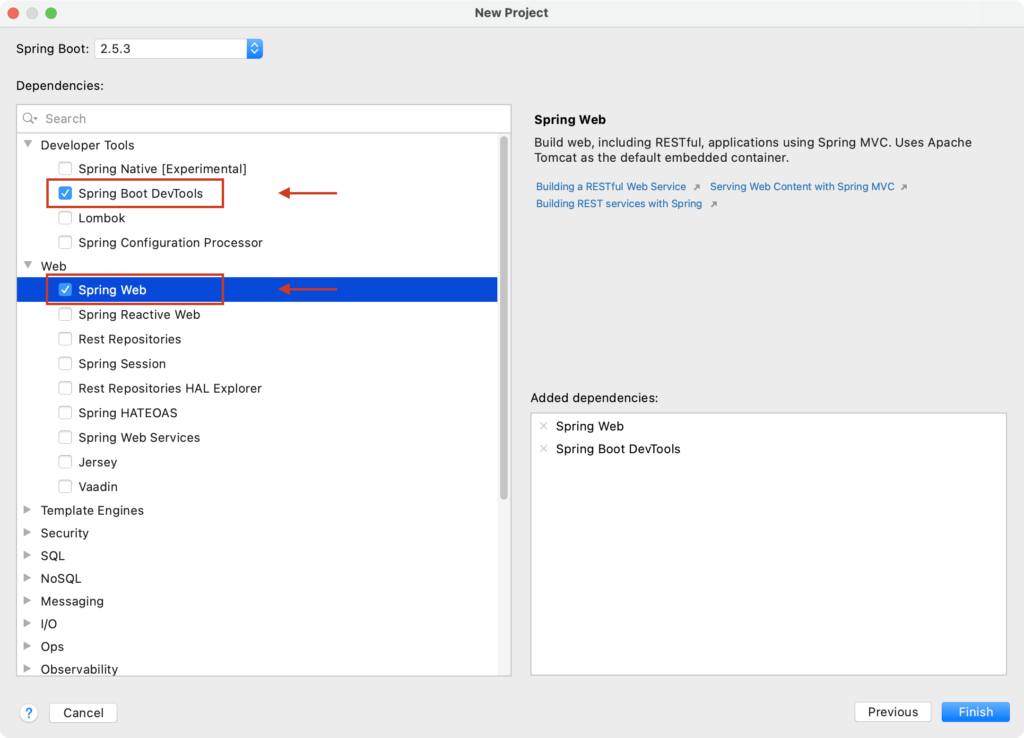
這邊選擇二個:

  • Web > Spring Web
  • Developer Tools > Spring Boot DevTools

不選也沒關係,後面可以自行新增。
按下「Finish」完成建立專案。

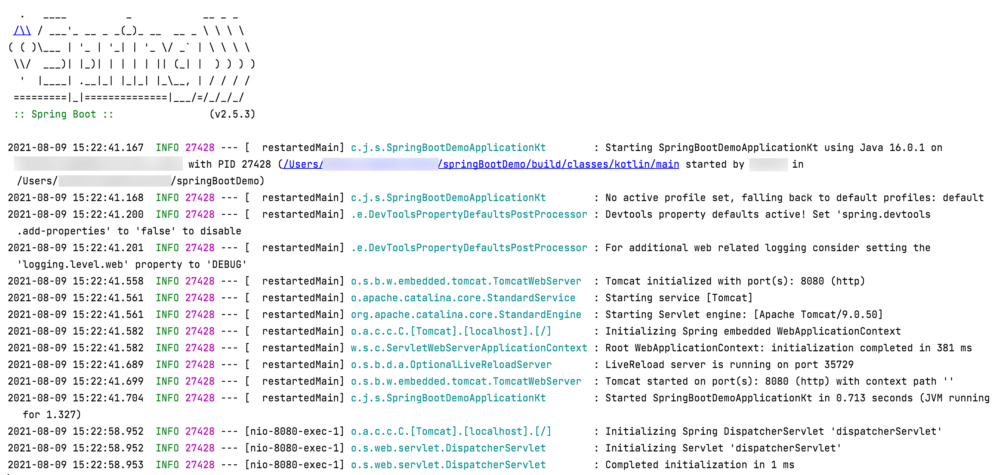
如果直接新增完跑的話,Log 大概會長這樣。

瀏覽會長這樣:

資料夾結構

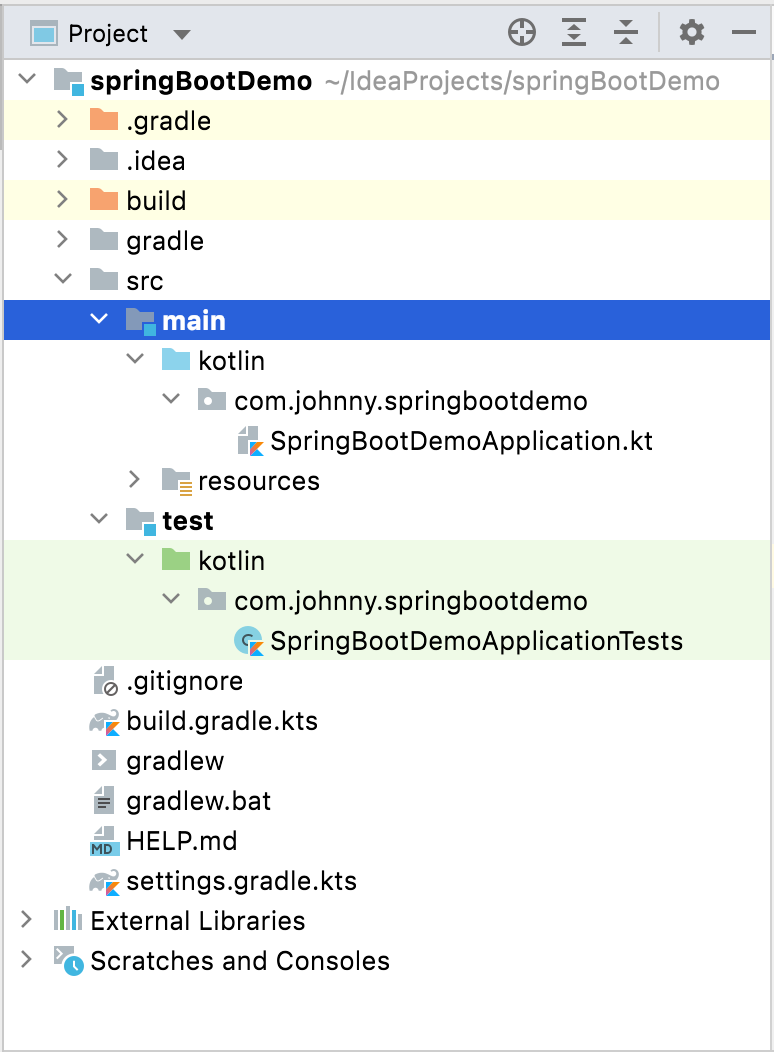
如果都是預設值的話,會看到以下資料夾結構:

  • src/main/kotlin/\<packageName>/
    主要程式碼的目錄
  • src/test/kotlin/\<packageName>/
    測試程式碼的目錄
  • build.gradle.kts
    專案的 gradle 檔案
  • src/main/resources/static
    存放一些靜態資源(例如:JavaScript、css、圖片…等)
  • src/main/resources/templates
    存放一些樣板檔案
  • src/main/resources/application.properties
    參數設定配置檔,存放一些資料連線資訊、雜項設定等等

修改啟動的連接埠 (Port)

找到 application.properties 檔案,加入這句即可

server.port=8086

啟動 Port 就改成 8086 了

其他參數請見:
https://docs.spring.io/spring-boot/docs/current/reference/html/appendix-application-properties.html

增加 Dependencies

打開 build.gradle.kts 找到 dependencies { } 的區塊

dependencies {
    implementation("org.springframework.boot:spring-boot-starter-web")
    developmentOnly("org.springframework.boot:spring-boot-devtools")
}

即是 Spring Web 跟 Spring Boot DevTools


觀察檔案

DemoApplication.kt (如果沒改名字的話)
或者有 @SpringBootApplication 標明字樣的檔案
即主要程式,程式的進入點
可以找到一個

fun main(args: Array<String>) {
    runApplication<DemoApplication>(*args)
}

可以找到 main 即程式進入點


寫第一個 Controller 寫一隻 API

著手來寫第一個 Controller

定義資料 Model

我們先定義幾個的 model class,

GeneralMessageResponse 是用來顯示範例 API 資料用的

GeneralMessageResponse.kt

package com.example.demo.model

data class GeneralMessageResponse(val message:String)

就這樣二句,就可以定義好資料 Model。

GeneralErrorResponse 用來顯示錯誤訊息的

GeneralErrorResponse.kt

package com.example.demo.model

data class GeneralErrorResponse(var message:String)

寫一個 Controller

製作一個 class 名叫 HelloController 使用 @RestController 標示,內容如下:

HelloController.kt

package com.example.demo

import com.example.demo.model.GeneralMessageResponse
import org.springframework.web.bind.annotation.RequestMapping
import org.springframework.web.bind.annotation.RestController

@RestController
class HelloController{

    @RequestMapping("/")
    fun hello(): GeneralMessageResponse {
        return GeneralMessageResponse("Hello, world!")
    }
}

做一個方法 (Method),方法名稱可以自訂,標上 @RequestMapping 標示,回傳一個物件
即回傳的資料

@RequestMapping 上面需標明綁定的 API 路徑(不可重複)
可綁定何種傳送方式 (GET, POST, PUT, DELETE)

可編譯此專案,並瀏覽之
預設會是 http://localhost:8080/

會得到以下結果:

{"message":"Hello, world!"}

新增另外一個 Method

在剛剛的 HelloController 在新增一個方法 (Method),名叫 getHello()
程式碼片段如下:

@RequestMapping("/hello", method = [RequestMethod.GET])
fun getHello(@RequestParam("name", defaultValue = "World") name: String): GeneralMessageResponse {
    return GeneralMessageResponse("Hello, $name")
}

比起剛剛的 Method 多了參數,只接受 GET 方法(使用其他方式存取會錯誤,因為沒定義)
不標明等於接收所有的方式

參數部分使用 @RequestParam 修飾字標明,標上參數名稱,
defaultValue 如果沒填資料的話的預設值為何
然後像剛才一樣,回傳一個 JSON 物件

方式+名稱 的組合不可重複,但可接受同名但不同的方式的 Method
例如這樣是合法的:

@RequestMapping("/hello")
fun hello(): GeneralMessageResponse {
    return GeneralMessageResponse("Hello, world (from default method)!")
}

@RequestMapping("/hello", method = [RequestMethod.GET])
fun getHello(@RequestParam("name", defaultValue = "World") name: String): GeneralMessageResponse {
    return GeneralMessageResponse("Hello, $name (from get)")
}

@RequestMapping("/hello", method = [RequestMethod.POST])
fun postHello(@RequestParam("name", defaultValue = "World") name: String): GeneralMessageResponse {
    return GeneralMessageResponse("Hello, $name (from post)")
}

後面 Restful API 的時候會再提到。


錯誤處理

錯誤處理有二個部分,不太一樣:

  • 執行時出現 Exception 時,可自訂回傳的錯誤訊息
  • 當存取一個不存在的 API 時,預設回的訊息( 404 Not found 頁面)

處理 Exception 錯誤

先新增一個 GeneralErrorResponse 做為錯誤訊息的回應

GeneralErrorResponse.kt

package com.example.demo.model

import com.fasterxml.jackson.annotation.JsonInclude

@JsonInclude(JsonInclude.Include.NON_NULL)
data class GeneralErrorResponse(
    val message:String, 
    val requestUrl: String? = null, 
    val errorStackStace: String? = null
)

新增一個 ThrowableExtension.kt 新增一個 stackTraceAsString() 拿到 stackTrace 的字串

ThrowableExtension.kt

package com.example.demo.utils

import java.io.PrintWriter
import java.io.StringWriter

fun Throwable.stackTraceAsString(): String {
    val errors = StringWriter()
    this.printStackTrace(PrintWriter(errors))
    return errors.toString()
}

最後新增 GlobalExceptionHandler 用來處理全域的 API 錯誤問題

GlobalExceptionHandler.kt

package com.example.demo

import com.example.demo.model.GeneralErrorResponse
import com.example.demo.utils.stackTraceAsString
import org.springframework.http.HttpStatus
import org.springframework.web.bind.annotation.ControllerAdvice
import org.springframework.web.bind.annotation.ExceptionHandler
import org.springframework.web.bind.annotation.ResponseBody
import org.springframework.web.bind.annotation.ResponseStatus
import javax.servlet.http.HttpServletRequest

@ControllerAdvice
class GlobalExceptionHandler {
    @ExceptionHandler(Throwable::class)
    @ResponseStatus(value = HttpStatus.BAD_REQUEST)
    @ResponseBody
    fun handleException(request: HttpServletRequest, error: Exception): GeneralErrorResponse {
        return GeneralErrorResponse("Error occurred!", request.requestURL.toString(), error.stackTraceAsString())
    }
}

這邊使用了 @ControllerAdvice@ExceptionHandler 標示
當然不同情境有不同的用法,這邊示範回傳一個 JSON

最後在 Controller 新增一個測試用的 Exception 方法

@RequestMapping("/testErr")
fun testErr() {
    throw Exception("test exception")
}

然後瀏覽測試之。

處理 404 Not found 頁面

這裡處理當存取一個不存在的 API 時,預設回的資料。
我們再新增一個 Controller 名叫 MyErrorController 實作 ErrorController 介面,
範例如下:

MyErrorController.kt

package com.example.demo

import com.example.demo.model.GeneralErrorResponse
import org.springframework.boot.web.servlet.error.ErrorController
import org.springframework.web.bind.annotation.RequestMapping
import org.springframework.web.bind.annotation.RestController

@RestController
class MyErrorController : ErrorController {
    override fun getErrorPath(): String {
        return "/error"
    }

    @RequestMapping("/error")
    fun handleError(): GeneralErrorResponse {
        return GeneralErrorResponse("404 Error")
    }
}

這裡需實作 ErrorController 介面,定義錯誤發生的預設 Path 將走去哪裡
這裡使用 "/error"
然後綁定前述的值,回應一個預設訊息。


參考資料

Linux Server 伺服器建置筆記 (用 Ubuntu 設定基礎網路 & SSH伺服器)

這邊整理了一些手動 Linux server 伺服器安裝,需注意的一些事情與指令。
備忘一下以備不時之需。
(如果是設定雲端主機的話,部分步驟可以跳過,它預設都幫你建好了。)

製作可開機 USB (Bootable USB)

使用 UNetbootin 軟體

軟體下載:https://unetbootin.github.io/

選擇 USB drive,選擇 ISO 就可以了
針對目標機器做開機。

Mac 系統的話,可以使用 Etcher
軟體下載:https://www.balena.io/etcher/

做法差不多


選擇作業系統:

  • Debian 系列:可選擇 Ubuntu, Debian
  • RedHat 系列:可選擇 RHEL, CentOS, Fedora
  • BSD 系列:可選擇 FreeBSD
  • SUSE 系列:可選擇 OpenSUSE

前二項是筆者較為熟悉的,推薦 Ubuntu, Debian, CentOS 做為選項。

ISO 的版本很多:

  • Desktop ISO:有一個完整的 Live CD 可供試用
  • Server ISO:有預載一些伺服器使用的套件
  • Minimal ISO:只是檔案小,預設網路驅動了之後,大多都從網路上抓

不知怎麼選擇的話,預設就選 Desktop ISO
(以下撰文用 ubuntu 做示範)

網路指令相關

這邊列出常用的網路指令,如果網路不通的事情,當然要優先處理。

列出網路介面與 IP 位址

$ ip a
$ ip addr show
$ ifconfig

這幾個指令都可以,輸出格式稍有不同。

列出路由閘道 Gateway 設定

$ route -n

設定網路連線資訊

這邊介紹一個新東西:netplan
網路對它介紹不多,但個人覺得非常可以取代目前網路設定不方便的窘境。

假設你要設定的網路連線資訊如下:

  • 目標介面: eth0

  • IP 位址 (IP Address): 192.168.10.200

  • 子網路遮罩 (Netmask): 255.255.255.0 (/24)

  • 網路閘道 (Gateway): 192.168.10.1

  • 主要 DNS 為 8.8.8.8

  • 次要 DNS 為 168.95.1.1

(請根據你的自身環境修改,這裡只是舉例)

只要找到 /etc/netplan/01-netcfg.yaml 這個檔案並編輯

$ sudo vi /etc/netplan/01-netcfg.yaml

修改成類似以下內容:

network:
  version: 2
  renderer: networkd
  ethernets:
    eth0:
      addresses: [192.168.10.200/24]
      gateway4: 192.168.10.1
      nameservers:
        addresses: [8.8.8.8,168.95.1.1]
      dhcp4: no

(請根據你的自身環境修改,這裡只是舉例)

就這樣而已,省二、三個指令,簡單又直覺。

如果你要 dhcp (自動取得 IP 位址) 那更簡單了:

network:
  version: 2
  renderer: networkd
  ethernets:
    eth0:
      dhcp4: yes

然後存檔離開

執行一個很直覺的指令: netplan try

$ sudo netplan try
Do you want to keep these settings?

Press ENTER before the timeout to accept the new configuration
Changes will revert in 120 seconds

是否要保留設定?按 Enter 保留設定,不然 120 秒後會復原。
就跟切換螢幕解析度一樣簡單。

爾或者可以用 netplan apply 直接套用。

$ sudo netplan apply

(舊式) 設定 IP 位址 (IP Address)

$ sudo ip addr add 192.168.10.200/24 dev eth0

這邊用 192.168.10.200 做為例子,請修改成恰當的值。

(舊式) 設定網路閘道 Gateway

$ sudo route add default gw 192.168.10.1 eth0

這邊用 192.168.10.1 做為例子,請修改成恰當的值。

(舊式) 設定 DNS

$ sudo echo nameserver 8.8.8.8″ > /etc/resolv.conf

這邊用 8.8.8.8 的 Google DNS 做為例子,你也可以調整成你喜歡的。

DHCP Relase

釋放從 DHCP 取得的 IP 位址

$ sudo dhclient -r

指令等同 Windows 裡的 ipconfig /release

DHCP Renew

從 DHCP 重新取得新的 IP

$ sudo dhclient

指令等同 Windows 裡的 ipconfig /renew

啟動/關閉 網路介面 (ip 指令)

$ ip link set dev eth0 up
$ ip link set dev eth0 down

例如介面名稱為 eth0,請自行修改成合適的網路名稱。

啟動/關閉 網路介面 (ifconfig 指令)

$ /sbin/ifconfig eth0 up
$ /sbin/ifconfig eth0 down

例如介面名稱為 eth0,請自行修改成合適的網路名稱。

列出所有網路介面與狀態

$ ip link show
$ ifconfig -a

這二個都可以

檢查外部公有 IP (Public IP)

$ curl ipinfo.io/ip

一個簡單的指令可以查詢外部公有IP地址 (Public IP)

SSH 相關

安裝 SSH Server (應該預設就有安裝了)

應該預設就有安裝了,如果沒有安裝,請手動用指令安裝之。
(以下為 ubuntu 的指令)

$ sudo apt install -y ssh openssh-server

開機預設啟動 ssh

$ sudo systemctl enable ssh

啟動 ssh

$ sudo systemctl start ssh

查看 ssh 狀態

$ sudo systemctl status ssh

使用 ssh key 取代密碼登入

增加方便性也加強安全性,建議用 ssh key (pem) 檔案來登入 ssh。

產生 ssh key

$ ssh-keygen

指定檔案,例如 id_rsa 檔案(檔名可自訂)。
密碼 passphrase 可以留空

將會產生 id_rsa (私鑰) 與 id_rsa.pub (公鑰) 檔案。

接下來的步驟將是把您的公鑰複製到伺服器上(或者是把私鑰下載回使用者電腦上)。
使用者(你)透過電腦上的私鑰來做連線。

自動複製 ssh key

(在 Client 端執行此指令)
這個步驟是自動把您的公鑰複製到伺服器上。

$ ssh-copy-id -i ~/.ssh/id_rsa -p 22 [email protected]

如果不能運作也不用太糾結,等等有手動的方式。

運行結果:

/usr/bin/ssh-copy-id: INFO: Source of key(s) to be installed: "/Users/user/.ssh/id_rsa.pub"
The authenticity of host '[192.168.10.200]:22 ([192.168.10.200]:22)' can't be established.
ECDSA key fingerprint is SHA256:wYmwxxxxxxxxxxxxxxxxxxxxxxxxxxxxxxxxxxcFme8.
Are you sure you want to continue connecting (yes/no/[fingerprint])? yes
/usr/bin/ssh-copy-id: INFO: attempting to log in with the new key(s), to filter out any that are already installed
/usr/bin/ssh-copy-id: INFO: 1 key(s) remain to be installed -- if you are prompted now it is to install the new keys
[email protected]'s password:

Number of key(s) added:        1

Now try logging into the machine, with:   "ssh -p '22' '[email protected]'"
and check to make sure that only the key(s) you wanted were added.

另外一個指令,作法相同。

$ cat ~/.ssh/id_rsa.pub | ssh -p 22 [email protected] "mkdir -p ~/.ssh && cat >> ~/.ssh/authorized_keys"

或者手動複製產生之公鑰 (PublicKey) 到伺服器的 ~/.ssh/authorized_keys 檔案。
(如果沒有 .ssh 隱藏資料夾與 authorized_keys 檔案,請自行建立。)

設定 SSH 關閉密碼登入

$ vi /etc/ssh/sshd_config

找到這行並修改

PasswordAuthentication no

設定免密碼 sudo

(這個步驟非必要)
在設定之前,先調整預設開啟的編輯器。
因為小弟長期習慣用 vim 所以用此指令先切換預設開啟的編輯器

$ sudo update-alternatives --config editor
There are 4 choices for the alternative editor (providing /usr/bin/editor).

  Selection    Path                Priority   Status
------------------------------------------------------------
* 0            /bin/nano            40        auto mode
  1            /bin/ed             -100       manual mode
  2            /bin/nano            40        manual mode
  3            /usr/bin/vim.basic   30        manual mode
  4            /usr/bin/vim.tiny    15        manual mode

Press <enter> to keep the current choice[*], or type selection number: 3
update-alternatives: using /usr/bin/vim.basic to provide /usr/bin/editor (editor) in manual mode

ubuntu 預設是開 nano 編輯器,可以用這個來修改
可以選擇 3 改用 vim 編輯器。

然後使用該指令編輯設定檔

$ sudo visudo

找到

%sudo   ALL=(ALL:ALL) ALL

把它改成

%sudo   ALL=(ALL:ALL) NOPASSWD: ALL

然後存檔離開。

連線 SSH

這個可以做為 bash script 以後方便使用。

$ ssh -i ~/.ssh/id_rsa -p 22 [email protected]

軟體更新

時時軟體更新、修補漏洞、修復 Bug 是很重要的,以下是一些常用的指令

更新套件庫清單(取得有哪些套件已更新)

$ sudo apt update -y

更新套件

$ sudo apt upgrade -y

確認版號

$ lsb_release -a

其實另外二個都可以,個人比較喜歡這個

$ cat /etc/os-release  
$ hostnamectl

列出 Linux 核心版本號

$ uname -r

整個大版本更新
例如從 ubuntu 20.04LTS 升到 ubuntu 22.04.2LTS

$ sudo do-release-upgrade

參考資料

https://www.cyberciti.biz/faq/ubuntu-linux-install-openssh-server/
https://www.digitalocean.com/community/tutorials/how-to-configure-ssh-key-based-authentication-on-a-linux-server
https://vitux.com/ubuntu-ip-address-management/
https://www.cyberciti.biz/faq/howto-linux-renew-dhcp-client-ip-address/
https://tldp.org/HOWTO/Linux+IPv6-HOWTO/ch05s02.html
https://www.cyberciti.biz/faq/upgrade-ubuntu-20-04-lts-to-22-04-lts/

[iOS] 跟 Sign in with Apple 的愛恨情仇

最近終於研究出如何使用 Sign in with Apple 包含前後端的串接,分享給大家。
(本文同步於 iPlayground 2020 演講)


投影片:

iPlayground 影音版:https://www.youtube.com/watch?v=DwXhZwRDlzk


為什麼要串?

在 Apple 開發者大會 WWDC 2019 發表了 Sign in with Apple 的功能,iOS 13 後皆支援。

主要二個重點:

  • 使用 Apple ID 登入,強化保護您的隱私權
  • 當用戶不願給出自己的 E-mail 時,蘋果可以生成一組
    「虛擬 E-mail」給用戶使用,
    「虛擬 E-mail」收到的資訊,蘋果會代轉給用戶的「真實 E-mail」

官方消息指出,從 2019 年 9 月 12 日開始,新上架的 APP 需設置 Apple ID 登入;

在 2020 年 4 月之後,蘋果直接強制要求,
只要您的 app 有支援第三方登入 (例如:Facebook 登入、Google 登入、Twitter 登入…等)
就「一定要」支援 Sign in with Apple (硬要多一顆按鈕),相當於強迫中獎的概念。

基本上只要有帳號系統的服務網站,幾乎全部得加。

否則會怎麼樣呢? app 送審不會過,新 app 無法上架,新的 app 更新無法推上架提供更新。

串接 Sign in with Apple 勢在必行,因為 App Store 是 Apple 在管,官方擁有至高無上的權力。

Apple Sign In 的原理

Apple Sign In 主要接近於標準的 OAuth 流程,我們主要分成 網站 跟 App 二個部分來說:

App 登入

  1. 在 App 中,使用者按下 Sign in with Apple 按鈕,呼叫相關 AuthenticationServices framework 的相關函式,讓 iOS 系統跳出登入確認
  2. iOS 系統跳出 AppleId 登入確認,利用 TouchId 指紋辨識或 FaceId 臉部辨識(可選擇是否隱藏其 E-mail)
  3. 登入授權成功,系統呼叫 didCompleteWithAuthorization,我們處理該 Callback 將相關參數,用 API 傳回自己的網站
    (如果不做伺服器驗證的話,到這邊就結束了,但不建議)
  4. 在我們的網站 API 收到相關參數後,拿著參數向 Apple 驗證,並取得該使用者資訊
  5. 拿到使用者資訊之後,進行驗證登入,如果沒有帳號者會自動創立帳號

網站登入

  1. 在我們的網站,使用者按下 Sign in with Apple 按鈕,呼叫指定網址,其中帶入 Redirect URI 轉址回跳我們網站的網址,瀏覽 Apple 網站進行登入與授權
  2. 使用者在 Apple 網站進行登入,輸入 AppleId 的帳號密碼,
    並授權開發商授權允許(可選擇是否隱藏其 E-mail )
  3. 登入授權成功,轉跳回我們的網站,並附上一些的參數
  4. 我們的後端,拿著 Apple 傳回的參數向 Apple 驗證,並取得該使用者資訊
  5. 拿到使用者資訊之後,進行驗證登入,如果沒有帳號者會自動創立帳號

流程有一點接近但不太一樣,怎麼向 Apple 驗證這個之後會說。

虛擬 E-mail

剛剛有提到,當用戶不願給出自己的 E-mail 時,蘋果可以生成一組
虛擬 E-mail 給用戶使用,
這個虛擬 E-mail 是 亂碼@privaterelay.appleid.com
它是每個 App 專屬的,每一組 E-mail 都不一樣,
蘋果會驗證寄件人與寄件來源(不是什麼信件蘋果都會轉)

刪掉重裝又會產生一組新的虛擬 E-mail,讓使用者可以在他的設定頁,充分控制自己的個資露出於否。

但要實現這個功能,需要設定寄件人,讓指定的寄件人可以寄給使用者。

如果您是用自訂網域的話,則要綁定您的網域,蘋果他會用 SPF (Sender Policy Framework) 來驗證寄件來源。換句話說,如果要讓這個 虛擬 E-mail 能夠正常收到您寄的信,看你網域常用發信服務是誰,在您的網域 DNS 設定對應的 SPF DNS Record。

蘋果開發者網站設定

在 Apple 的開發者網站 ( https://developer.apple.com/ ) 當然要做很多設定

一樣分成網站 跟 App 二個部分來說:

App 部分

在 Certificates, Identifiers & Profiles -> Identifiers -> App IDs

按旁邊 + 號,選擇 App ID,選擇 App (不是 App Clip)
來創建您的 App ID(如果已經建立的話就修改它)

  • Description
    這裏填入您的 App 名字,
  • Bundle ID
    選擇 Explicit ,並填入 Xcode 裡的 Bundle identifier

(這應該是一般 IOS 開發者會做的事情)

今天要勾選 Sign In with Apple,並按下 Edit

  • Sign In with Apple: App ID Configuration
    留預設值 Enable as a primary App ID 即可
  • Server to Server Notification Endpoint
    這裡要填入一個網址,接收處理從 Apple 傳來的通知,後面會提到

網站部分

在 Certificates, Identifiers & Profiles -> Identifiers -> Service IDs

按旁邊 + 號,選擇 Service ID 來創建您的 Service ID
這裡有二個選項要填:

  • Description
    這裏填入您網站的名字
    (注意:這個值會顯示在前台網站給使用者看到)
  • Identifier
    你可以隨意取一個,作為辨識用
  • 勾選 Sign in with Apple 並按旁邊的 Configure

在 Web Authentication Configuration 頁面

  • Primary App ID
    選擇你主要 App 的 App ID
  • Register Website URLs

    • Domains and Subdomains
      這裏填入您網站的網域
      (注意:你的網站必須要有 https,不可用 localhost 或者 IP ,否則這裡不會過)

    • Return URLs
      這裡填入回跳用的 Redirect URI
      (一樣的規則,你的網站必須要有 https,不可用 localhost 或者 IP ,否則這裡不會過)

    如果是測試用的話,可以使用測試用的 Redirect URI:

    https://example-app.com/redirect

    (他是一個合法的網站,不是亂寫唬爛的)
    轉導到 example-app.com 之後藉由您手動複製貼上的方式把回傳值帶到你本機的測試程式中

Sign Key 驗證金鑰

我們需要建立一個 Sign Key 在等一下跟蘋果 API 做驗證使用,這部分因為網站跟 App 驗證流程後半段是一樣的,不管支援哪一個部分都要做。

在 Certificates, Identifiers & Profiles -> Keys

按旁邊 + 號,建立一個 Key

  • Key name
    可以自行取名
  • 勾選 Sign in with Apple 並按旁邊的 Configure
    • Primary App ID
      選擇主要 App 使用的 App ID
    • Grouped App IDs
      取名會把網站跟 App 群組綁在一起

按下 Continue 之後會讓你下載一個私鑰 p8 檔案,
注意這只能被下載一次,請好好保存。
如果不見的話就只能再重新產生一個。

設定寄件人、寄件網域

在 Certificates, Identifiers & Profiles -> More -> Sign in with Apple for Email Communication

按旁邊 + 號,輸入您的自訂網域與寄件人。

寄件人可以設定 Gmail 會直接通過。

如果自訂網域,需設定 SPF (DNS Sender Policy Freamwork)

設定 SPF

如果您是用自訂網域的話,則要綁定您的網域,蘋果他會用 SPF (Sender Policy Framework) 來驗證寄件來源。換句話說,如果要讓這個 虛擬 E-mail 能夠正常收到您寄的信,看你網域常用發信服務是誰,在您的網域 DNS 設定對應的 SPF DNS Record。

這遍設定各家有點不一樣

需要新增一個 TXT Record
值為

"v=spf1 include:_spf.google.com include:sendgrid.net include:amazonses.com ~all"

這個是範例值,裡面包含三個郵件服務 Email Service Provider (ESP)

  • Google (Gsuite) (Gmail)
  • SendGrid
  • Amazon SES

看您的郵件服務是哪一家,找到那家業者,照這個方式設定您允許的郵件服務存取您的網域

做一個簡單整理

  • CLIENT ID
    它可以是 App ID (也就是 Bundle ID) 也可以是 Service ID。

    • 如果要 App 端做登入,它就會是 App ID (也就是 Bundle ID)。
    • 如果要 網站端做登入,它就會是 Service ID。
  • REDIRECT URI
    OAuth 之後要轉跳的網址

    • App 的部分在 App ID 裡面做設定
      Certificates, Identifiers & Profiles -> Identifiers -> App IDs -> 您的 App ID -> Configure -> Return URLs
    • 網站的部分在 Service ID 裡面做設定
      Certificates, Identifiers & Profiles -> Identifiers -> Service IDs -> 您的 Service ID -> Configure -> Return URLs
  • TEAM ID
    你的開發者帳號 Team ID,這可以在你的右上角看到
    進去 Certificates, Identifiers & Profiles -> Identifiers -> App IDs -> 您的 App -> App ID Prefix 可以看見

  • KEY ID
    您建立驗證的 Sign Key 的 Key ID
    在 Certificates, Identifiers & Profiles -> Keys -> 您的 Apple Sign Key -> View Key Details -> Key ID 可以看到

  • SIGN KEY
    剛剛產生的 Sign Key 私鑰( p8 檔案 )

App 端實作

這裏你可以使用 Apple 所使用的 Sign In with Apple 按鈕,
Sign In with Apple 的按鈕 這裡

這裡有按鈕樣式規範與素材:
https://developer.apple.com/design/human-interface-guidelines/sign-in-with-apple/overview/buttons/

我使用的是直接呼叫的方式

import Foundation
import AuthenticationServices

class AppleSignInManager: NSObject {
    var currentView: UIView?

    func signIn(currentView: UIView) {
        guard #available(iOS 13.0, *) else { return }
        self.currentView = currentView
        let provider = ASAuthorizationAppleIDProvider()
        let request = provider.createRequest()
        request.requestedScopes = [.email, .fullName]
        request.nonce = "[NONCE]"
        request.state = "[STATE]"
        let controller = ASAuthorizationController(authorizationRequests: [request])
        controller.delegate = self
        controller.presentationContextProvider = self
        controller.performRequests()
    }
}

這邊我寫了一個 AppleSignInManager 來控制整個流程,做一個 signIn() 的 method 呼叫 Sign in with Apple。

要設定

  • state:一個您設定的,辨識用的字串
  • nonce:一個您產生的,辨識用的亂碼

來避免 CRSF 跨網域攻擊

extension AppleSignInManager: ASAuthorizationControllerDelegate {
    @available(iOS 13.0, *)
    func authorizationController(controller: ASAuthorizationController, 
               didCompleteWithError error: Error) {
        // Handle error
        print(error)
    }

    @available(iOS 13.0, *)
    func authorizationController(controller: ASAuthorizationController, 
               didCompleteWithAuthorization authorization: ASAuthorization) {
        guard let credential = authorization.credential as? ASAuthorizationAppleIDCredential else { return }
        // Post identityToken & authorizationCode to your server
        print(String(decoding: credential.identityToken ?? Data.init(), as: UTF8.self))
        print(String(decoding: credential.authorizationCode ?? Data.init(), as: UTF8.self))
    }
}

這邊要實作一個 ASAuthorizationControllerDelegate,處理登入成功、登入失敗之後的動作,
登入成功要把 identityTokenauthorizationCode 等資訊 回傳給您的伺服器,繼續做驗證。

extension AppleSignInManager: ASAuthorizationControllerPresentationContextProviding {
    @available(iOS 13.0, *)
    func presentationAnchor(for controller: ASAuthorizationController) -> ASPresentationAnchor {
        return self.currentView?.window ?? UIApplication.shared.keyWindow!
    }
}

這邊要實作一個 ASAuthorizationControllerPresentationContextProviding,回傳目前當下 ViewController 的 window 給它,它會在 Sign in with Apple 呼叫後,把系統的畫面放在它上面。

網站前端實作

文件在這:
https://developer.apple.com/documentation/sign_in_with_apple/sign_in_with_apple_js/configuring_your_webpage_for_sign_in_with_apple

你可以使用蘋果他預設給你的按鈕,

  • 字樣有 Sign in with Apple 或者 Continue with Apple 二種(包含多國語言)可以選
  • 樣式有 黑色白色 二種樣式,還有要邊框 (border) 與否可以選

或者你可以照個他的規範,自訂一個按鈕來用

按鈕樣式的規範與素材在這:
https://developer.apple.com/design/human-interface-guidelines/sign-in-with-apple/overview/buttons/

OAuth 跳轉模式有二種可以選:

  • 直接頁面轉跳
  • 開新視窗(彈窗)登入後關閉(一般 popup window 的做法)

前者較簡單,後者要自行處理流程

文件上提到的寫法就有二種,不過意思是一樣的:

<html>
    <head>
    </head>
    <body>
        <script type="text/javascript" src="https://appleid.cdn-apple.com/appleauth/static/jsapi/appleid/1/en_US/appleid.auth.js"></script>
        <div id="appleid-signin" data-color="black" data-border="true" data-type="sign in"></div>
        <script type="text/javascript">
            AppleID.auth.init({
                clientId : '[CLIENT_ID]',
                scope : '[SCOPES]',
                redirectURI : '[REDIRECT_URI]',
                state : '[STATE]',
                nonce : '[NONCE]',
                usePopup : true //or false defaults to false
            });
        </script>
    </body>
</html>
  • clientId:這遍填入你的 Services ID
  • scope:我都填固定值 name email (注意:中間有空格)
  • redirectURI:填入登入成功後要轉跳的網址,必須是 https 不能為 localhost 或者 IP
  • state:一個您設定的,辨識用的字串
  • nonce:一個您產生的,辨識用的亂碼
  • usePopup:是否用開新視窗(彈窗)登入,預設值是否

我使用的是自訂按鈕搭配 JavaScript 直接呼叫的方式:

async function doAppleSignIn() {
    try {
        const data = await AppleID.auth.signIn();
        console.log(data);
    } catch (error) {
        //handle error.
    }
}

上面的 AppleID.auth.signIn() 它會啟動整個 OAuth 流程。
如果是使用彈窗模式的話,會收到回傳的內容,如果是一般模式的話,會用頁面轉跳的。

成功登入時,如果是用轉跳的方式,會轉跳你設定的 REDIRECT_URI 並且傳入幾個參數供使用。

  • code
    單次使用的 Authentication code (效期只有 5 分鐘)

  • id_token
    identityToken 是一個包含用戶資訊的 JSON web token (JWT)

  • state
    你定義的字串

  • user
    一些 firstName, lastName, email 等使用者資料
    (不過蘋果這麼注重用戶隱私,也拿不到什麼資料)

如果是開新視窗登入,需要另外處理事件

//Listen for authorization success
document.addEventListener('AppleIDSignInOnSuccess', (data) => {
     //handle successful response
});
//Listen for authorization failures
document.addEventListener('AppleIDSignInOnFailure', (error) => {
     //handle error.
});

這裡你可以打你自己設計的 API,
identityTokenauthorizationCode 傳回給你自己的伺服器繼續做驗證

網站後端實作

JWT (JSON Web Token)

Apple Sign In 的資料交換主要使用 JWT (JSON Web Token) 的格式
(更明確點說,他是一個 JSON Web Signatures (JWS) 的格式)

在這之前,我們先釐清一下一些相關名詞:

  • RFC 7519 – JSON Web Token(JWT)
    定義了 header 內容與 claim 內容,以及 token 的相關規範

    • RFC 7515 – JSON Web Signature(JWS)
      定義如何做帶有簽章的 token
    • RFC 7516 – JSON Web Encryption(JWE)
      定義內容加密的 token
  • RFC 7517 – JSON Web Key(JWK)
    定義金鑰的格式
  • RFC 7518 – JSON Web Algorithms(JWA)
    定義加解密的演算法

所以

  • JWS 與 JWE 都是屬於 JWT 的一種。
  • 如果沒特別說明,則 JWT 皆是指 JWS。

我們再來說明一下什麼是 JWT

JWT 的全名是 JSON Web Token,是一種基於 JSON 的開放標準(RFC 7519),它定義了一種簡潔(compact)且自包含(self-contained)的方式,用於在雙方之間安全地將訊息作為 JSON 物件傳輸。而這個訊息是經過數位簽章(Digital Signature),因此可以被驗證及信任。可以使用 密碼(經過 HMAC 演算法) 或用一對 公鑰/私鑰(經過 RSA 或 ECDSA 演算法) 來對 JWT 進行簽章。

它是用 .(點)來分隔,主要有三個部分 base64UrlDecode 的內容:

  • Header
  • Payload
  • Signature/Encryption data

前二者用 Base64UrlDecode 解碼後,各會是一個 JSON 資料,
而 signature 故名思義就是一個用演算法算出來的 Hash

展開說明如下:

  • Header

    • alg
      必要欄位,對此 JWT 進行簽章、加解密的主要演算法 (JWA)。
      (這個名字叫做 JWA (JSON Web Algorithms) )
      這裡列出幾個常見的:

      • HS256 (HMAC-SHA256)
      • RS256 (RSA-SHA256)
      • ES256 (ECDSA-SHA256)

      第一項只有單向由同一把金鑰做雜湊 (Hash)。
      而後二者為非對稱式加解密,由私鑰進行簽名,由公鑰進行驗證。

    • typ
      JWT 本身的媒體類型,在 Sign In with Apple 這裡,
      我們使用預設值 JWT

    • kid
      這邊是 Apple 定義的 Sign Key 的 Key ID。

  • Payload
    • iss
      Issuer 的簡稱,表示發行者。
    • aud
      Audience 的簡稱,表示接收者。
    • iat
      Issued at (time) 的簡稱,即該 JWT 發行的時間,用 Unix timestamp 表示(POSIX 定義的自紀元以來的秒數)。
    • exp
      Expiration (time) 的簡稱,即該 JWT 過期的時間,格式一樣為 Unix timestamp。
    • sub
      Subject 的簡稱,用字串(case-sensitive) 或 URI 表示這個 JWT 所夾帶的唯一識別訊息。

怎麼驗證?

驗證方式有二種方式:

  • identityToken 用 JWT 的格式定義來驗證是否為 Apple 所簽發的
  • authorizationCode 用 OAuth 的機制向 Apple 伺服器交換並要求 Access Token

前後者不衝突,也可以二者都做,看你的需求。

驗證 IdentityToken

其實從 app 端拿到的 identityToken 它本身也是一個 JWT 格式

payload 用 base64UrlDecode 解開後可以得到類似以下的資料

Header 部分
{
  "kid": "86D88Kf",
  "alg": "RS256"
}

你可以看到他是用 RS256 (RSA-SHA256) 做加密簽章的,
由蘋果伺服器所擁有的私鑰進行簽名,由蘋果提供的 API 取得公鑰進行驗證。
它的 Key ID 為 86D88Kf (辨識是蘋果哪一把 Key 簽的,這等下會說)

Payload 部分
{
  "iss": "https://appleid.apple.com",
  "aud": "com.your.app.id",
  "exp": 1596621649,
  "iat": 1596621049,
  "sub": "001451.3dc436155xxxxxxxxxxxxxxxxxxxx59f.0447",
  "c_hash": "iUqI9Vyxxxxxxxxxg-CyoA",
  "email": "[email protected]",
  "email_verified": "true",
  "is_private_email": "true",
  "auth_time": 1596621049,
  "nonce_supported": true
}

取重點說明:

  • iss:發行者(issuer)
    https://appleid.apple.com,蘋果的伺服器
  • aud:接收者(audience)
    com.your.app.id (您的 App Id)
  • sub:Subject 主題的值,是使用者辨識唯一識別碼
    (可作為 使用者 ID 當做判斷依據)
  • email:使用者的 Email,範例值為虛擬 E-mail,
    如果用戶選擇不隱藏 E-mail,這裡就會顯示真實用戶的 E-mail
  • exp:過期時間
Signature 部份

從 Header 可以知道,
蘋果是用 86D88Kf 這把私鑰用 RS256 (RSA-SHA256) 簽的,等下取得該 86D88Kf 的公鑰就可以驗證它。

取得蘋果的公鑰

這裡蘋果有提供 API 來取得公鑰,

蘋果 API 文件在此:
https://developer.apple.com/documentation/sign_in_with_apple/fetch_apple_s_public_key_for_verifying_token_signature

用 GET 來打以下網址取得:

https://appleid.apple.com/auth/keys

它是一個標準 JSON Web Key Set (JWKS) 格式,
會得到類似這樣的資料

{
  "keys": [
    {
      "kty": "RSA",
      "kid": "86D88Kf",
      "use": "sig",
      "alg": "RS256",
      "n": "iGaLqP..................zHLwQ",
      "e": "AQAB"
    }
  ]
}

礙於篇幅縮減了一下資料,重點說明:

  • kid:金鑰 ID,你可以找到剛剛範例的 86D88Kf 這個金鑰
  • alg:使用的演算法,範例值是 RS256
  • use:用途描述,白話文就是拿來幹嘛用的
    sig 意思就是拿來簽章用的
  • n:RSA 模數 (e),公鑰內容的一部分
  • e:RSA 指數 (n),公鑰內容的一部分

簡單來說,我們要:

  1. kid 找到對應的金鑰,
  2. ne 這二個值還原回 PEM 格式,
  3. 對 identityToken 做 Signature 驗證,檢核是否為蘋果伺服器發的
  4. 取用裡面的資料

以下使用 PHP 搭配 Lcobucci/JWTFirebase\JWT 套件來實作

require_once '../vendor/autoload.php';
function getUserDataFromIdentityToken($idToken)
{
    $token = (new Lcobucci\JWT\Parser())->parse((string)$idToken);

    $applePublicKeysRaw = curlGetAppleAuthKeys();
    $applePublicKeys = JWKParseKeySet($applePublicKeysRaw);

    $applePublicKey = $applePublicKeys[$token->getHeader('kid')];

    $signer = new Lcobucci\JWT\Signer\Rsa\Sha256();
    $keychain = new Lcobucci\JWT\Signer\Keychain();   
    if (!$token->verify($signer, $keychain->getPublicKey($applePublicKey))) {
        throw new RuntimeException("Key validation failed.");
    }

    if ('https://appleid.apple.com' !== $token->getClaim('iss')) {
        throw new RuntimeException("Source incorrect.");
    }
    $userData = array();
    $userData['email'] = $token->getClaim('email');
    $userData['id'] = $token->getClaim('sub');
    return $userData;
}

function curlGetAppleAuthKeys()
{
    $ch = curl_init('https://appleid.apple.com/auth/keys');
    curl_setopt($ch, CURLOPT_RETURNTRANSFER, 1);
    $result = curl_exec($ch);
    curl_close($ch);

    return json_decode($result, true);
}

function JWKParseKeySet($keySets)
{
    $parsed = \Firebase\JWT\JWK::parseKeySet($keySets);
    $pemKeySets = array();
    foreach ($parsed as $keyId => $sslKey) {
        $pemKeySets[$keyId] = openssl_pkey_get_details($sslKey)['key'];
    }
    return $pemKeySets;
}

function JWKVerify($idToken, $publicKeyPem)
{
    $signer = new Lcobucci\JWT\Signer\Rsa\Sha256();
    $keychain = new Lcobucci\JWT\Signer\Keychain();
    $token = (new Lcobucci\JWT\Parser())->parse((string)$idToken);
    return $token->verify($signer, $keychain->getPublicKey($publicKeyPem));
}

composer.json

{
  "require": {
    "firebase/php-jwt": "5.2.0",
    "lcobucci/jwt": "3.3.2"
  }
}

使用 AuthorizationCode 交換 AccessToken

這部分也就是最困難的部分

先貼蘋果 API 文件:
https://developer.apple.com/documentation/sign_in_with_apple/generate_and_validate_tokens

需要 POST 以下網址:

https://appleid.apple.com/auth/token

它定義了幾個參數

  • client_id
    如果是 App 登入就是 App ID (Bundle ID),
    如果是網站登入就是 Services ID。
  • client_secret
    一個 JWT 格式的要求文件,並利用前面申請的 Sign Key 來簽章
  • code
    填入 App 或 網站 收到的 Authorization Code
    (注意:Authorization Code 的效期非常短,文件上說最長只有 5 分鐘效期,
    但實際設定可能只有 30 秒至 1 分鐘左右)
  • grant_type
    這裡我們填 authorization_code 來交換 AccessToken

所以我們要:

  1. 自己組一個 JWT,並利用前面申請的 Sign Key 來簽章(指定使用 ES256 演算法),作為 client_secret,並帶入收到的 Authorization Code 作為參數,
  2. 打蘋果的 API

蘋果有給一個 JWT 的組成範例:

{
    "alg": "ES256",
    "kid": "ABC123DEFG"
}
  • alg:指定使用 ES256 (ECDSA-SHA256)
  • kid:你的 Sign Key 的 Key ID
{
    "iss": "DEF123GHIJ",
    "iat": 1437179036,
    "exp": 1493298100,
    "aud": "https://appleid.apple.com",
    "sub": "com.mytest.app"
}
  • iss:發行者(issuer)
    填入你的 開發者帳號的 TEAM ID
  • aud:接收者(audience)
    填入固定值 https://appleid.apple.com
  • iat:填入現在時間 (Unix timestamp)
  • exp:填入過期時間 (Unix timestamp),不能超過六個月
  • sub:Subject 主題的部分填入上述的 client_id
    如果是 App 登入就是 App ID (Bundle ID),
    如果是網站登入就是 Services ID。

最後簽章,組成一個 JWT 當作 client_secret 來打 API

成功的話會有類似以下的回傳值

{
  "access_token": "a6cab...........Y1A",
  "token_type": "Bearer",
  "expires_in": 3600,
  "refresh_token": "r9d77fa9..........gfYA",
  "id_token": "eyJraW.................jMA"
}

其中一個重點, id_token 就是 identityToken,是我們要的資料,
解開後有:

  • sub :Subject 主題的值為 使用者 ID
  • email:值為使用者的 Email

這些前面有提到了,就不在重述。

Troubleshooting

雖然文件定義了很多錯誤訊息
https://developer.apple.com/documentation/sign_in_with_apple/errorresponse

大致會出現的只有幾種:

  • invalid_request 通常是連參數都弄錯
  • invalid_client 可能是 client_id 弄錯,
    client_secret (JWT 格式) 裡的 subclient_id 參數不吻合,或者根本沒這個 client_id
  • invalid_grant 這個是最常見(也是最難排查的)的錯誤,
    • 可能是 client_secret JWT 格式的加解密算錯 ⚠️
    • 可能是 Authorization Code 過期(沒即時打 API 做交換)
      (Authorization Code 效期超短,通常只有 1-2 分鐘,不超過 5 分鐘) ⚠️
    • 可能是 Authorization Code 已經被交換掉,變成無效 Code ⚠️
      (API 帶相同參數重複打就會出現)

Server to Server Notification

這個功能在新的 WWDC 2020 影片中推出,
截稿至今,蘋果還沒有寫 API 文件,只有釋出影片解釋 😓。

詳述在這裡

設定上去之後,蘋果會在用戶有帳號變更的時候通知你。

蘋果會用 POST 傳一個 json 格式給你,格式大致如下:

{
  "payload": "eyJraWQxxxxxxxxxxxxxxiUlMyNTYifQ.eyJpcxxxxxxxxxxxxxc0fSJ9.IUFWxPxxxxxxxxxxxxxxxxxbL3olA"
}

只有一個值叫做 payload,裡面也是一個 JWT 格式
你把 JWT 其中的 payload 用 base64UrlDecode 解開,會得到以下格式

{
  "iss": "https://appleid.apple.com/",
  "aud": "<Bundle Identifier>",
  "iat": 1508184845,
  "jti": "<unique events stream id>",
  "events": [
    {
      "type": "email-disabled",
      "sub": "<user_id>",
      "email": "<[email protected]>",
      "is_private_email": true,
      "event_time": 1508184845
    }
  ]
}

重點說明如下:

  • iss:發行者(issuer)
    https://appleid.apple.com,蘋果的伺服器
  • aud:接收者(audience)
    com.your.app.id (您的 App Id)
  • iat
    Issued at (time) 的簡稱,即該 JWT 發行的時間,用 Unix timestamp 表示。
  • jti:事件唯一碼
  • events:事件
    • type:目前狀態
    • sub:用戶唯一碼
    • email:用戶電子信箱(有可能是虛擬 Email)
    • is_private_email:是否為虛擬 Email
    • event_time:事件時間

其中 type 狀態有幾種:

  • email-enabled
  • email-disabled
  • consent-revoked
  • account-delete

祝串接順利。 🙂


參考資料