# /etc/config/dhcp
uci del dhcp.lan.ra_slaac
uci set dhcp.lan.start='2'
uci set dhcp.lan.limit='254'
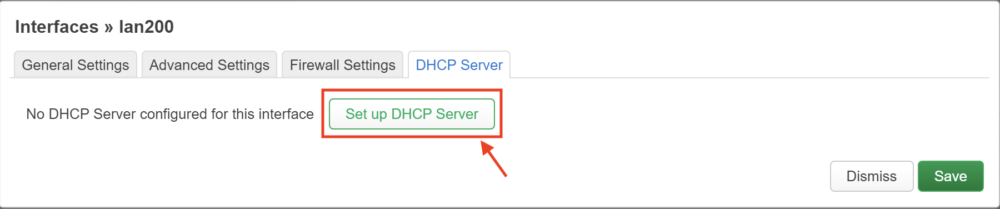
uci set dhcp.lan200=dhcp
uci set dhcp.lan200.interface='lan200'
uci set dhcp.lan200.start='100'
uci set dhcp.lan200.limit='150'
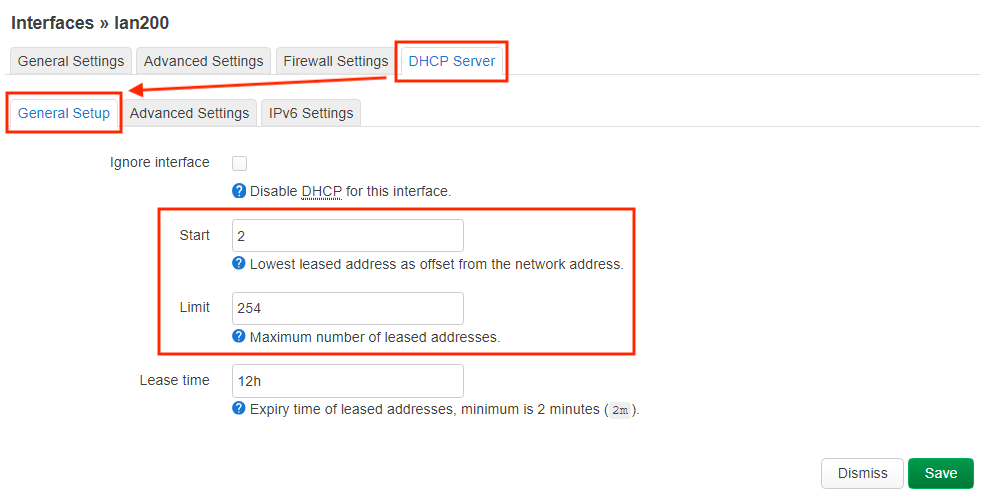
uci set dhcp.lan200.leasetime='12h'
uci set dhcp.lan200.start='2'
uci set dhcp.lan200.limit='254'
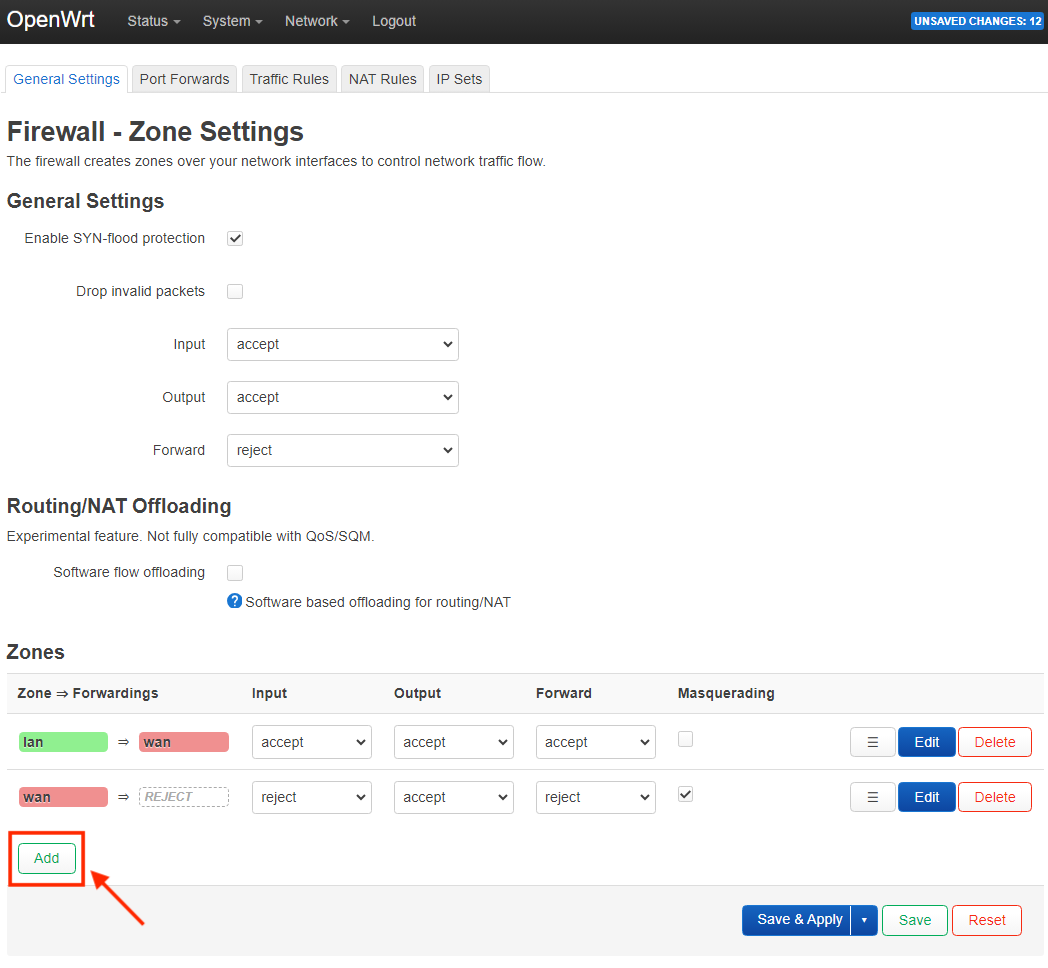
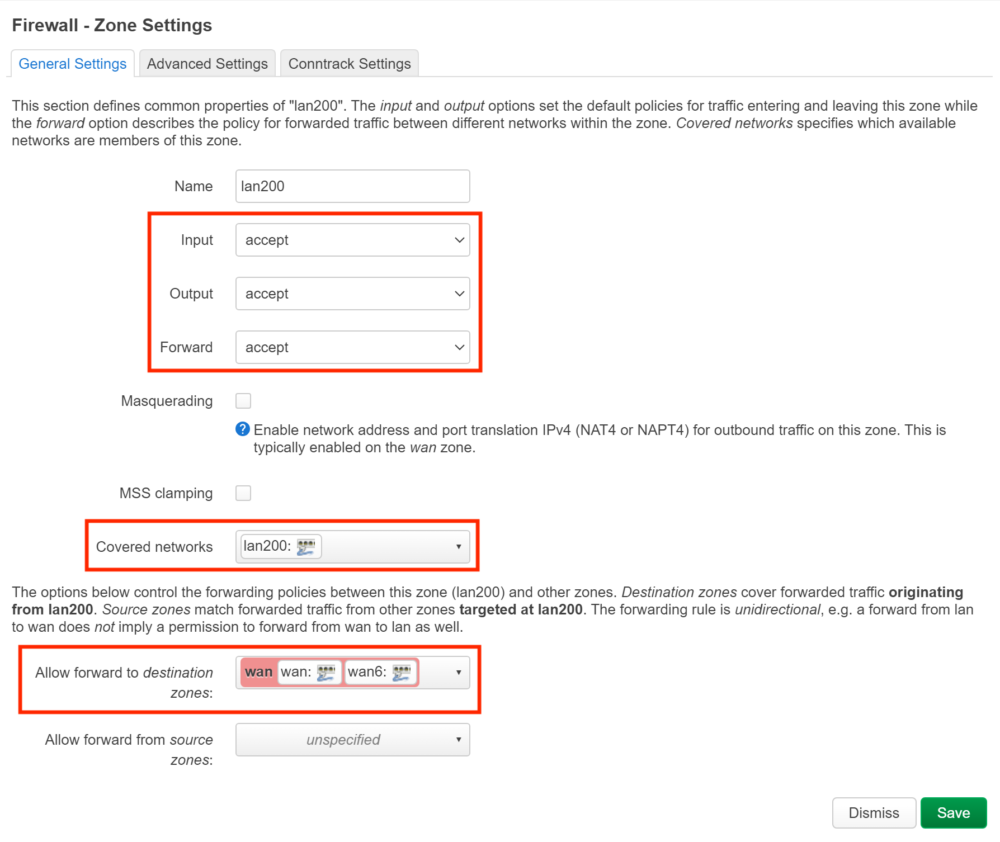
# /etc/config/firewall
uci add firewall zone # =cfg0edc81
uci set firewall.@zone[-1].name='lan200'
uci set firewall.@zone[-1].input='ACCEPT'
uci set firewall.@zone[-1].output='ACCEPT'
uci set firewall.@zone[-1].forward='ACCEPT'
uci add_list firewall.@zone[-1].network='lan200'
uci add firewall forwarding # =cfg0fad58
uci set firewall.@forwarding[-1].src='lan200'
uci set firewall.@forwarding[-1].dest='wan'
# /etc/config/network
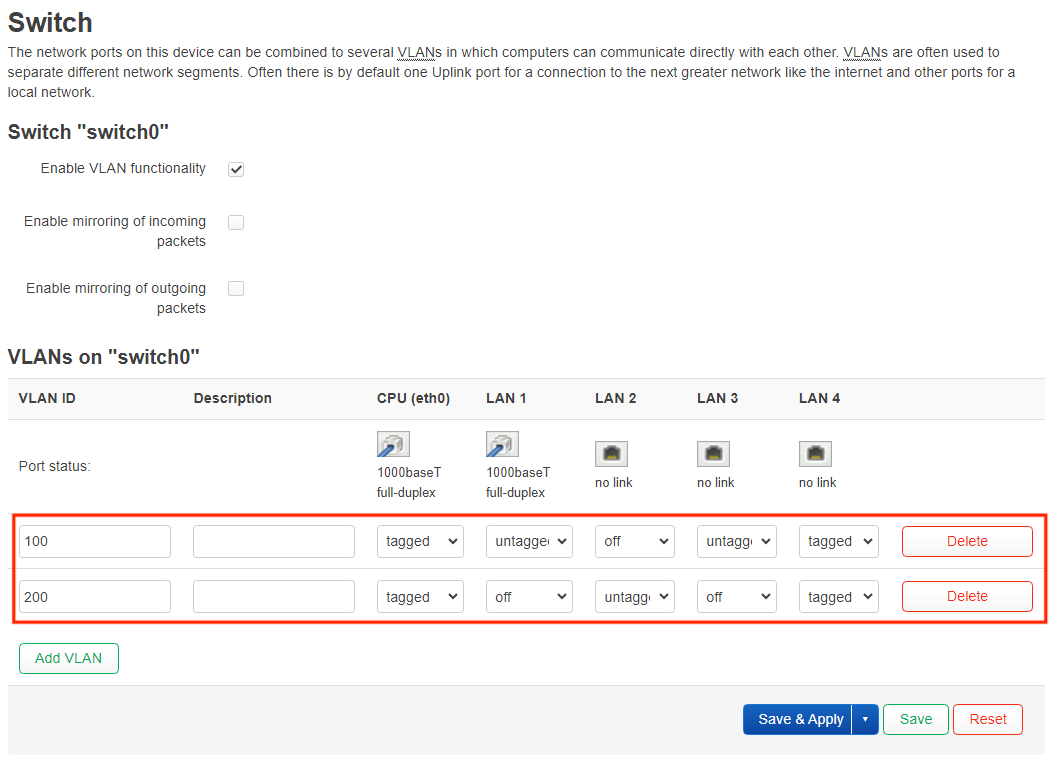
uci add network switch_vlan # =cfg0b1ec7
uci set network.@switch_vlan[-1].device='switch0'
uci set network.@switch_vlan[-1].vlan='2'
uci set network.cfg0a1ec7.ports='0t 4 2 1t'
uci set network.cfg0a1ec7.vid='100'
uci set network.@switch_vlan[-1].ports='0t 3 1t'
uci set network.@switch_vlan[-1].vid='200'
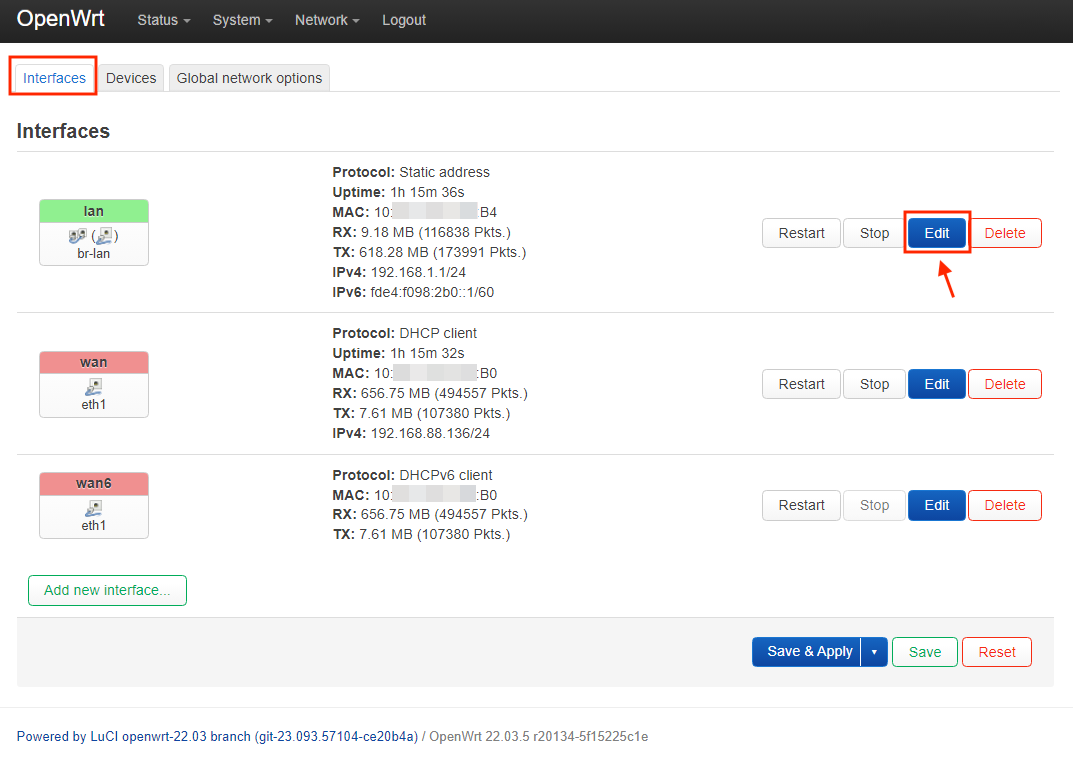
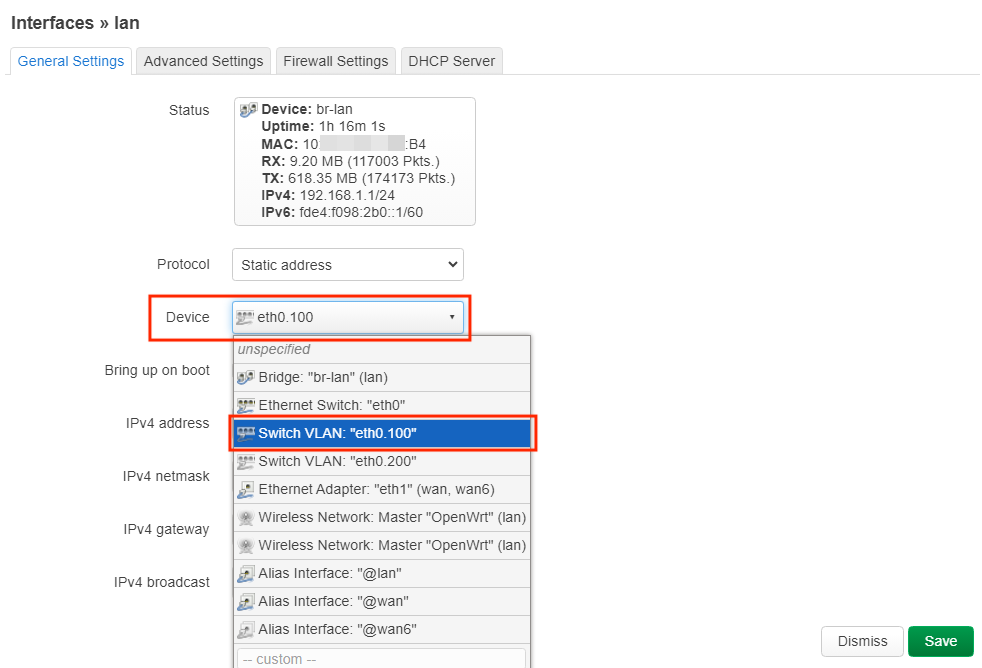
uci set network.lan.device='eth0.100'
uci set network.lan.ipaddr='192.168.10.1'
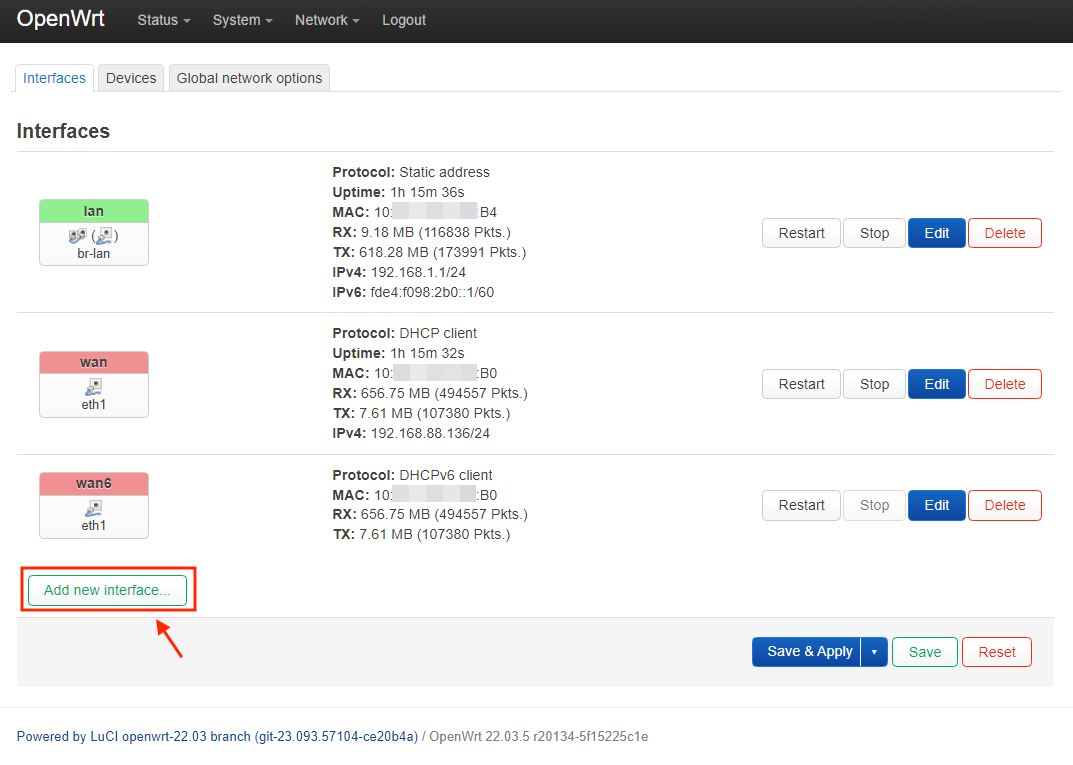
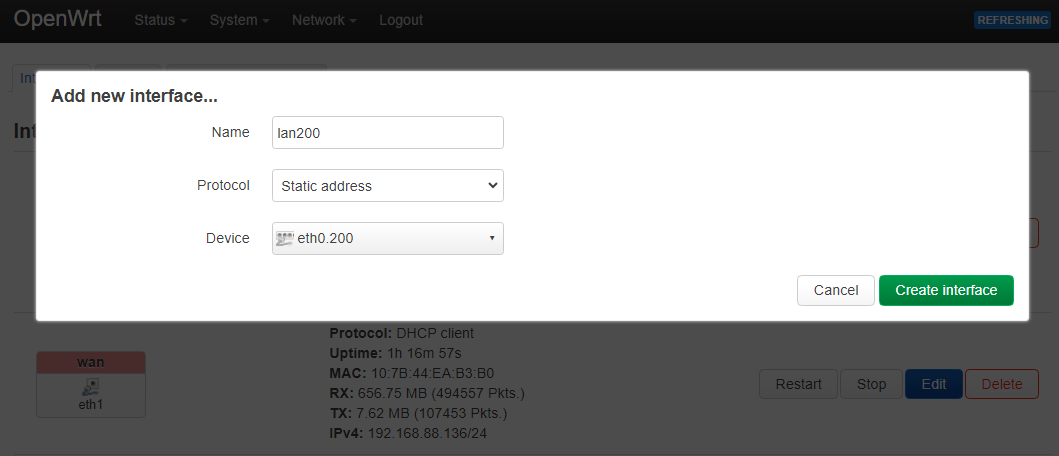
uci set network.lan200=interface
uci set network.lan200.proto='static'
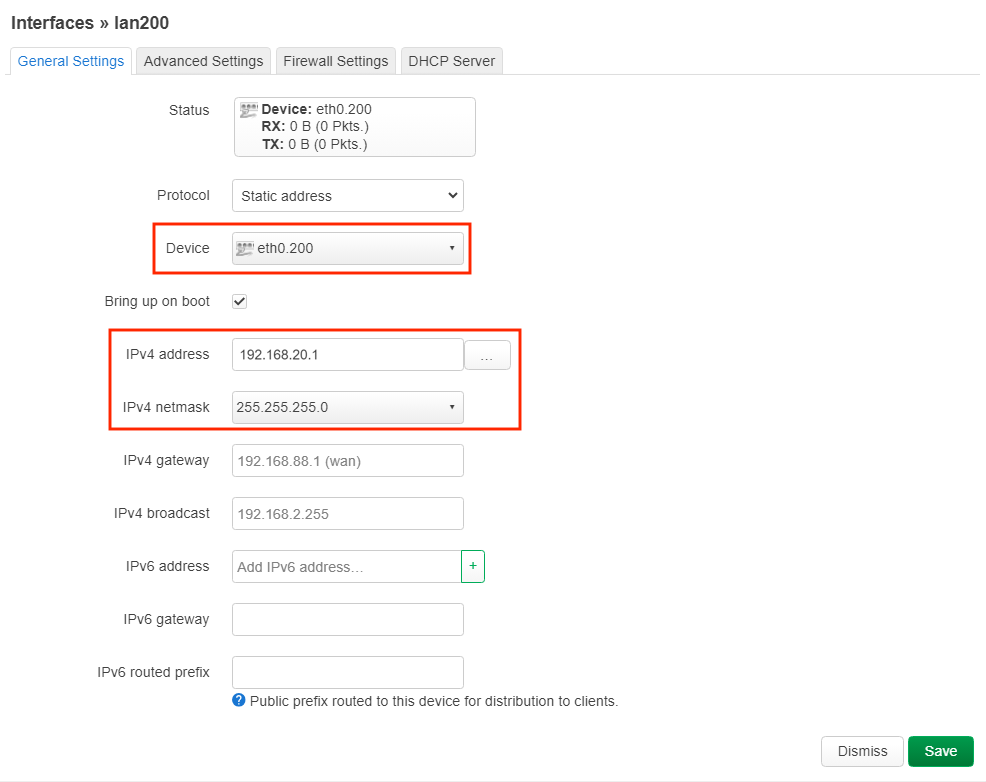
uci set network.lan200.device='eth0.200'
uci set network.lan200.ipaddr='192.168.20.1'
uci set network.lan200.netmask='255.255.255.0'
uci set network.lan200.type='bridge'
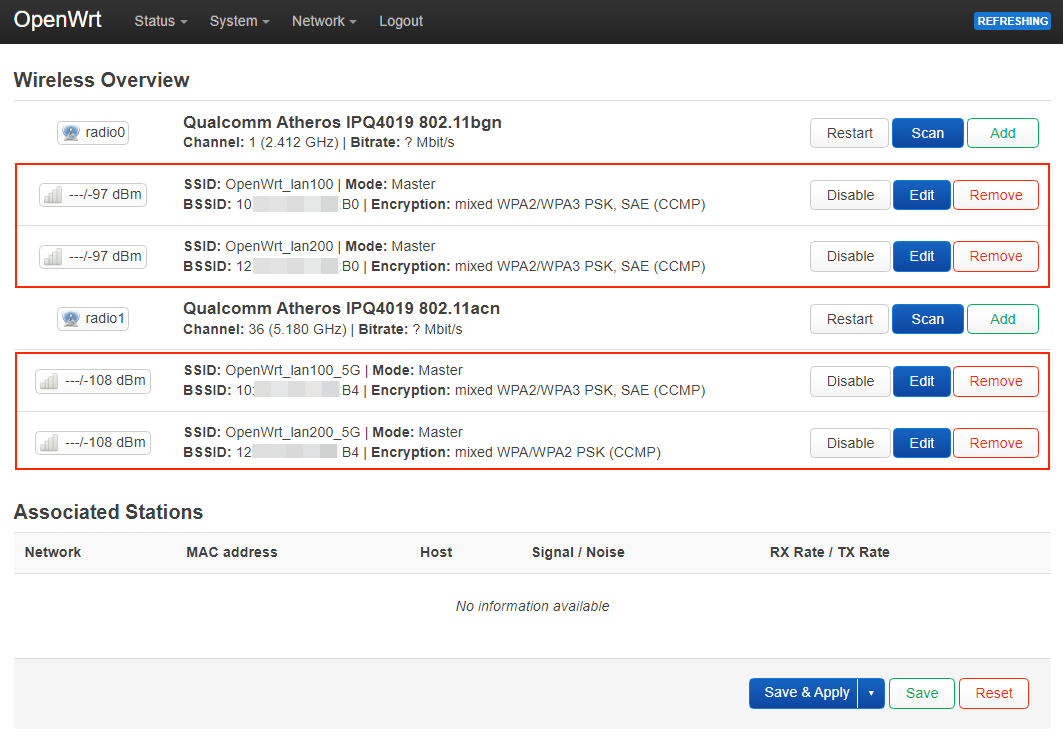
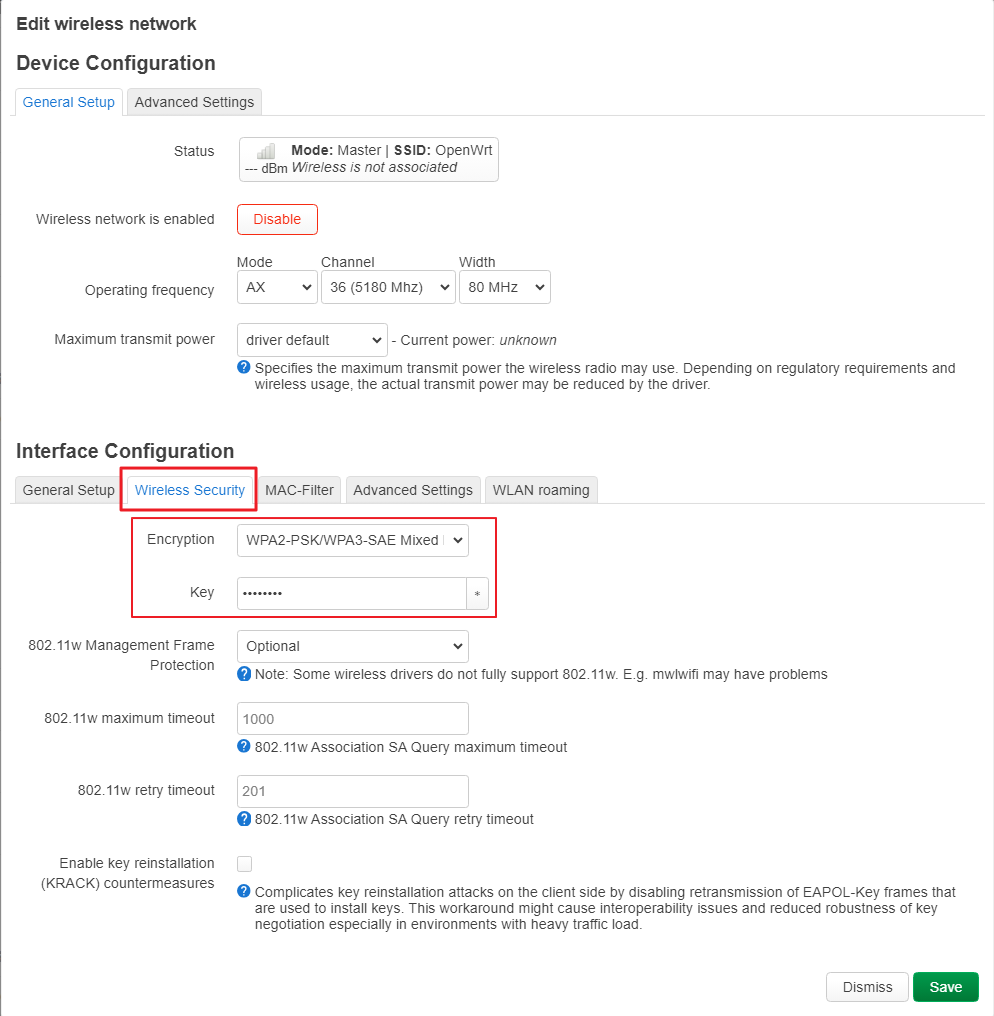
# /etc/config/wireless
uci set wireless.radio0.cell_density='0'
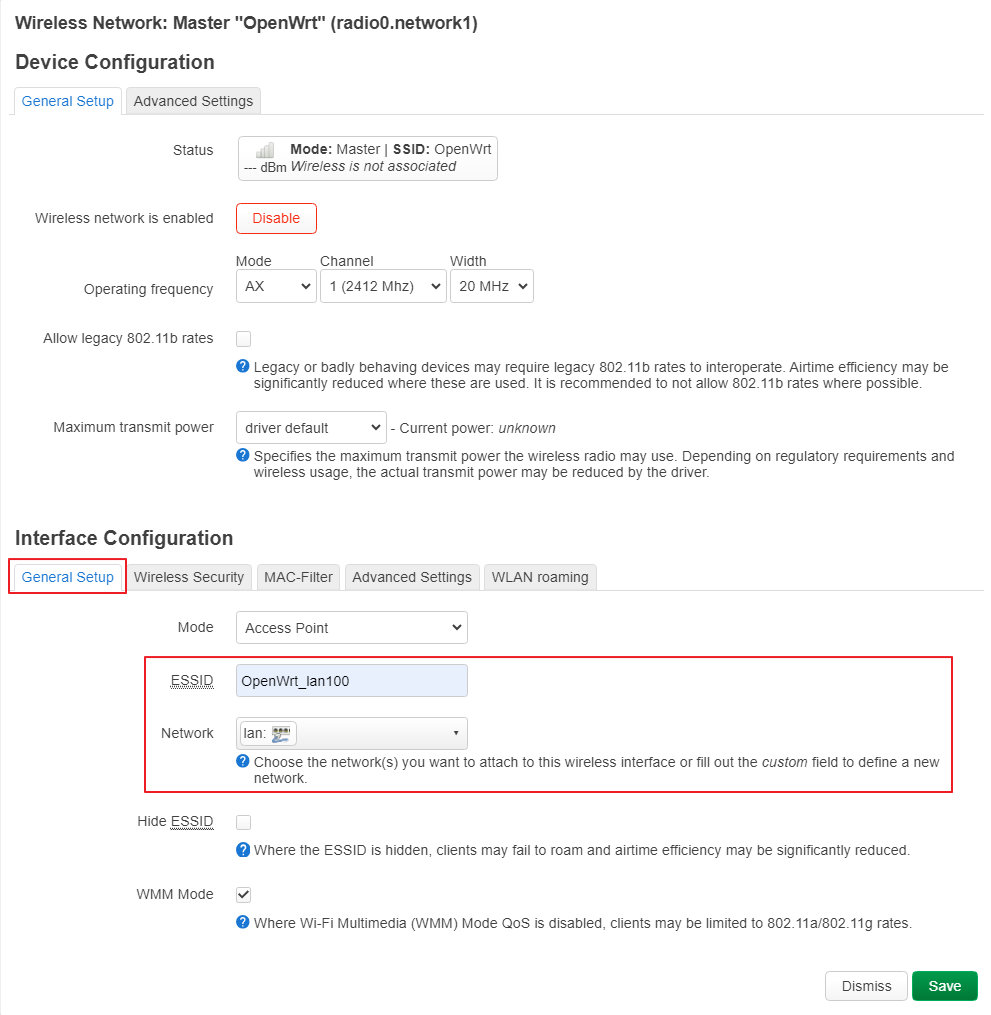
uci set wireless.default_radio0.ssid='OpenWrt_lan100'
uci set wireless.default_radio0.encryption='sae-mixed'
uci set wireless.default_radio0.key='YOUR_PASSWD'
uci del wireless.radio0.disabled
uci set wireless.wifinet2=wifi-iface
uci set wireless.wifinet2.device='radio0'
uci set wireless.wifinet2.mode='ap'
uci set wireless.wifinet2.ssid='OpenWrt_lan200'
uci set wireless.wifinet2.encryption='sae-mixed'
uci set wireless.wifinet2.key='YOUR_PASSWD'
uci set wireless.wifinet2.network='lan200'
uci set wireless.radio1.cell_density='0'
uci set wireless.default_radio1.ssid='OpenWrt_lan100_5G'
uci set wireless.default_radio1.encryption='sae-mixed'
uci set wireless.default_radio1.key='YOUR_PASSWD'
uci del wireless.radio1.disabled
uci set wireless.wifinet3=wifi-iface
uci set wireless.wifinet3.device='radio1'
uci set wireless.wifinet3.mode='ap'
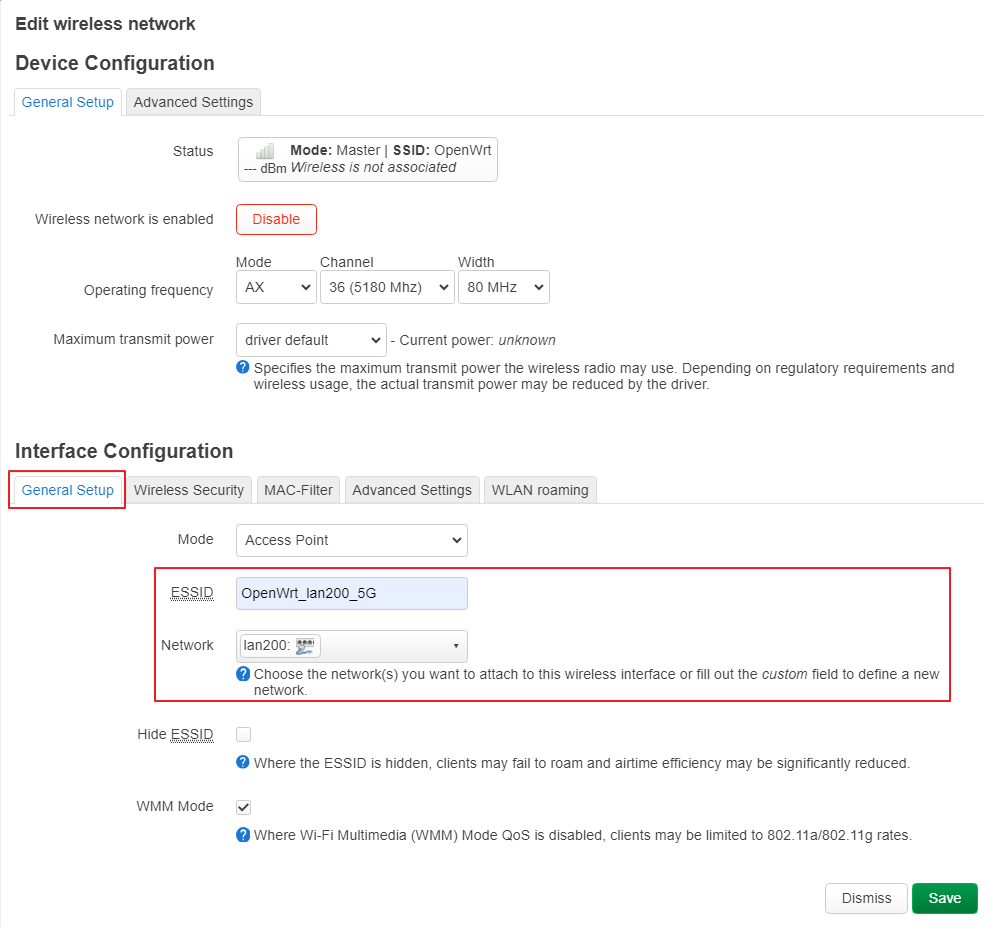
uci set wireless.wifinet3.ssid='OpenWrt_lan200_5G'
uci set wireless.wifinet3.encryption='sae-mixed'
uci set wireless.wifinet3.key='YOUR_PASSWD'
uci set wireless.wifinet3.network='lan200'
# /etc/config/dhcp
uci del dhcp.lan.ra_slaac
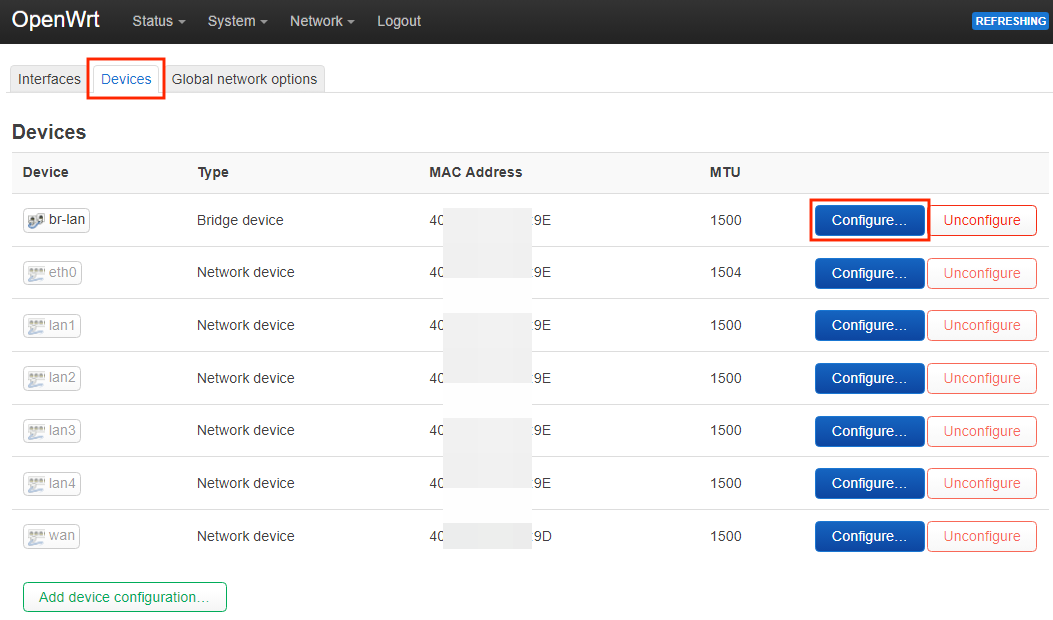
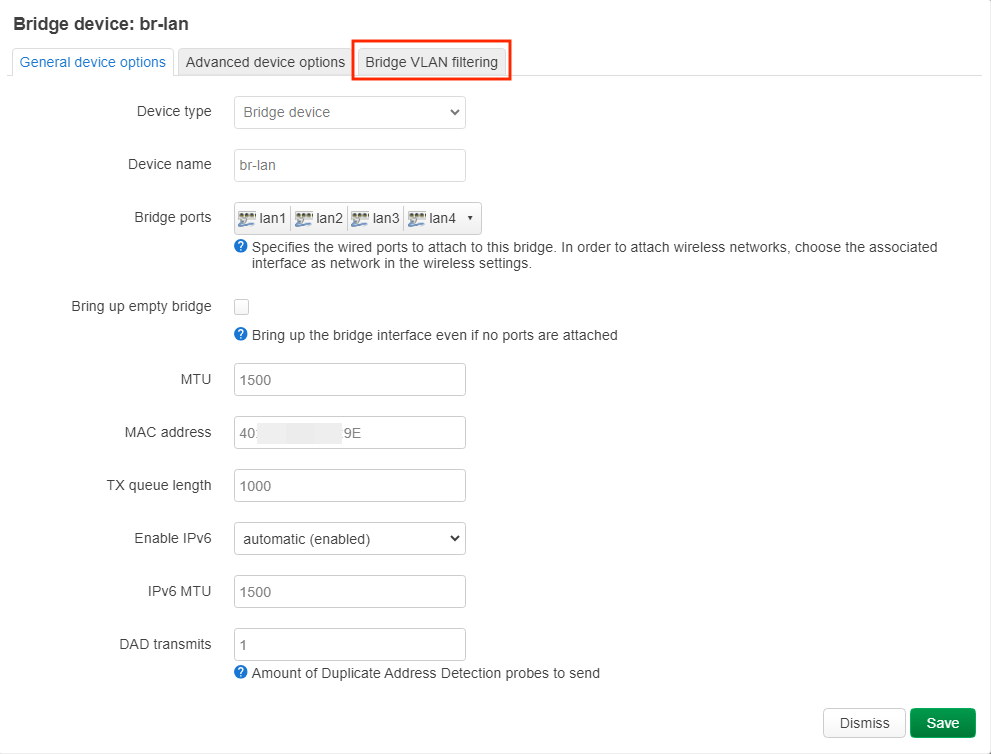
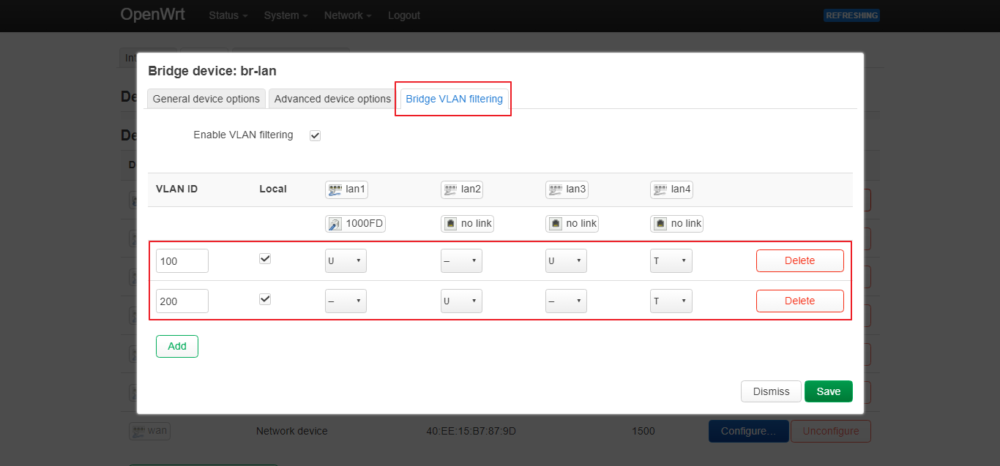
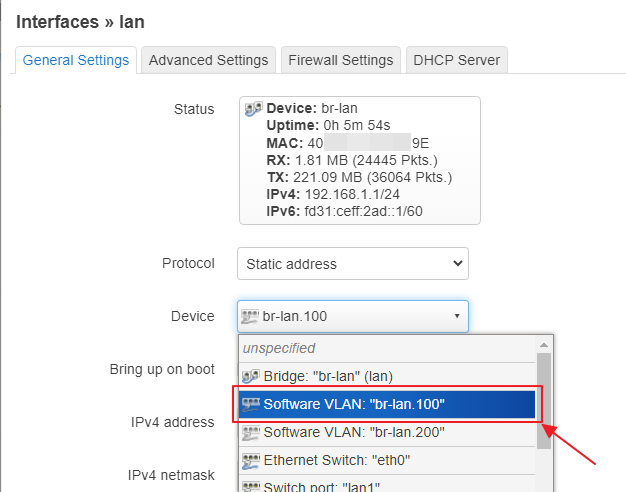
# /etc/config/network
uci add network bridge-vlan # =cfg07a1b0
uci set network.@bridge-vlan[-1].device='br-lan'
uci set network.@bridge-vlan[-1].vlan='100'
uci add_list network.@bridge-vlan[-1].ports='lan1'
uci add_list network.@bridge-vlan[-1].ports='lan3'
uci add_list network.@bridge-vlan[-1].ports='lan4:t'
uci add network bridge-vlan # =cfg08a1b0
uci set network.@bridge-vlan[-1].device='br-lan'
uci set network.@bridge-vlan[-1].vlan='200'
uci add_list network.@bridge-vlan[-1].ports='lan2'
uci add_list network.@bridge-vlan[-1].ports='lan4:t'
uci set network.lan.device='br-lan.100'
# /etc/config/dhcp
uci set dhcp.lan.start='2'
uci set dhcp.lan.limit='254'
uci set dhcp.lan200=dhcp
uci set dhcp.lan200.interface='lan200'
uci set dhcp.lan200.start='100'
uci set dhcp.lan200.limit='150'
uci set dhcp.lan200.leasetime='12h'
uci set dhcp.lan200.start='2'
uci set dhcp.lan200.limit='254'
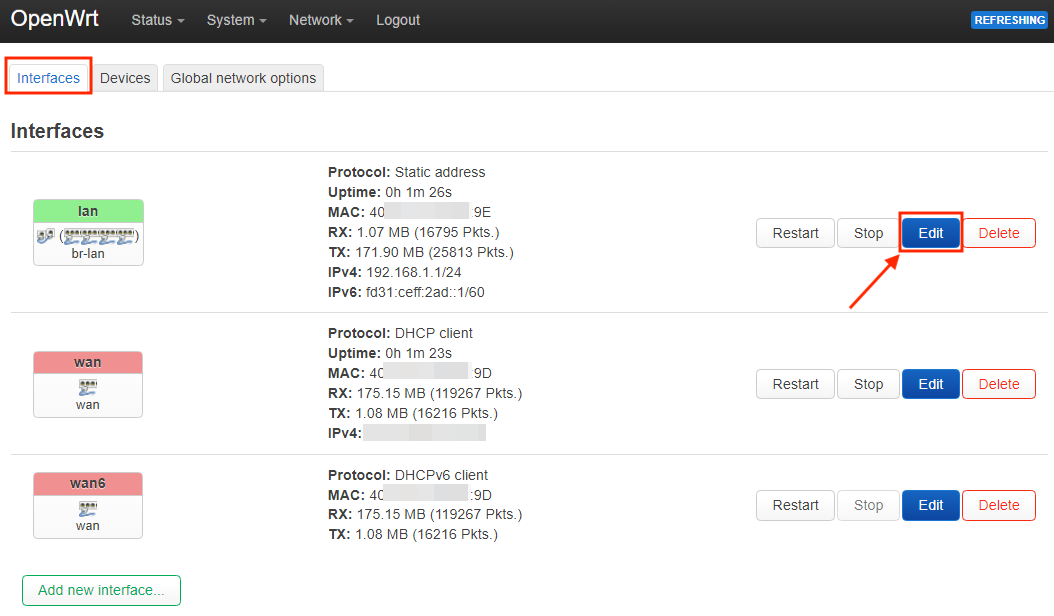
# /etc/config/network
uci set network.lan.ipaddr='192.168.10.1'
uci set network.lan200=interface
uci set network.lan200.proto='static'
uci set network.lan200.device='br-lan.200'
uci set network.lan200.ipaddr='192.168.20.1'
uci set network.lan200.netmask='255.255.255.0'
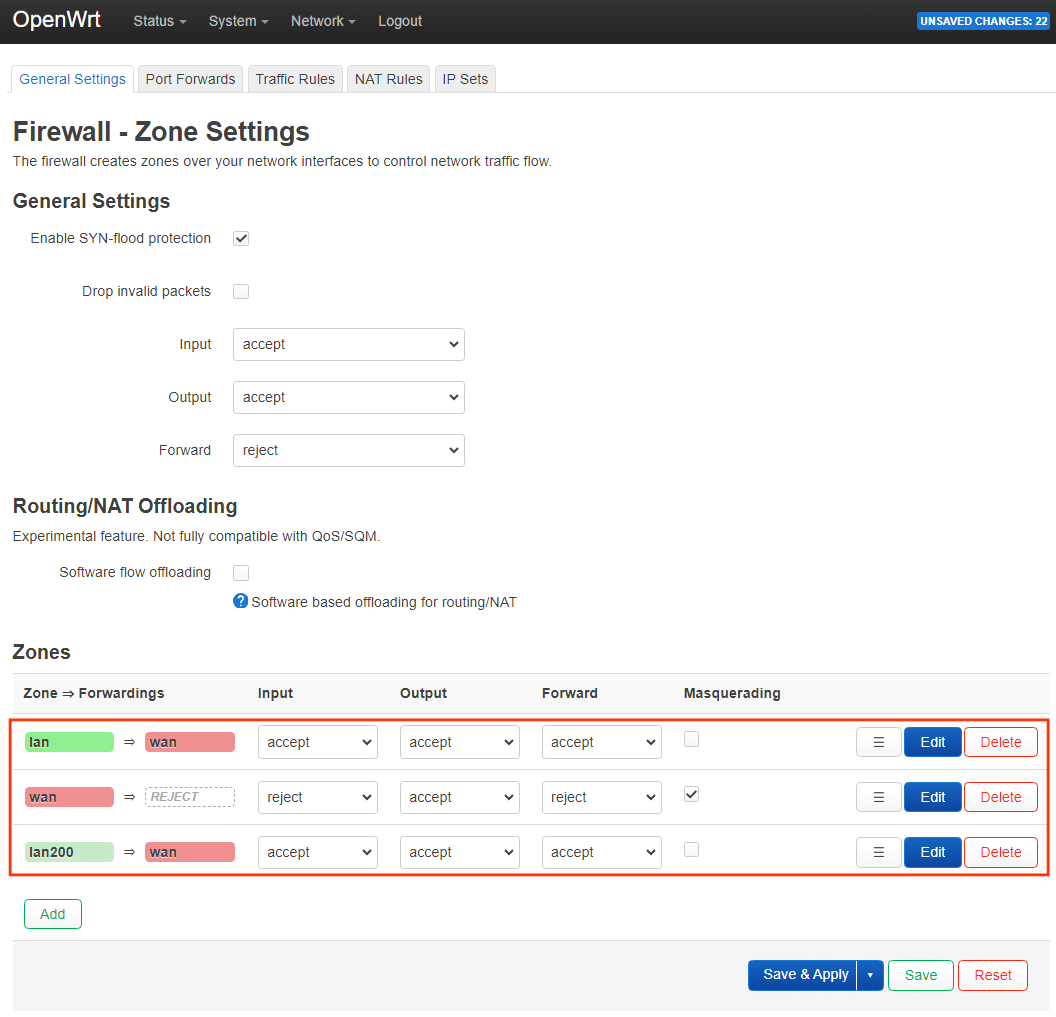
# /etc/config/firewall
uci add firewall zone # =cfg0edc81
uci set firewall.@zone[-1].name='lan200'
uci set firewall.@zone[-1].input='ACCEPT'
uci set firewall.@zone[-1].output='ACCEPT'
uci set firewall.@zone[-1].forward='REJECT'
uci add_list firewall.@zone[-1].network='lan200'
uci add firewall forwarding # =cfg0fad58
uci set firewall.@forwarding[-1].src='lan200'
uci set firewall.@forwarding[-1].dest='wan'
# /etc/config/wireless
uci del wireless.radio0.disabled
uci set wireless.wifinet2=wifi-iface
uci set wireless.wifinet2.device='radio0'
uci set wireless.wifinet2.mode='ap'
uci set wireless.wifinet2.ssid='OpenWrt_lan200'
uci set wireless.wifinet2.encryption='sae-mixed'
uci set wireless.wifinet2.key='YOUR_PASSWD'
uci set wireless.wifinet2.network='lan200'
uci set wireless.radio0.cell_density='0'
uci set wireless.default_radio0.ssid='OpenWrt_lan100'
uci set wireless.default_radio0.encryption='sae-mixed'
uci set wireless.default_radio0.key='YOUR_PASSWD'
uci del wireless.radio1.disabled
uci set wireless.wifinet3=wifi-iface
uci set wireless.wifinet3.device='radio1'
uci set wireless.wifinet3.mode='ap'
uci set wireless.wifinet3.ssid='OpenWrt_lan200_5G'
uci set wireless.wifinet3.encryption='sae-mixed'
uci set wireless.wifinet3.key='YOUR_PASSWD'
uci set wireless.wifinet3.network='lan200'
uci set wireless.radio1.cell_density='0'
uci set wireless.default_radio1.ssid='OpenWrt_lan100_5G'
uci set wireless.default_radio1.encryption='sae-mixed'
uci set wireless.default_radio1.key='YOUR_PASSWD'
在 Kubernetes (K8s) 的微服務架構中,了解 Pod 之間的連線細節是至關重要的一環。透過這篇文章的例子,深度探討 Kubernetes 的工作原理,讓讀者不僅理解 Pod 與 Service 之間的基本關聯,還能掌握其背後的機制與細節。我們將從 Pod 的概念和建立開始,進一步講解 Service 的角色和功能,並討論如何實現兩者間的連線。希望通過這篇文章,讀者能夠更具信心地運用 Kubernetes,無論是管理現有的微服務,還是設計新的應用架構。我們將嘗試將這些概念以最簡潔明了的方式呈現,使初學者和專業人士都能從中獲益。本文章帶你深入淺出,一窺 Kubernetes 的核心,理解與掌握 Pod 連線的關鍵知識。
# kubeadm init --pod-network-cidr=10.244.0.0/16 --cri-socket unix:///var/run/cri-dockerd.sock

[init] Using Kubernetes version: v1.28.2
[preflight] Running pre-flight checks
[preflight] Pulling images required for setting up a Kubernetes cluster
[preflight] This might take a minute or two, depending on the speed of your internet connection
[preflight] You can also perform this action in beforehand using 'kubeadm config images pull'
W0503 18:35:29.693213    1321 images.go:80] could not find officially supported version of etcd for Kubernetes v1.28.2, falling back to the nearest etcd version (3.5.7-0)
W0503 18:35:46.627127    1321 checks.go:835] detected that the sandbox image "registry.k8s.io/pause:3.6" of the container runtime is inconsistent with that used by kubeadm. It is recommended that using "registry.k8s.io/pause:3.9" as the CRI sandbox image.
[certs] Using certificateDir folder "/etc/kubernetes/pki"
[certs] Generating "ca" certificate and key
[certs] Generating "apiserver" certificate and key
[certs] apiserver serving cert is signed for DNS names [k8s-ctrl kubernetes kubernetes.default kubernetes.default.svc kubernetes.default.svc.cluster.local] and IPs [10.96.0.1 192.168.1.100]
[certs] Generating "apiserver-kubelet-client" certificate and key
[certs] Generating "front-proxy-ca" certificate and key
[certs] Generating "front-proxy-client" certificate and key
[certs] Generating "etcd/ca" certificate and key
[certs] Generating "etcd/server" certificate and key
[certs] etcd/server serving cert is signed for DNS names [k8s-ctrl localhost] and IPs [192.168.1.100 127.0.0.1 ::1]
[certs] Generating "etcd/peer" certificate and key
[certs] etcd/peer serving cert is signed for DNS names [k8s-ctrl localhost] and IPs [192.168.1.100 127.0.0.1 ::1]
[certs] Generating "etcd/healthcheck-client" certificate and key
[certs] Generating "apiserver-etcd-client" certificate and key
[certs] Generating "sa" key and public key
[kubeconfig] Using kubeconfig folder "/etc/kubernetes"
[kubeconfig] Writing "admin.conf" kubeconfig file
[kubeconfig] Writing "kubelet.conf" kubeconfig file
[kubeconfig] Writing "controller-manager.conf" kubeconfig file
[kubeconfig] Writing "scheduler.conf" kubeconfig file
[kubelet-start] Writing kubelet environment file with flags to file "/var/lib/kubelet/kubeadm-flags.env"
[kubelet-start] Writing kubelet configuration to file "/var/lib/kubelet/config.yaml"
[kubelet-start] Starting the kubelet
[control-plane] Using manifest folder "/etc/kubernetes/manifests"
[control-plane] Creating static Pod manifest for "kube-apiserver"
[control-plane] Creating static Pod manifest for "kube-controller-manager"
[control-plane] Creating static Pod manifest for "kube-scheduler"
[etcd] Creating static Pod manifest for local etcd in "/etc/kubernetes/manifests"
W0503 18:36:08.496065    1321 images.go:80] could not find officially supported version of etcd for Kubernetes v1.28.2, falling back to the nearest etcd version (3.5.7-0)
[wait-control-plane] Waiting for the kubelet to boot up the control plane as static Pods from directory "/etc/kubernetes/manifests". This can take up to 4m0s
[apiclient] All control plane components are healthy after 8.502958 seconds
[upload-config] Storing the configuration used in ConfigMap "kubeadm-config" in the "kube-system" Namespace
[kubelet] Creating a ConfigMap "kubelet-config" in namespace kube-system with the configuration for the kubelets in the cluster
[upload-certs] Skipping phase. Please see --upload-certs
[mark-control-plane] Marking the node k8s-ctrl as control-plane by adding the labels: [node-role.kubernetes.io/control-plane node.kubernetes.io/exclude-from-external-load-balancers]
[mark-control-plane] Marking the node k8s-ctrl as control-plane by adding the taints [node-role.kubernetes.io/control-plane:NoSchedule]
[bootstrap-token] Using token: c1hnqs.c4imcnzqxqry62d0
[bootstrap-token] Configuring bootstrap tokens, cluster-info ConfigMap, RBAC Roles
[bootstrap-token] Configured RBAC rules to allow Node Bootstrap tokens to get nodes
[bootstrap-token] Configured RBAC rules to allow Node Bootstrap tokens to post CSRs in order for nodes to get long term certificate credentials
[bootstrap-token] Configured RBAC rules to allow the csrapprover controller automatically approve CSRs from a Node Bootstrap Token
[bootstrap-token] Configured RBAC rules to allow certificate rotation for all node client certificates in the cluster
[bootstrap-token] Creating the "cluster-info" ConfigMap in the "kube-public" namespace
[kubelet-finalize] Updating "/etc/kubernetes/kubelet.conf" to point to a rotatable kubelet client certificate and key
[addons] Applied essential addon: CoreDNS
[addons] Applied essential addon: kube-proxy

Your Kubernetes control-plane has initialized successfully!

To start using your cluster, you need to run the following as a regular user:

  mkdir -p $HOME/.kube
  sudo cp -i /etc/kubernetes/admin.conf $HOME/.kube/config
  sudo chown $(id -u):$(id -g) $HOME/.kube/config

Alternatively, if you are the root user, you can run:

  export KUBECONFIG=/etc/kubernetes/admin.conf

You should now deploy a pod network to the cluster.
Run "kubectl apply -f [podnetwork].yaml" with one of the options listed at:
  https://kubernetes.io/docs/concepts/cluster-administration/addons/

Then you can join any number of worker nodes by running the following on each as root:

kubeadm join 192.168.1.100:6443 --token cxxxxs.c4xxxxxxxxxxxxd0 \
    --discovery-token-ca-cert-hash sha256:103d7xxxxxxxxxxxxxxxxxxxxxxxxxxxxxxxxxxxxxxxxxxxxxxxxxxxxxx5b1b6
如果沒意外的話,完成之後會看到
Your Kubernetes control-plane has initialized successfully!
$ kubeadm join 192.168.1.100:6443
    --token cxxxxs.c4xxxxxxxxxxxxd0 \
    --discovery-token-ca-cert-hash sha256:103d7xxxxxxxxxxxxxxxxxxxxxxxxxxxxxxxxxxxxxxxxxxxxxxxxxxxxxx5b1b6 \
    --cri-socket unix:///var/run/cri-dockerd.sock

[preflight] Running pre-flight checks
[preflight] Reading configuration from the cluster...
[preflight] FYI: You can look at this config file with 'kubectl -n kube-system get cm kubeadm-config -o yaml'
[kubelet-start] Writing kubelet configuration to file "/var/lib/kubelet/config.yaml"
[kubelet-start] Writing kubelet environment file with flags to file "/var/lib/kubelet/kubeadm-flags.env"
[kubelet-start] Starting the kubelet
[kubelet-start] Waiting for the kubelet to perform the TLS Bootstrap...

This node has joined the cluster:
* Certificate signing request was sent to apiserver and a response was received.
* The Kubelet was informed of the new secure connection details.

Run 'kubectl get nodes' on the control-plane to see this node join the cluster.
這樣就加入叢集了
查看 kubelet Log
另外這二個指令,對於 kubelet 的啟動不了的問題,也會有一些方向
查看 kubelet 狀態
systemctl status kubelet
查看 kubelet 的 Log
journalctl -xeu kubelet
最後,一個小小經驗談, --control-plane-endpoint 和 --apiserver-advertise-address 的 IP 可以再次確認是否有打錯字,這也會造成錯誤
$ kubeadm reset -f --cri-socket unix:///var/run/cri-dockerd.sock

[preflight] Running pre-flight checks
W0507 02:43:32.160215    1264 removeetcdmember.go:106] [reset] No kubeadm config, using etcd pod spec to get data directory
[reset] Deleted contents of the etcd data directory: /var/lib/etcd
[reset] Stopping the kubelet service
[reset] Unmounting mounted directories in "/var/lib/kubelet"
W0507 02:43:32.169757    1264 cleanupnode.go:134] [reset] Failed to evaluate the "/var/lib/kubelet" directory. Skipping its unmount and cleanup: lstat /var/lib/kubelet: no such file or directory
[reset] Deleting contents of directories: [/etc/kubernetes/manifests /etc/kubernetes/pki]
[reset] Deleting files: [/etc/kubernetes/admin.conf /etc/kubernetes/kubelet.conf /etc/kubernetes/bootstrap-kubelet.conf /etc/kubernetes/controller-manager.conf /etc/kubernetes/scheduler.conf]

The reset process does not clean CNI configuration. To do so, you must remove /etc/cni/net.d

The reset process does not reset or clean up iptables rules or IPVS tables.
If you wish to reset iptables, you must do so manually by using the "iptables" command.

If your cluster was setup to utilize IPVS, run ipvsadm --clear (or similar)
to reset your system's IPVS tables.

The reset process does not clean your kubeconfig files and you must remove them manually.
Please, check the contents of the $HOME/.kube/config file.
kube-system (K8s 核心元件) 的 kube-controller-manager 的 Pod 為 Running
kube-system (K8s 核心元件) 的 kube-apiserver 的 Pod 為 Running
kube-system (K8s 核心元件) 的 kube-scheduler 的 Pod 為 Running
kube-system (K8s 核心元件) 的若干個 kube-proxy 的 Pod 為 Running
當然,放在 kube-system 裡面的 Pod 屬於系統保留的,請勿更動修改。
取得所有 nodes (主機節點)
你可以用 kubectl get nodes -A 指令來取得所有運作的 nodes
kubectl get nodes -A

NAME        STATUS   ROLES           AGE     VERSION
k8s-ctrl    Ready    control-plane   4m40s   v1.28.2
k8s-node1   Ready    <none>          3m59s   v1.28.2
k8s-node2   Ready    <none>          3m53s   v1.28.2
以 iOS 而言,你可能要透過 NSOperationQueue 或者 GCD (Grand Central Dispatch) 這些方法來做非同步的流程。
如果要接續觸發( A 事情做完做 B )的情境,A 事情的 callback 做完之後緊接著 B 事情,你可能會得到一個很深的縮排。
如果是互相等待完成( A 跟 B 事情 )的情境,你可能要透過一些 boolean 來把狀態記住,然後 A 事情跟 B 事情的 callback 同時要檢查對方是否做完,才接續另外一個 callback 。 以上並不是說這樣寫不能用,只是你會有更好的解法,讓程式碼變得更乾淨好閱讀。
firstly {
    // Show Loading status bar
    return when(myAsnycTaskA(), myAsnycTaskB())
}.then { (resultA:MyObjectA, resultB:MyObjectB) -> Void in
    // Show results
}.always {
    // Hide Loading status bar
}.catch { error in
    print(error)
}
最簡單的範例
這是一個最基本的範例
基本句型有 then 跟 catch 就可以了
myAsnycTaskA().then {
    (resultA:MyObjectA) -> Void in
    // Show results

}.catch { error in
    print(error)
}
firstly {
    // Show Loading status bar
    return when(myAsnycTaskA(), myAsnycTaskB())
}.then { (resultA:MyObjectA, resultB:MyObjectB) -> Promise<MyObjectC> in
    // So some processing
    return myProcessingTaskC()
}.then { (resultC:MyObjectC) -> Void in
    // Show results
}.always {
    // Hide Loading status bar
}.catch { error in
    print(error)
}
#
# Default PF configuration file.
#
# This file contains the main ruleset, which gets automatically loaded
# at startup.  PF will not be automatically enabled, however.  Instead,
# each component which utilizes PF is responsible for enabling and disabling
# PF via -E and -X as documented in pfctl(8).  That will ensure that PF
# is disabled only when the last enable reference is released.
#
# Care must be taken to ensure that the main ruleset does not get flushed,
# as the nested anchors rely on the anchor point defined here. In addition,
# to the anchors loaded by this file, some system services would dynamically
# insert anchors into the main ruleset. These anchors will be added only when
# the system service is used and would removed on termination of the service.
#
# See pf.conf(5) for syntax.
#
#
# com.apple anchor point
#
scrub-anchor "com.apple/*"
nat-anchor "com.apple/*"
rdr-anchor "com.apple/*"
dummynet-anchor "com.apple/*"
anchor "com.apple/*"
load anchor "com.apple" from "/etc/pf.anchors/com.apple"
# 最佳化模式:一般模式
set optimization normal
# 阻擋的策略:直接丟棄
set block-policy drop
# 封包需要照順序
set require-order yes
# 跳過 lookback 介面不處理
set skip on lo
# log 紀錄只記最危急的等級
set debug urgent
# === Developer machine example ===
# 指定連線介面
int_if="{ en0 en1 }"
# 指定要開放 連入 的服務
webports = "{http, https}"
# 定義私有IP範圍
table <private> const { 192.168/16 }
# 預設允許所有連出連入連線,並保持狀態
pass in all keep state
pass out all keep state
# 跳過 lookback 介面不處理
set skip on lo
# MySQL (TCP:3306) 允許本機 lookback 介面 能連線,阻擋其他的封包
pass in quick on lo proto tcp from any to any port 3306
block in quick proto tcp from any to any port 3306
# 只允許私有 IP 能連線,阻擋其他的封包
pass in quick proto tcp from <private> to any port webports
block in quick proto tcp from any to any port webports
測試
設定好了之後來測試,這裡列出幾個:
是否本機能正常連線到 MySQL?
找一台同網段的裝置,是否無法連接 MySQL?
找一台接不同網路的裝置來測試,是否無法連接 MySQL?
是否本機能正常看到自己開發中的網站?
找一台同網段的裝置,是否能正常看到網站?
找一台接不同網路的裝置來測試,是否能正常看到網站?
附註:MySQL 連線指令為
$ mysql -u root -h <YOUR_IP> -p
測試 HTTP 伺服器
$ docker run -d -p 80:00 j796160836/simple-test-http
使用 docker 這個測試 image,
對應內部 container 80 port (後者) 到主機 80 port (前者)
# === HTTP server example ====
# 指定對外連線介面
ext_if="{ ppp0 }"
# 指定要開放 連入 的服務
webports = "{http, https}"
# 指定要開放的 連出 的服務
int_tcp_services = "{domain, ssh, ntp, www, https}"
int_udp_services = "{domain, ntp}"
# 跳過 lookback 介面不處理
set skip on lo
# 重新組合封包
scrub in all random-id fragment reassemble
# 擋掉所有 進入 的連線
block drop in log all
# 擋掉所有 連出 的連線
block out all
# 阻擋惡意偽造封包
antispoof quick for $ext_if
# 指定要開放 連入 的服務
pass in on $ext_if proto tcp from any to any port $webports
# 指定要開放的 連出 的服務
pass out quick on $ext_if proto tcp to any port $int_tcp_services
pass out quick on $ext_if proto udp to any port $int_udp_services
# 接受 PING 回應
pass on $ext_if inet proto icmp to $ext_if icmp-type "echoreq" keep state
# 接受使用 traceroute
pass out on $ext_if inet proto udp from any to any port 33433 >< 33626 keep state