# apk info | grep wpad
WARNING: opening from cache https://downloads.openwrt.org/snapshots/targets/mediatek/filogic/packages/packages.adb: No such file or directory
WARNING: opening from cache https://downloads.openwrt.org/snapshots/packages/aarch64_cortex-a53/base/packages.adb: No such file or directory
WARNING: opening from cache https://downloads.openwrt.org/snapshots/targets/mediatek/filogic/kmods/6.12.67-1-aa4948ece684816486d1fa5040ce0bb3/packages.adb: No such file or directory
WARNING: opening from cache https://downloads.openwrt.org/snapshots/packages/aarch64_cortex-a53/luci/packages.adb: No such file or directory
WARNING: opening from cache https://downloads.openwrt.org/snapshots/packages/aarch64_cortex-a53/packages/packages.adb: No such file or directory
WARNING: opening from cache https://downloads.openwrt.org/snapshots/packages/aarch64_cortex-a53/routing/packages.adb: No such file or directory
WARNING: opening from cache https://downloads.openwrt.org/snapshots/packages/aarch64_cortex-a53/telephony/packages.adb: No such file or directory
WARNING: opening from cache https://downloads.openwrt.org/snapshots/packages/aarch64_cortex-a53/video/packages.adb: No such file or directory
wpad-basic-mbedtls
(這些 WARNING 可以先不用理會,關注在搜尋結果即可)
移除wpad-basic-mbedtls 套件,改安裝 wpad-wolfssl 套件
apk del wpad-basic-mbedtls && apk add wpad-wolfssl
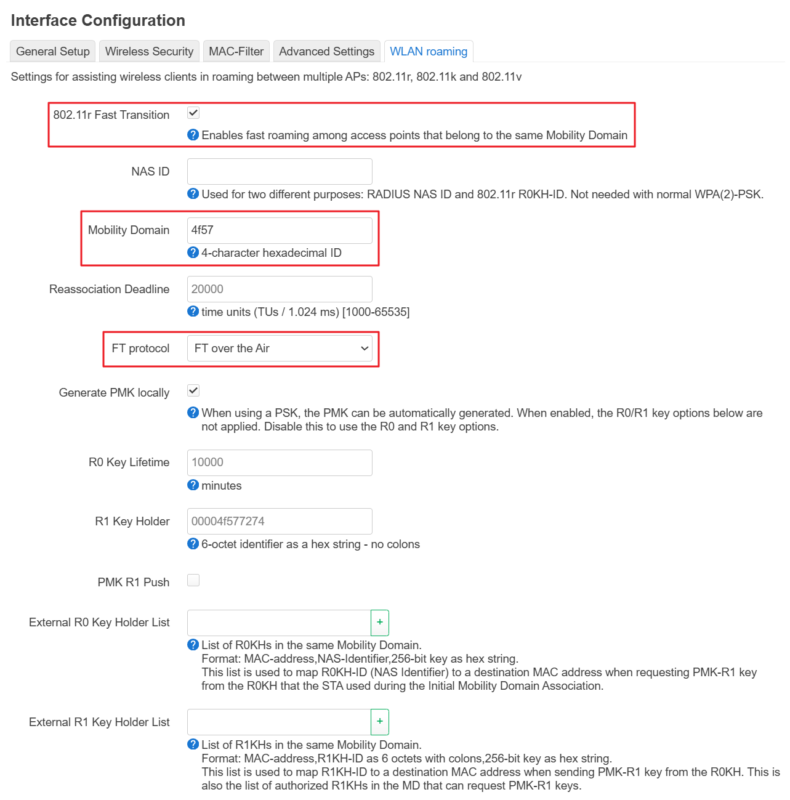
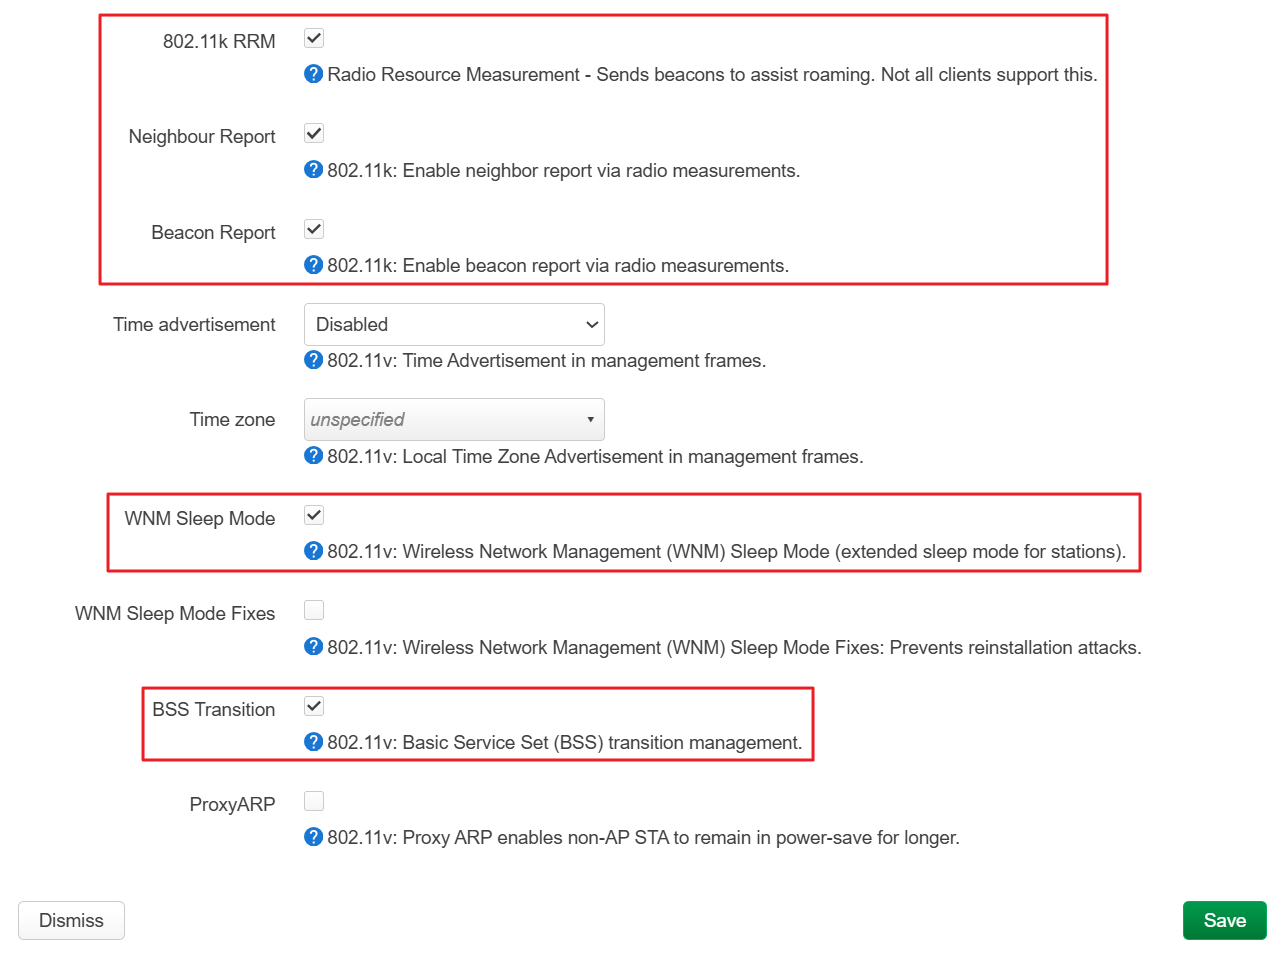
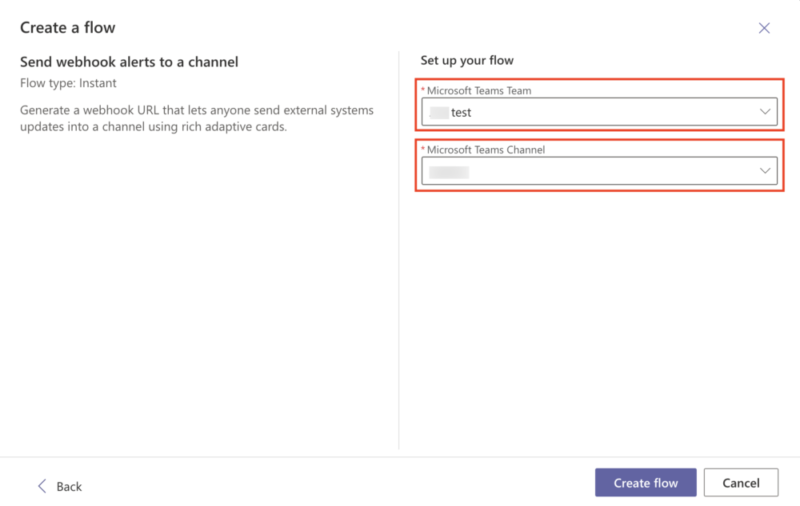
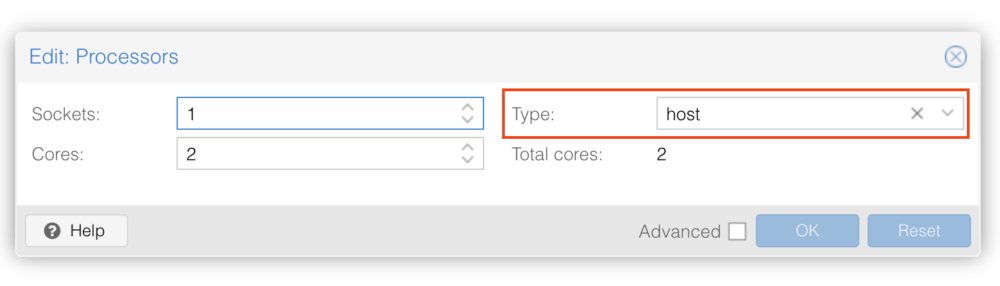
勾選Generate PMK locally (本地生成 PMK) 。 (When using a PSK, the PMK can be automatically generated. When enabled, the R0/R1 key options below are not applied. Disable this to use the R0 and R1 key options.) 說明:勾選後路由器會自動處理金鑰,不需要手動輸入繁瑣的 R0KH/R1KH 列表。
BusyBox v1.37.0 (2026-01-02 17:07:02 UTC) built-in shell (ash)

  _______                     ________        __
 |       |.-----.-----.-----.|  |  |  |.----.|  |_
 |   -   ||  _  |  -__|     ||  |  |  ||   _||   _|
 |_______||   __|_____|__|__||________||__|  |____|
          |__| W I R E L E S S   F R E E D O M
 -----------------------------------------------------
 OpenWrt SNAPSHOT, r32804-ac8b5526bc
 -----------------------------------------------------

 OpenWrt recently switched to the "apk" package manager!

 OPKG Command           APK Equivalent      Description
 ------------------------------------------------------------------
 opkg install <pkg>     apk add <pkg>       Install a package
 opkg remove <pkg>      apk del <pkg>       Remove a package
 opkg upgrade           apk upgrade         Upgrade all packages
 opkg files <pkg>       apk info -L <pkg>   List package contents
 opkg list-installed    apk info            List installed packages
 opkg update            apk update          Update package lists
 opkg search <pkg>      apk search <pkg>    Search for packages
 ------------------------------------------------------------------

For more information visit:
https://openwrt.org/docs/guide-user/additional-software/opkg-to-apk-cheatsheet
這邊用
OpenSSL 1.1.1 for AIX 6.1, 7.1, 7.2 & 7.3
VRMF: 1.1.2.2400 (1.1.1x with no weak ciphers support)
做為範例
檔名:openssl-1.1.2.2400.tar.Z
首先我們把它解壓縮
(註:這邊雖然也是 tar 指令,但跟 Linux 的指令用法不同)
zcat openssl-1.1.2.2400.tar.Z | tar -xvf -
執行結果
x openssl-1.1.2.2400
x openssl-1.1.2.2400/openssl.base, 70546432 bytes, 137786 media blocks.
x openssl-1.1.2.2400/openssl.license, 31744 bytes, 62 media blocks.
x openssl-1.1.2.2400/openssl.man.en_US, 5326848 bytes, 10404 media blocks.
得到 openssl-1.1.2.2400 資料夾
我們切換資料夾,用 installp 來安裝
cd openssl-1.1.2.2400
installp -qaXFY -d . openssl.base openssl.license openssl.man.en_US
執行結果
+-----------------------------------------------------------------------------+
                    Pre-installation Verification...
+-----------------------------------------------------------------------------+
Verifying selections...done
Verifying requisites...done
Results...

SUCCESSES
---------
  Filesets listed in this section passed pre-installation verification
  and will be installed.

  Selected Filesets
  -----------------
  openssl.base 1.1.2.2400                     # Open Secure Socket Layer
  openssl.license 1.1.2.2400                  # Open Secure Socket License
  openssl.man.en_US 1.1.2.2400                # Open Secure Socket Layer

  << End of Success Section >>

+-----------------------------------------------------------------------------+
                   BUILDDATE Verification ...
+-----------------------------------------------------------------------------+
Verifying build dates...done
FILESET STATISTICS
------------------
    3  Selected to be installed, of which:
        3  Passed pre-installation verification
  ----
    3  Total to be installed

+-----------------------------------------------------------------------------+
                         Installing Software...
+-----------------------------------------------------------------------------+

installp:  APPLYING software for:
        openssl.man.en_US 1.1.2.2400

. . . . . << Copyright notice for openssl.man.en_US >> . . . . . . .
 Licensed Materials - Property of IBM

 5765G6281
   Copyright International Business Machines Corp. 2011, 2024.

 All rights reserved.
 US Government Users Restricted Rights - Use, duplication or disclosure
 restricted by GSA ADP Schedule Contract with IBM Corp.
. . . . . << End of copyright notice for openssl.man.en_US >>. . . .

Filesets processed:  1 of 3  (Total time:  32 secs).

installp:  APPLYING software for:
        openssl.license 1.1.2.2400

. . . . . << Copyright notice for openssl.license >> . . . . . . .
 Licensed Materials - Property of IBM

 5765G6281
   Copyright International Business Machines Corp. 2011, 2024.

 All rights reserved.
 US Government Users Restricted Rights - Use, duplication or disclosure
 restricted by GSA ADP Schedule Contract with IBM Corp.
. . . . . << End of copyright notice for openssl.license >>. . . .

Filesets processed:  2 of 3  (Total time:  32 secs).

installp:  APPLYING software for:
        openssl.base 1.1.2.2400

. . . . . << Copyright notice for openssl.base >> . . . . . . .
 Licensed Materials - Property of IBM

 5765G6281
   Copyright International Business Machines Corp. 2011, 2024.
   Copyright Baltimore Technologies Ltd. 2004.
   Copyright KISA (Korea Information Security Agency), 2007.
   Copyright Ben Laurie ([email protected]), 2008.
   Copyright Richard Levitte <[email protected]), 2004.
   Copyright The OpenSSL Project. 1998-2008
   Copyright The OpenTSA Project. 2002
   Copyright Andy Polyakov <[email protected]>, 2008
   Copyright Sun Microsystems, Inc. 2002.

 All rights reserved.
 US Government Users Restricted Rights - Use, duplication or disclosure
 restricted by GSA ADP Schedule Contract with IBM Corp.
. . . . . << End of copyright notice for openssl.base >>. . . .

Successfully updated the Kernel Authorization Table.
Successfully updated the Kernel Role Table.
Successfully updated the Kernel Command Table.
Successfully updated the Kernel Device Table.
Successfully updated the Kernel Object Domain Table.
Successfully updated the Kernel Domains Table.
Successfully updated the Kernel Authorization Table.
Successfully updated the Kernel Role Table.
Successfully updated the Kernel Command Table.
Successfully updated the Kernel Device Table.
Successfully updated the Kernel Object Domain Table.
Successfully updated the Kernel Domains Table.
Finished processing all filesets.  (Total time:  40 secs).

+-----------------------------------------------------------------------------+
                                Summaries:
+-----------------------------------------------------------------------------+

Installation Summary
--------------------
Name                        Level           Part        Event       Result
-------------------------------------------------------------------------------
openssl.man.en_US           1.1.2.2400      USR         APPLY       SUCCESS
openssl.license             1.1.2.2400      USR         APPLY       SUCCESS
openssl.base                1.1.2.2400      USR         APPLY       SUCCESS
openssl.base                1.1.2.2400      ROOT        APPLY       SUCCESS
+-----------------------------------------------------------------------------+
                    Pre-installation Verification...
+-----------------------------------------------------------------------------+
Verifying selections...done
Verifying requisites...done
Results...

SUCCESSES
---------
  Filesets listed in this section passed pre-installation verification
  and will be installed.

  Selected Filesets
  -----------------
  aixtools.gnu.bash.man.en_US 5.0.18.0        # gnu bash man pages
  aixtools.gnu.bash.rte 5.0.18.0              # gnu bash 15-Oct-2020
  aixtools.gnu.bash.share 5.0.18.0            # gnu bash universal files

  << End of Success Section >>

+-----------------------------------------------------------------------------+
                   BUILDDATE Verification ...
+-----------------------------------------------------------------------------+
Verifying build dates...done
FILESET STATISTICS
------------------
    3  Selected to be installed, of which:
        3  Passed pre-installation verification
  ----
    3  Total to be installed

+-----------------------------------------------------------------------------+
                         Installing Software...
+-----------------------------------------------------------------------------+

installp:  APPLYING software for:
        aixtools.gnu.bash.share 5.0.18.0
        aixtools.gnu.bash.rte 5.0.18.0
        aixtools.gnu.bash.man.en_US 5.0.18.0

Finished processing all filesets.  (Total time:  1 secs).

+-----------------------------------------------------------------------------+
                                Summaries:
+-----------------------------------------------------------------------------+

Installation Summary
--------------------
Name                        Level           Part        Event       Result
-------------------------------------------------------------------------------
aixtools.gnu.bash.share     5.0.18.0        USR         APPLY       SUCCESS
aixtools.gnu.bash.rte       5.0.18.0        USR         APPLY       SUCCESS
aixtools.gnu.bash.man.en_US 5.0.18.0        USR         APPLY       SUCCESS
如找不到 bash 可以用以下指令尋找
find / -name bash 2>/dev/null
這樣我們就萬事具備了
撰寫 ansible playbook 腳本
設定完成後,終於可以來寫 ansible playbook 了
這邊給一個範例,印出 oslevel,查看系統版本
在 Control node 這邊建立 playbook.yml 與 inventory 二個檔案
playbook.yml
- name: print os version
  hosts: aix
  gather_facts: no
  tasks:
    - name: print os version
      ansible.builtin.command: "oslevel"
      register: out
    - name: output
      ansible.builtin.debug:
        msg:
          - "{{ out.stdout_lines }}"
# kubeadm init \
    --control-plane-endpoint=192.168.1.100 \
    --apiserver-advertise-address=192.168.1.100 \
    --node-name k8s-ctrl \
    --apiserver-bind-port=6443 \
    --pod-network-cidr=10.244.0.0/16 \
    --cri-socket unix:///var/run/cri-dockerd.sock

[[init] Using Kubernetes version: v1.28.2
[preflight] Running pre-flight checks
        [WARNING Firewalld]: firewalld is active, please ensure ports [6443 10250] are open or your cluster may not function correctly
        [WARNING Service-Kubelet]: kubelet service is not enabled, please run 'systemctl enable kubelet.service'
[preflight] Pulling images required for setting up a Kubernetes cluster
[preflight] This might take a minute or two, depending on the speed of your internet connection
[preflight] You can also perform this action in beforehand using 'kubeadm config images pull'
W1019 08:18:09.599064    3875 checks.go:835] detected that the sandbox image "registry.k8s.io/pause:3.6" of the container runtime is inconsistent with that used by kubeadm. It is recommended that using "registry.k8s.io/pause:3.9" as the CRI sandbox image.
[certs] Using certificateDir folder "/etc/kubernetes/pki"
[certs] Generating "ca" certificate and key
[certs] Generating "apiserver" certificate and key
[certs] apiserver serving cert is signed for DNS names [kubernetes kubernetes.default kubernetes.default.svc kubernetes.default.svc.cluster.local rk8-ctrl] and IPs [10.96.0.1 192.168.1.100]
[certs] Generating "apiserver-kubelet-client" certificate and key
[certs] Generating "front-proxy-ca" certificate and key
[certs] Generating "front-proxy-client" certificate and key
[certs] Generating "etcd/ca" certificate and key
[certs] Generating "etcd/server" certificate and key
[certs] etcd/server serving cert is signed for DNS names [localhost rk8-ctrl] and IPs [192.168.1.100 127.0.0.1 ::1]
[certs] Generating "etcd/peer" certificate and key
[certs] etcd/peer serving cert is signed for DNS names [localhost rk8-ctrl] and IPs [192.168.1.100 127.0.0.1 ::1]
[certs] Generating "etcd/healthcheck-client" certificate and key
[certs] Generating "apiserver-etcd-client" certificate and key
[certs] Generating "sa" key and public key
[kubeconfig] Using kubeconfig folder "/etc/kubernetes"
[kubeconfig] Writing "admin.conf" kubeconfig file
[kubeconfig] Writing "kubelet.conf" kubeconfig file
[kubeconfig] Writing "controller-manager.conf" kubeconfig file
[kubeconfig] Writing "scheduler.conf" kubeconfig file
[etcd] Creating static Pod manifest for local etcd in "/etc/kubernetes/manifests"
[control-plane] Using manifest folder "/etc/kubernetes/manifests"
[control-plane] Creating static Pod manifest for "kube-apiserver"
[control-plane] Creating static Pod manifest for "kube-controller-manager"
[control-plane] Creating static Pod manifest for "kube-scheduler"
[kubelet-start] Writing kubelet environment file with flags to file "/var/lib/kubelet/kubeadm-flags.env"
[kubelet-start] Writing kubelet configuration to file "/var/lib/kubelet/config.yaml"
[kubelet-start] Starting the kubelet
[wait-control-plane] Waiting for the kubelet to boot up the control plane as static Pods from directory "/etc/kubernetes/manifests". This can take up to 4m0s
[apiclient] All control plane components are healthy after 6.504831 seconds
[upload-config] Storing the configuration used in ConfigMap "kubeadm-config" in the "kube-system" Namespace
[kubelet] Creating a ConfigMap "kubelet-config" in namespace kube-system with the configuration for the kubelets in the cluster
[upload-certs] Skipping phase. Please see --upload-certs
[mark-control-plane] Marking the node rk8-ctrl as control-plane by adding the labels: [node-role.kubernetes.io/control-plane node.kubernetes.io/exclude-from-external-load-balancers]
[mark-control-plane] Marking the node rk8-ctrl as control-plane by adding the taints [node-role.kubernetes.io/control-plane:NoSchedule]
[bootstrap-token] Using token: ktwf96.9mhdqldhpu3ema54
[bootstrap-token] Configuring bootstrap tokens, cluster-info ConfigMap, RBAC Roles
[bootstrap-token] Configured RBAC rules to allow Node Bootstrap tokens to get nodes
[bootstrap-token] Configured RBAC rules to allow Node Bootstrap tokens to post CSRs in order for nodes to get long term certificate credentials
[bootstrap-token] Configured RBAC rules to allow the csrapprover controller automatically approve CSRs from a Node Bootstrap Token
[bootstrap-token] Configured RBAC rules to allow certificate rotation for all node client certificates in the cluster
[bootstrap-token] Creating the "cluster-info" ConfigMap in the "kube-public" namespace
[kubelet-finalize] Updating "/etc/kubernetes/kubelet.conf" to point to a rotatable kubelet client certificate and key
[addons] Applied essential addon: CoreDNS
[addons] Applied essential addon: kube-proxy

Your Kubernetes control-plane has initialized successfully!

To start using your cluster, you need to run the following as a regular user:

  mkdir -p $HOME/.kube
  sudo cp -i /etc/kubernetes/admin.conf $HOME/.kube/config
  sudo chown $(id -u):$(id -g) $HOME/.kube/config

Alternatively, if you are the root user, you can run:

  export KUBECONFIG=/etc/kubernetes/admin.conf

You should now deploy a pod network to the cluster.
Run "kubectl apply -f [podnetwork].yaml" with one of the options listed at:
  https://kubernetes.io/docs/concepts/cluster-administration/addons/

You can now join any number of control-plane nodes by copying certificate authorities
and service account keys on each node and then running the following as root:

  kubeadm join 192.168.1.100:6443 --token cxxxxs.c4xxxxxxxxxxxxd0 \
        --discovery-token-ca-cert-hash sha256:103d7xxxxxxxxxxxxxxxxxxxxxxxxxxxxxxxxxxxxxxxxxxxxxxxxxxxxxx5b1b6 \
        --control-plane

Then you can join any number of worker nodes by running the following on each as root:

kubeadm join 192.168.1.100:6443 --token cxxxxs.c4xxxxxxxxxxxxd0 \
        --discovery-token-ca-cert-hash sha256:103d7xxxxxxxxxxxxxxxxxxxxxxxxxxxxxxxxxxxxxxxxxxxxxxxxxxxxxx5b1b6
開立防火牆 (TCP 6443, TCP 10250)
你會注意到這次有一些警告需要處理
警告訊息: firewalld 有啟動,請記得開 6443, 10250 連接埠 (port)
[WARNING Firewalld]: firewalld is active, please ensure ports [6443 10250] are open or your cluster may not function correctly
$ kubeadm join 192.168.1.100:6443
    --token cxxxxs.c4xxxxxxxxxxxxd0 \
    --discovery-token-ca-cert-hash sha256:103d7xxxxxxxxxxxxxxxxxxxxxxxxxxxxxxxxxxxxxxxxxxxxxxxxxxxxxx5b1b6 \
    --cri-socket unix:///var/run/cri-dockerd.sock

[preflight] Running pre-flight checks
[preflight] Reading configuration from the cluster...
[preflight] FYI: You can look at this config file with 'kubectl -n kube-system get cm kubeadm-config -o yaml'
[kubelet-start] Writing kubelet configuration to file "/var/lib/kubelet/config.yaml"
[kubelet-start] Writing kubelet environment file with flags to file "/var/lib/kubelet/kubeadm-flags.env"
[kubelet-start] Starting the kubelet
[kubelet-start] Waiting for the kubelet to perform the TLS Bootstrap...

This node has joined the cluster:
* Certificate signing request was sent to apiserver and a response was received.
* The Kubelet was informed of the new secure connection details.

Run 'kubectl get nodes' on the control-plane to see this node join the cluster.
這樣就加入叢集了
Troubleshoting
若你看到
[preflight] Running pre-flight checks
然後卡住的話,可以加上 -v=5 得到更 verbose 的內容
$ kubeadm join 192.168.1.100:6443
    --token cxxxxs.c4xxxxxxxxxxxxd0 \
    --discovery-token-ca-cert-hash sha256:103d7xxxxxxxxxxxxxxxxxxxxxxxxxxxxxxxxxxxxxxxxxxxxxxxxxxxxxx5b1b6 \
    --cri-socket unix:///var/run/cri-dockerd.sock -v=5

I1019 08:29:40.569229    2362 join.go:412] [preflight] found NodeName empty; using OS hostname as NodeName
[preflight] Running pre-flight checks
I1019 08:29:40.569740    2362 preflight.go:93] [preflight] Running general checks
I1019 08:29:40.569938    2362 checks.go:280] validating the existence of file /etc/kubernetes/kubelet.conf
I1019 08:29:40.570190    2362 checks.go:280] validating the existence of file /etc/kubernetes/bootstrap-kubelet.conf
I1019 08:29:40.570330    2362 checks.go:104] validating the container runtime
I1019 08:29:40.628420    2362 checks.go:639] validating whether swap is enabled or not
I1019 08:29:40.628538    2362 checks.go:370] validating the presence of executable crictl
I1019 08:29:40.628603    2362 checks.go:370] validating the presence of executable conntrack
I1019 08:29:40.628770    2362 checks.go:370] validating the presence of executable ip
I1019 08:29:40.628809    2362 checks.go:370] validating the presence of executable iptables
I1019 08:29:40.628865    2362 checks.go:370] validating the presence of executable mount
I1019 08:29:40.628925    2362 checks.go:370] validating the presence of executable nsenter
I1019 08:29:40.628980    2362 checks.go:370] validating the presence of executable ebtables
I1019 08:29:40.629025    2362 checks.go:370] validating the presence of executable ethtool
I1019 08:29:40.629060    2362 checks.go:370] validating the presence of executable socat
I1019 08:29:40.629099    2362 checks.go:370] validating the presence of executable tc
I1019 08:29:40.629150    2362 checks.go:370] validating the presence of executable touch
I1019 08:29:40.629212    2362 checks.go:516] running all checks
I1019 08:29:40.639498    2362 checks.go:401] checking whether the given node name is valid and reachable using net.LookupHost
I1019 08:29:40.639703    2362 checks.go:605] validating kubelet version
I1019 08:29:40.704380    2362 checks.go:130] validating if the "kubelet" service is enabled and active
I1019 08:29:40.721619    2362 checks.go:203] validating availability of port 10250
I1019 08:29:40.722091    2362 checks.go:280] validating the existence of file /etc/kubernetes/pki/ca.crt
I1019 08:29:40.722136    2362 checks.go:430] validating if the connectivity type is via proxy or direct
I1019 08:29:40.722196    2362 checks.go:329] validating the contents of file /proc/sys/net/bridge/bridge-nf-call-iptables
I1019 08:29:40.722316    2362 checks.go:329] validating the contents of file /proc/sys/net/ipv4/ip_forward
I1019 08:29:40.722358    2362 join.go:529] [preflight] Discovering cluster-info
I1019 08:29:40.722412    2362 token.go:80] [discovery] Created cluster-info discovery client, requesting info from "192.168.1.100:6443"
I1019 08:29:40.723841    2362 token.go:217] [discovery] Failed to request cluster-info, will try again: Get "https://192.168.1.100:6443/api/v1/namespaces/kube-public/configmaps/cluster-info?timeout=10s": dial tcp 192.168.1.100:6443: connect: no route to host
你會看到類似問題字眼
[discovery] Failed to request cluster-info, will try again: Get "https://192.168.1.100:6443/api/v1/namespaces/kube-public/configmaps/cluster-info?timeout=10s": dial tcp 192.168.1.100:6443: connect: no route to host
$ kubeadm reset -f --cri-socket unix:///var/run/cri-dockerd.sock

[preflight] Running pre-flight checks
W1019 08:24:38.813576    2256 removeetcdmember.go:106] [reset] No kubeadm config, using etcd pod spec to get data directory
[reset] Deleted contents of the etcd data directory: /var/lib/etcd
[reset] Stopping the kubelet service
[reset] Unmounting mounted directories in "/var/lib/kubelet"
[reset] Deleting contents of directories: [/etc/kubernetes/manifests /var/lib/kubelet /etc/kubernetes/pki]
[reset] Deleting files: [/etc/kubernetes/admin.conf /etc/kubernetes/kubelet.conf /etc/kubernetes/bootstrap-kubelet.conf /etc/kubernetes/controller-manager.conf /etc/kubernetes/scheduler.conf]

The reset process does not clean CNI configuration. To do so, you must remove /etc/cni/net.d

The reset process does not reset or clean up iptables rules or IPVS tables.
If you wish to reset iptables, you must do so manually by using the "iptables" command.

If your cluster was setup to utilize IPVS, run ipvsadm --clear (or similar)
to reset your system's IPVS tables.

The reset process does not clean your kubeconfig files and you must remove them manually.
Please, check the contents of the $HOME/.kube/config file.
kube-system (K8s 核心元件) 的 kube-controller-manager 的 Pod 為 Running
kube-system (K8s 核心元件) 的 kube-apiserver 的 Pod 為 Running
kube-system (K8s 核心元件) 的 kube-scheduler 的 Pod 為 Running
kube-system (K8s 核心元件) 的若干個 kube-proxy 的 Pod 為 Running
當然,放在 kube-system 裡面的 Pod 屬於系統保留的,請勿更動修改。
取得所有 nodes (主機節點)
你可以用 kubectl get nodes -A 指令來取得所有運作的 nodes
$ kubectl get nodes -A

NAME        STATUS   ROLES           AGE     VERSION
k8s-ctrl    Ready    control-plane   4m40s   v1.28.2
k8s-node1   Ready    <none>          3m59s   v1.28.2
k8s-node2   Ready    <none>          3m53s   v1.28.2
你應該要看到你的叢集,三台都是 Ready 的
Trobleshoting
若你可能看到這樣的錯誤
# kubectl get node -A

E1019 08:31:28.269393    5101 memcache.go:265] couldn't get current server API group list: Get "http://localhost:8080/api?timeout=32s": dial tcp [::1]:8080: connect: connection refused
E1019 08:31:28.270061    5101 memcache.go:265] couldn't get current server API group list: Get "http://localhost:8080/api?timeout=32s": dial tcp [::1]:8080: connect: connection refused
E1019 08:31:28.271897    5101 memcache.go:265] couldn't get current server API group list: Get "http://localhost:8080/api?timeout=32s": dial tcp [::1]:8080: connect: connection refused
E1019 08:31:28.272478    5101 memcache.go:265] couldn't get current server API group list: Get "http://localhost:8080/api?timeout=32s": dial tcp [::1]:8080: connect: connection refused
E1019 08:31:28.273617    5101 memcache.go:265] couldn't get current server API group list: Get "http://localhost:8080/api?timeout=32s": dial tcp [::1]:8080: connect: connection refused
The connection to the server localhost:8080 was refused - did you specify the right host or port?
有可能是
真的連不上,檢查防火牆 control panel 有沒有開
沒有設定好 kubectl 連線 config
kubelet 沒有正確啟動
可以用以下指令查看每台 kubelet 的細節 log
journalctl -f -u kubelet
最後貼一下所有看得到的 images
control panel
# docker image ls
REPOSITORY                                TAG       IMAGE ID       CREATED         SIZE
flannel/flannel                           v0.22.3   e23f7ca36333   4 weeks ago     70.2MB
registry.k8s.io/kube-apiserver            v1.28.2   cdcab12b2dd1   5 weeks ago     126MB
registry.k8s.io/kube-controller-manager   v1.28.2   55f13c92defb   5 weeks ago     122MB
registry.k8s.io/kube-proxy                v1.28.2   c120fed2beb8   5 weeks ago     73.1MB
registry.k8s.io/kube-scheduler            v1.28.2   7a5d9d67a13f   5 weeks ago     60.1MB
flannel/flannel-cni-plugin                v1.2.0    a55d1bad692b   2 months ago    8.04MB
registry.k8s.io/etcd                      3.5.9-0   73deb9a3f702   5 months ago    294MB
registry.k8s.io/coredns/coredns           v1.10.1   ead0a4a53df8   8 months ago    53.6MB
registry.k8s.io/pause                     3.9       e6f181688397   12 months ago   744kB
registry.k8s.io/pause                     3.6       6270bb605e12   2 years ago     683kB
worker node
# docker image ls
REPOSITORY                   TAG       IMAGE ID       CREATED        SIZE
flannel/flannel              v0.22.3   e23f7ca36333   4 weeks ago    70.2MB
registry.k8s.io/kube-proxy   v1.28.2   c120fed2beb8   5 weeks ago    73.1MB
flannel/flannel-cni-plugin   v1.2.0    a55d1bad692b   2 months ago   8.04MB
registry.k8s.io/pause        3.6       6270bb605e12   2 years ago    683kB
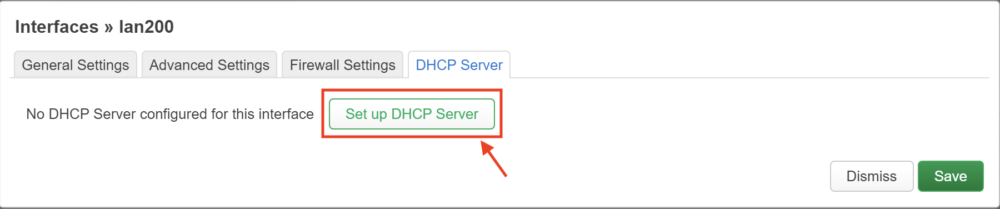
# /etc/config/dhcp
uci del dhcp.lan.ra_slaac
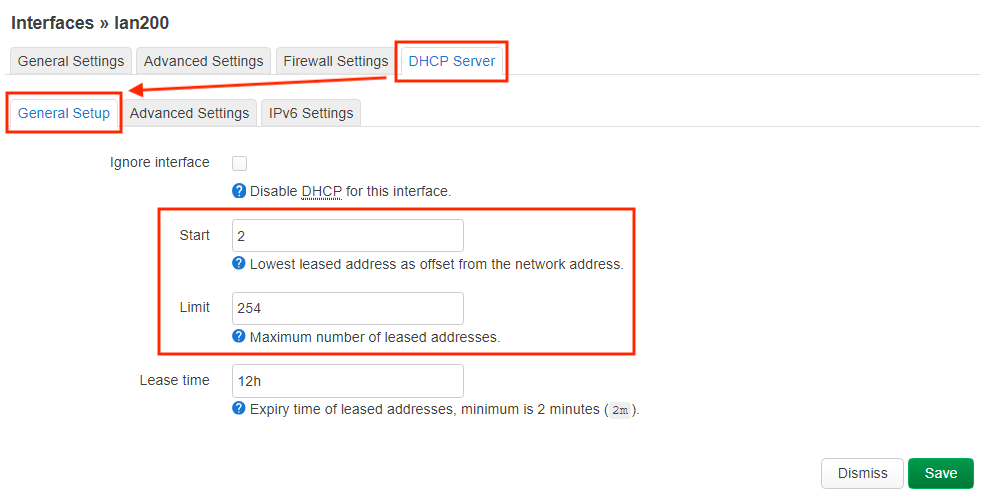
uci set dhcp.lan.start='2'
uci set dhcp.lan.limit='254'
uci set dhcp.lan200=dhcp
uci set dhcp.lan200.interface='lan200'
uci set dhcp.lan200.start='100'
uci set dhcp.lan200.limit='150'
uci set dhcp.lan200.leasetime='12h'
uci set dhcp.lan200.start='2'
uci set dhcp.lan200.limit='254'
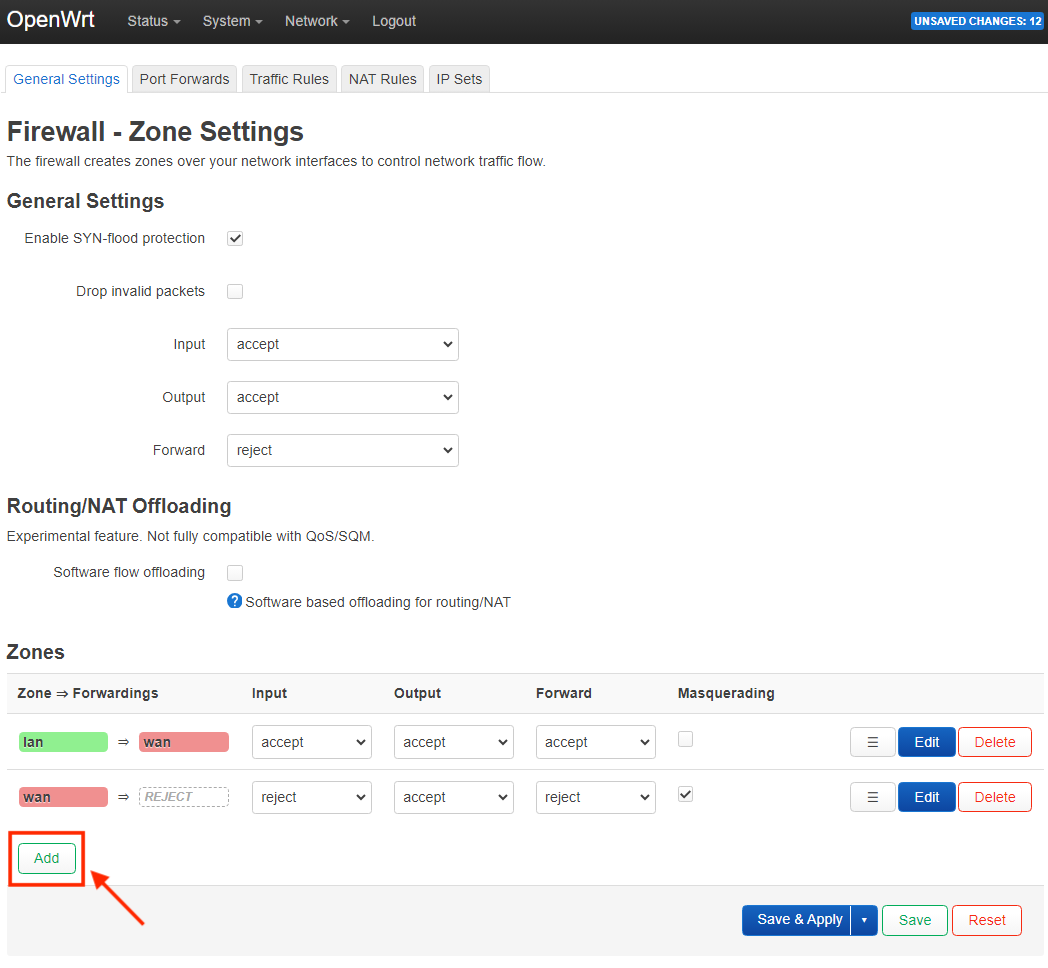
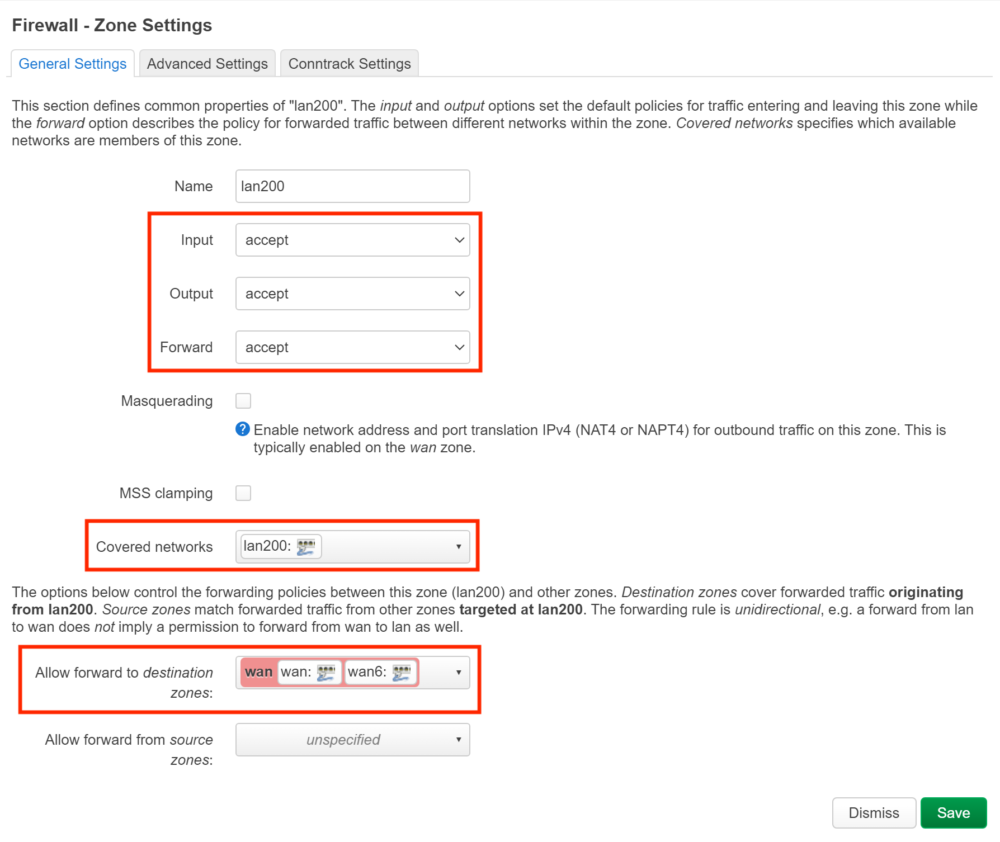
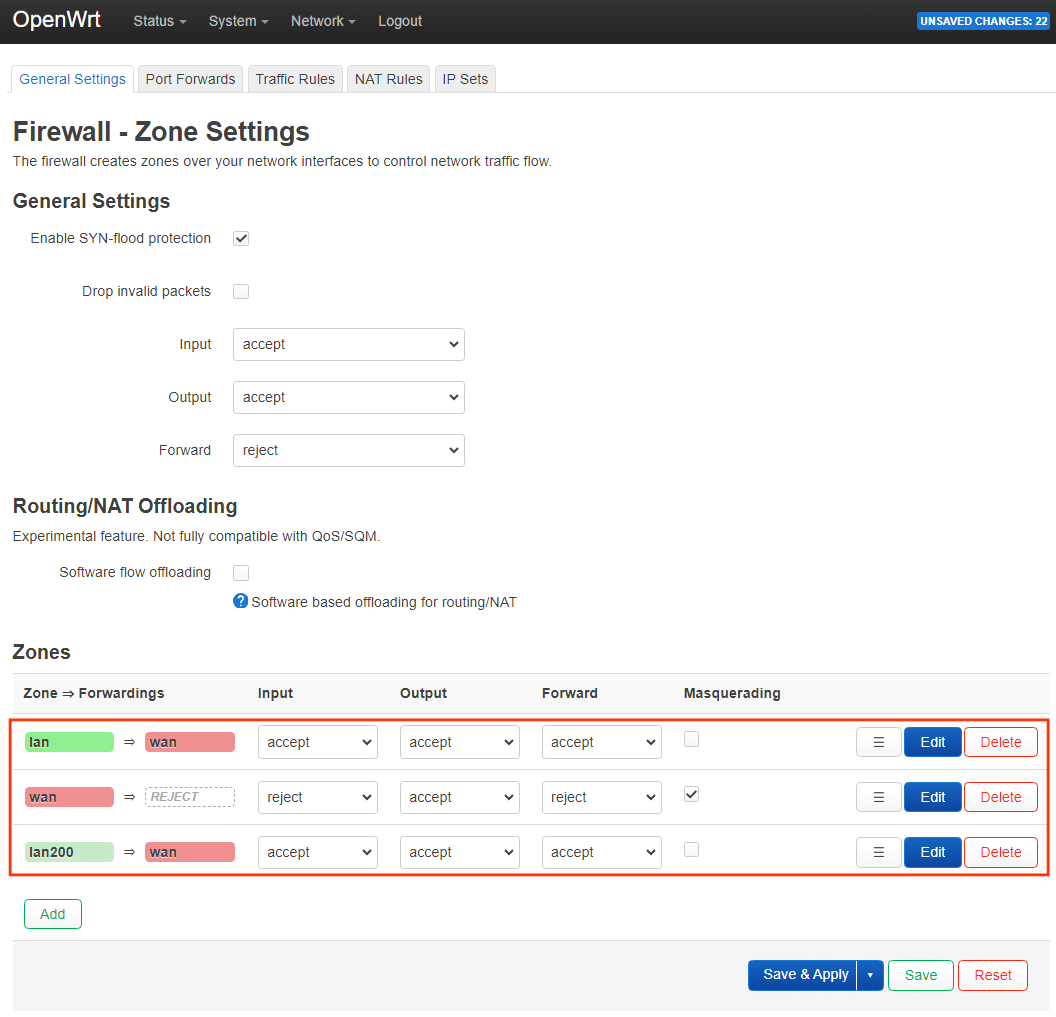
# /etc/config/firewall
uci add firewall zone # =cfg0edc81
uci set firewall.@zone[-1].name='lan200'
uci set firewall.@zone[-1].input='ACCEPT'
uci set firewall.@zone[-1].output='ACCEPT'
uci set firewall.@zone[-1].forward='ACCEPT'
uci add_list firewall.@zone[-1].network='lan200'
uci add firewall forwarding # =cfg0fad58
uci set firewall.@forwarding[-1].src='lan200'
uci set firewall.@forwarding[-1].dest='wan'
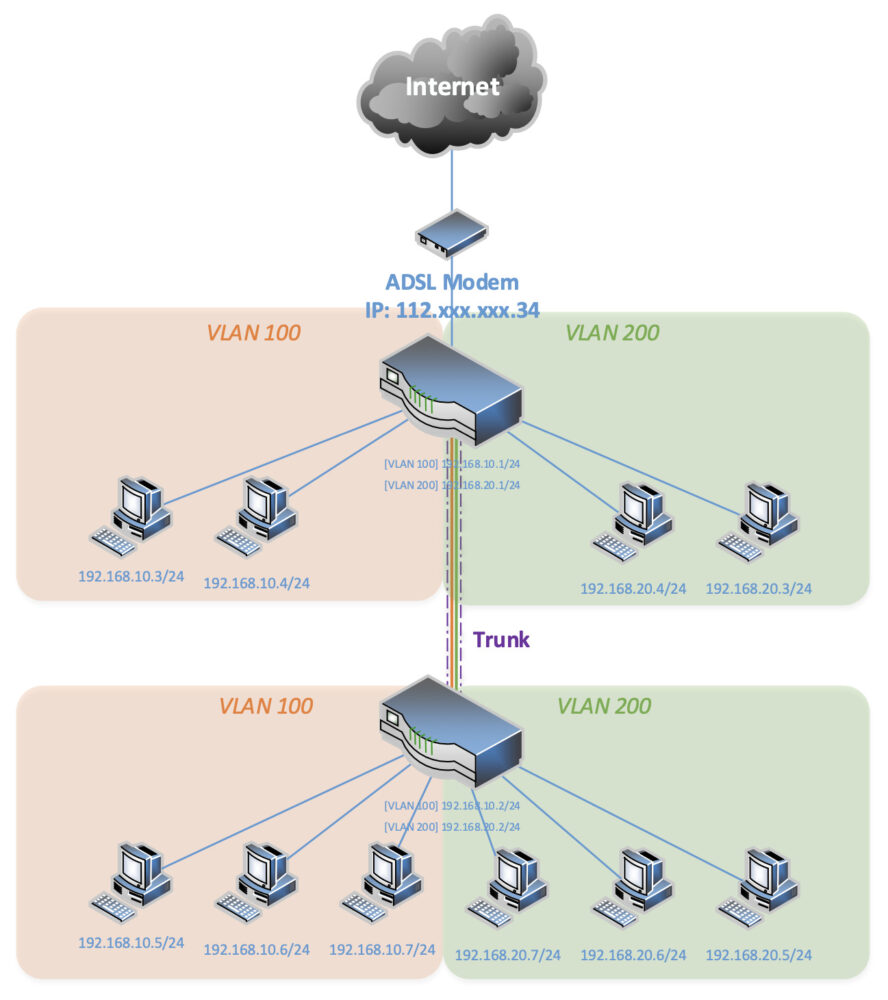
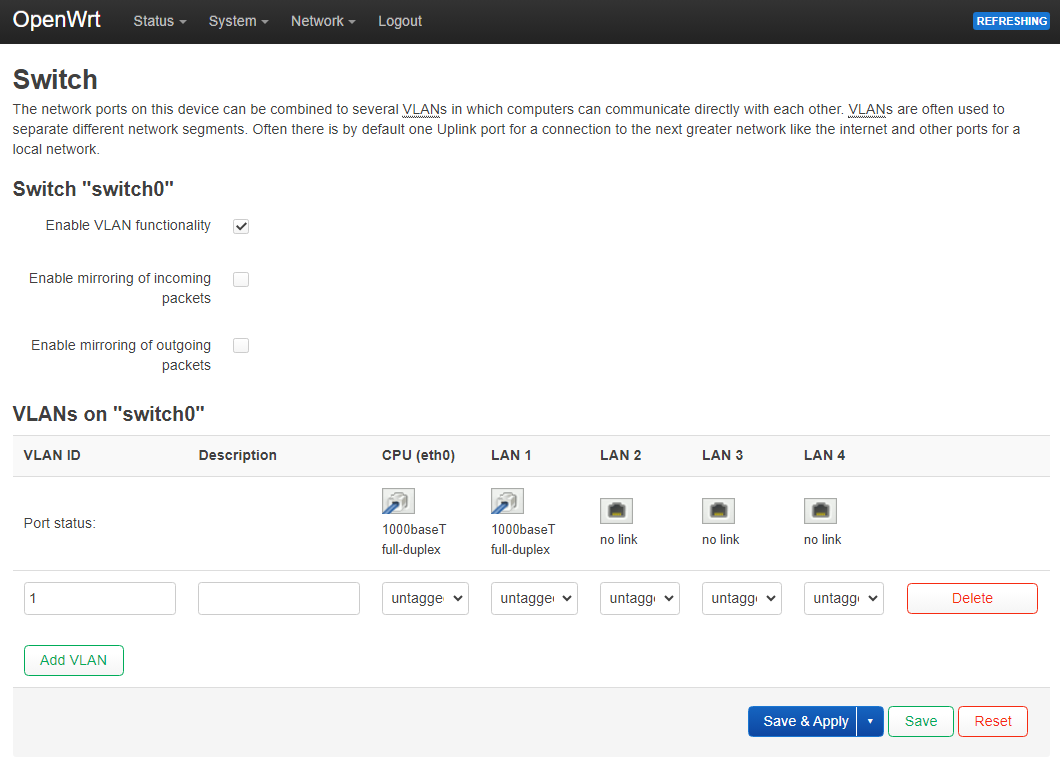
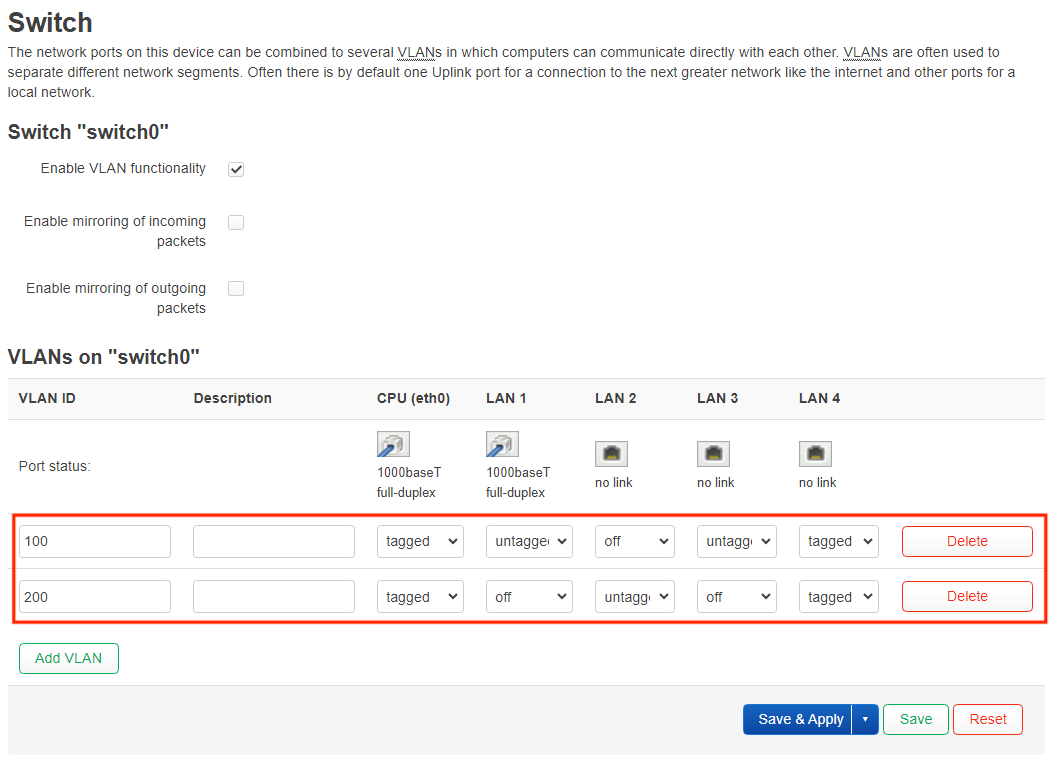
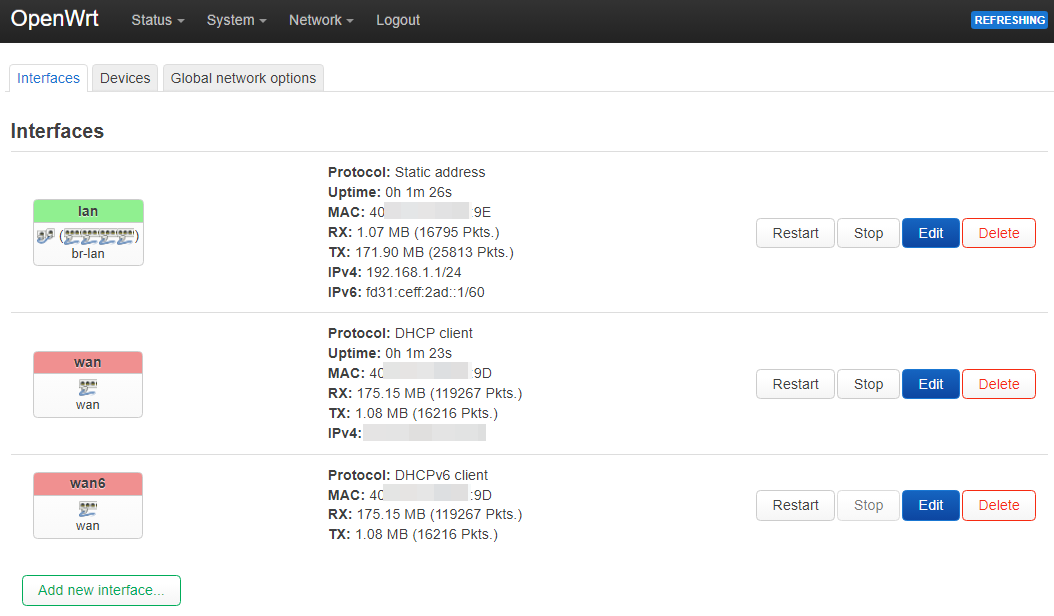
# /etc/config/network
uci add network switch_vlan # =cfg0b1ec7
uci set network.@switch_vlan[-1].device='switch0'
uci set network.@switch_vlan[-1].vlan='2'
uci set network.cfg0a1ec7.ports='0t 4 2 1t'
uci set network.cfg0a1ec7.vid='100'
uci set network.@switch_vlan[-1].ports='0t 3 1t'
uci set network.@switch_vlan[-1].vid='200'
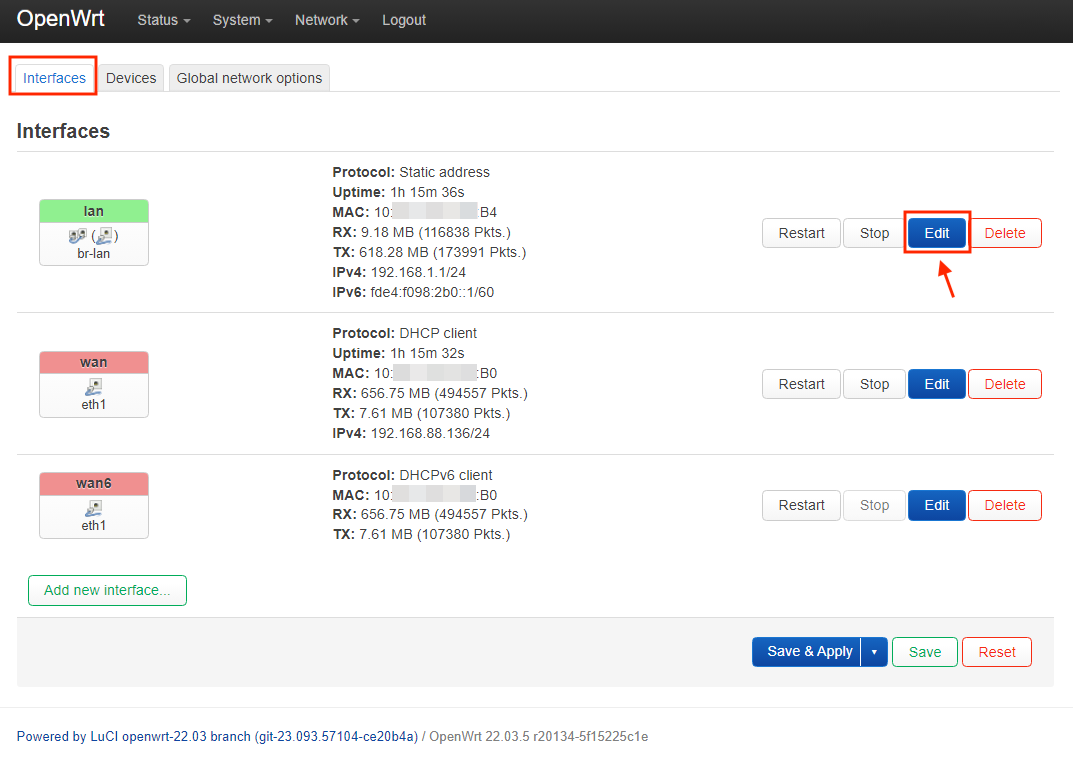
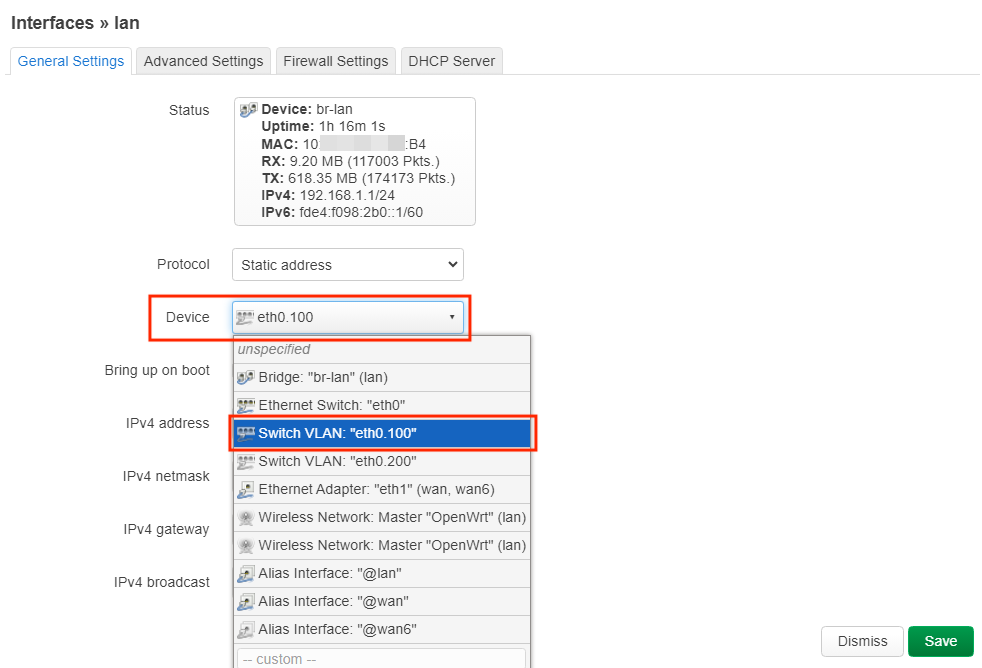
uci set network.lan.device='eth0.100'
uci set network.lan.ipaddr='192.168.10.1'
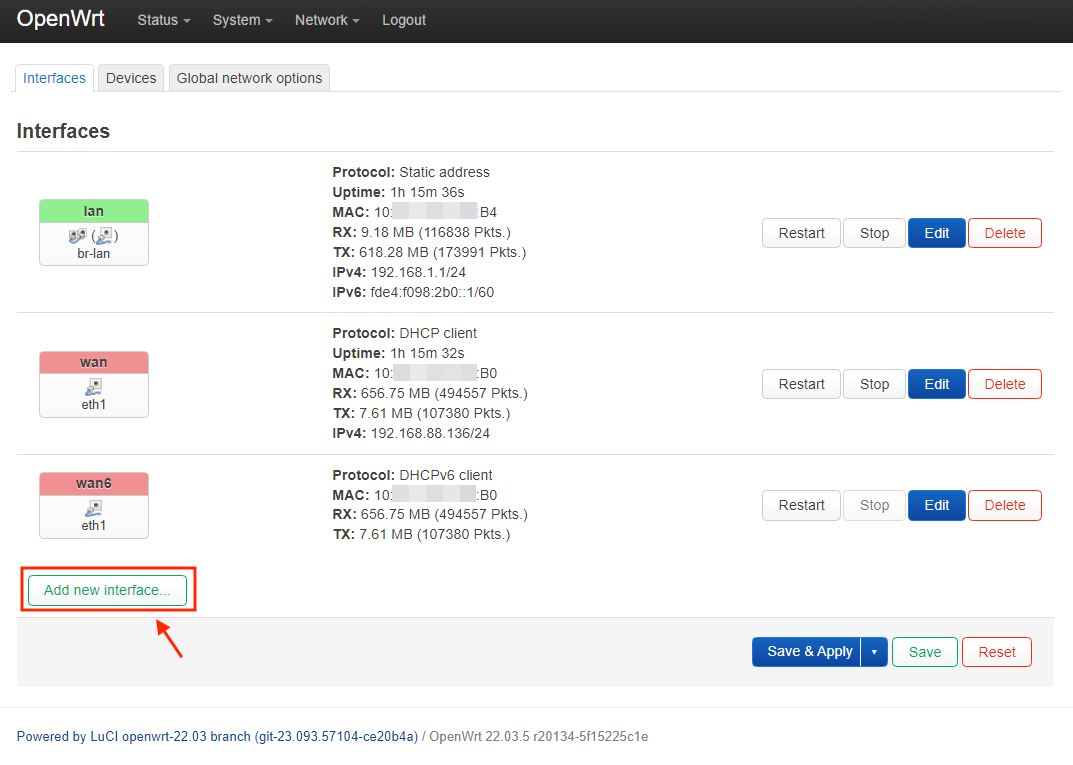
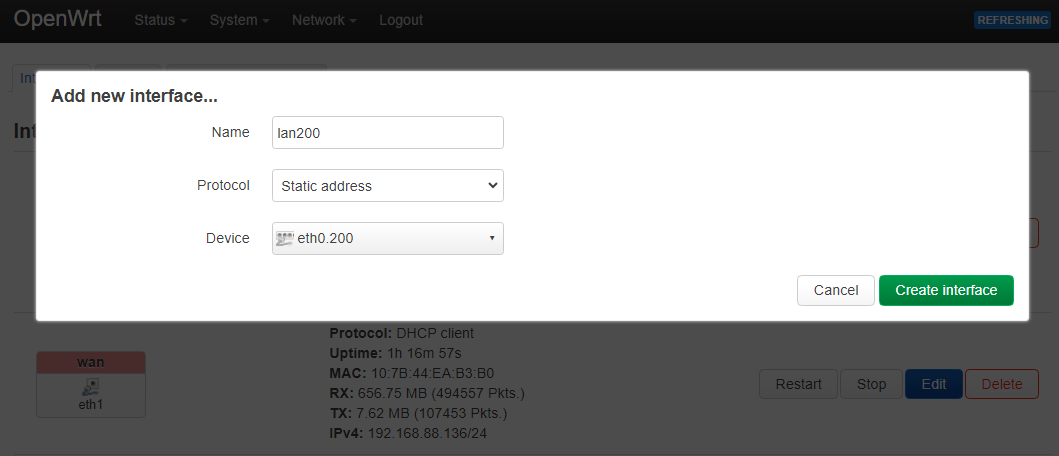
uci set network.lan200=interface
uci set network.lan200.proto='static'
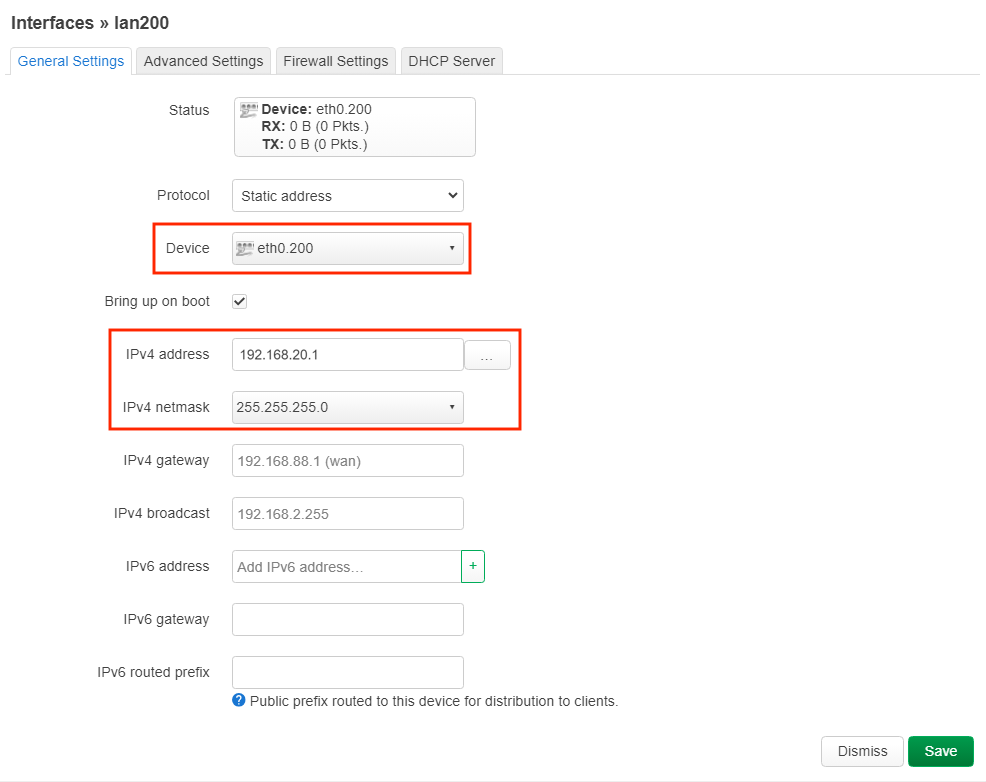
uci set network.lan200.device='eth0.200'
uci set network.lan200.ipaddr='192.168.20.1'
uci set network.lan200.netmask='255.255.255.0'
uci set network.lan200.type='bridge'
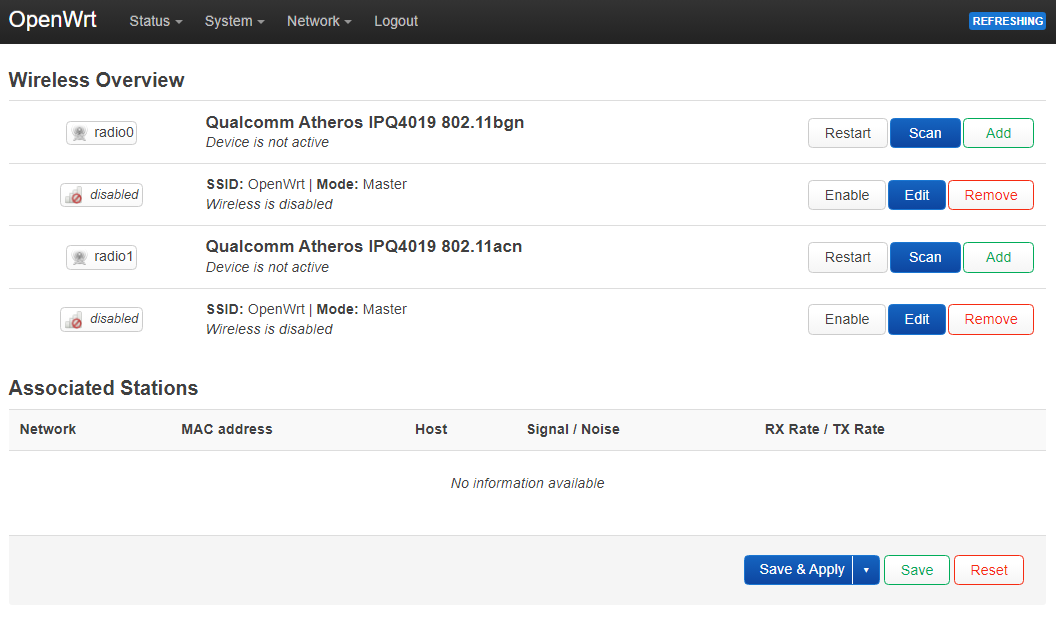
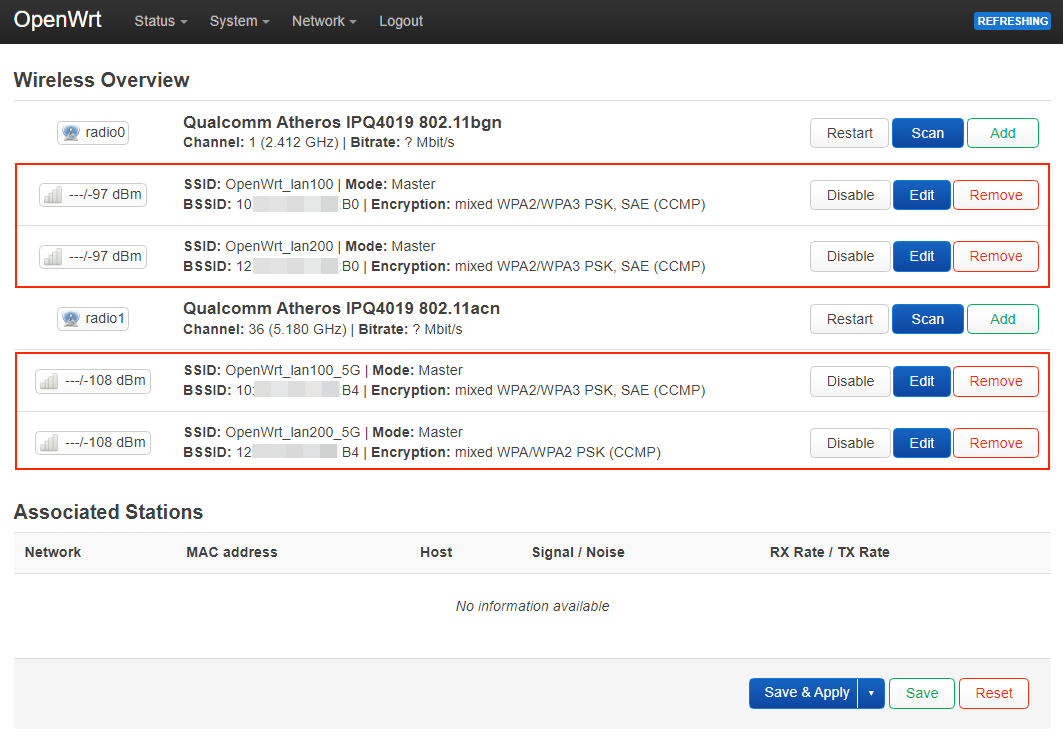
# /etc/config/wireless
uci set wireless.radio0.cell_density='0'
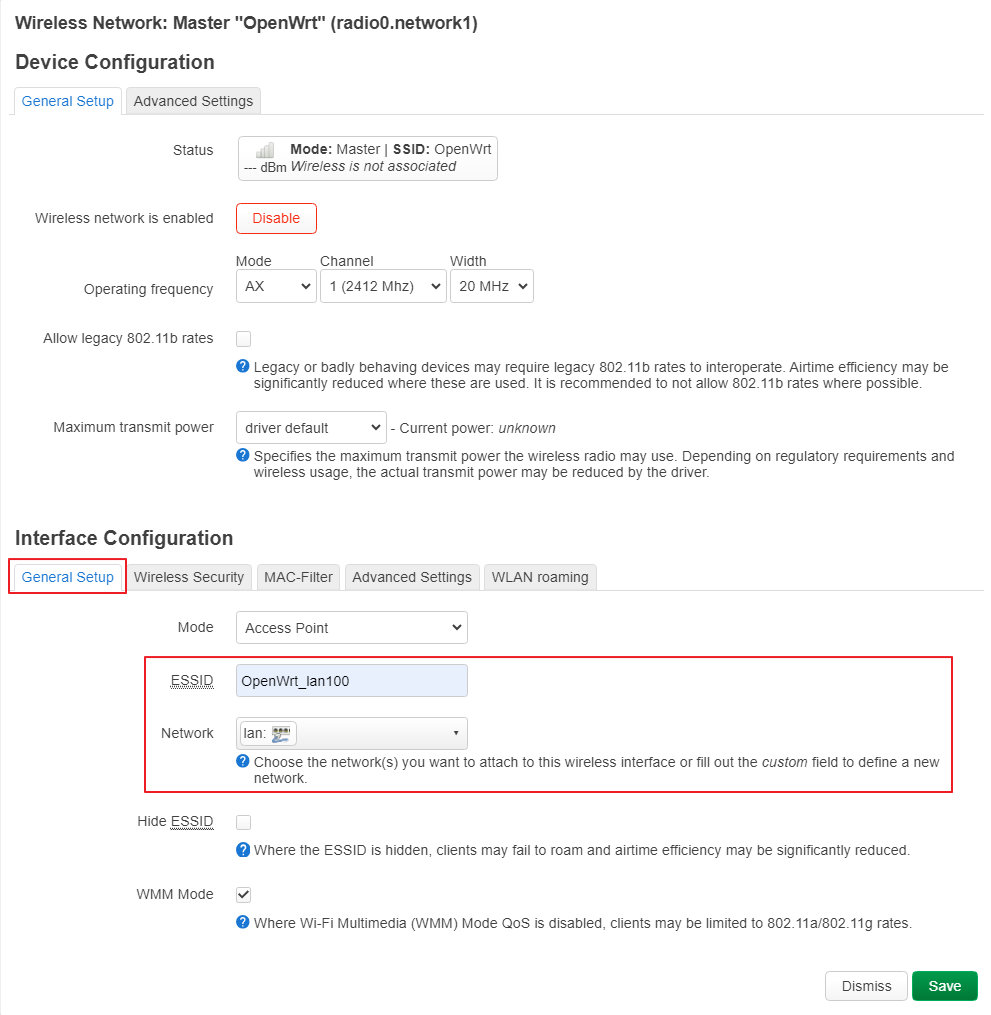
uci set wireless.default_radio0.ssid='OpenWrt_lan100'
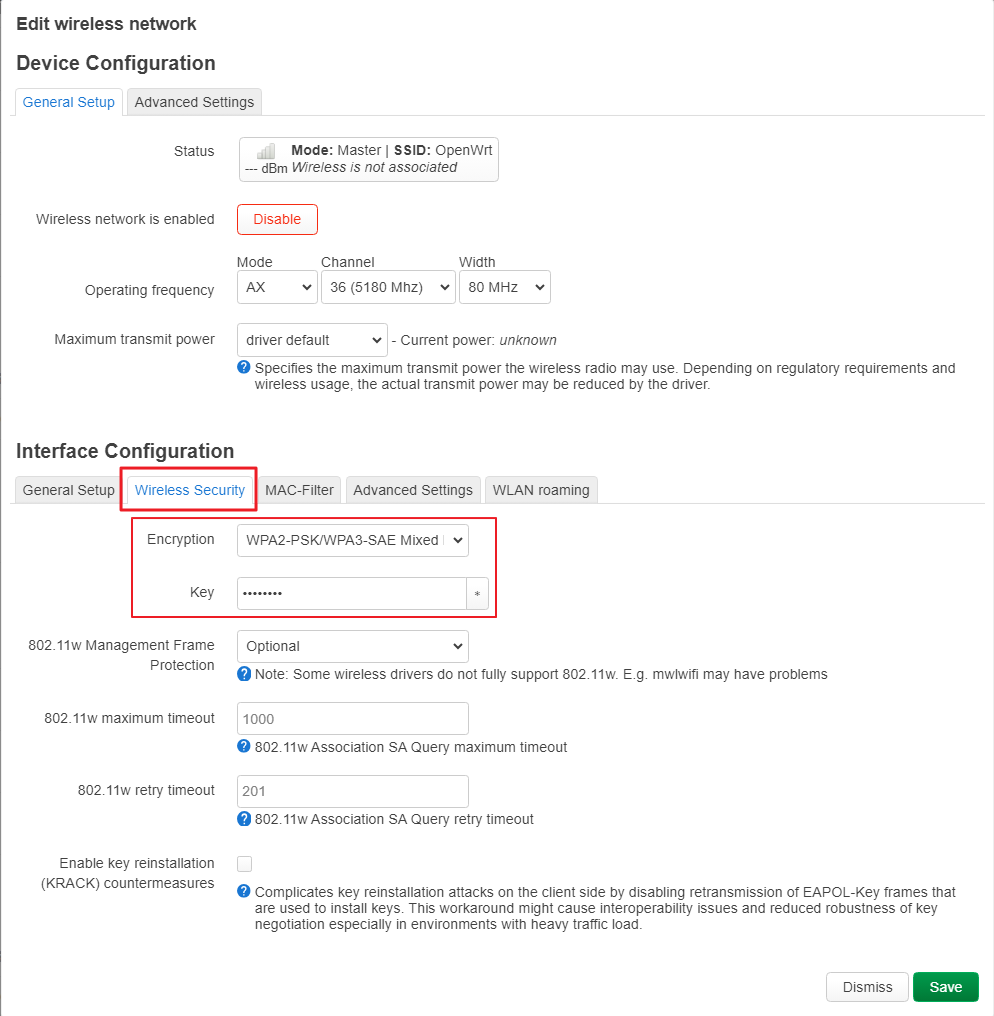
uci set wireless.default_radio0.encryption='sae-mixed'
uci set wireless.default_radio0.key='YOUR_PASSWD'
uci del wireless.radio0.disabled
uci set wireless.wifinet2=wifi-iface
uci set wireless.wifinet2.device='radio0'
uci set wireless.wifinet2.mode='ap'
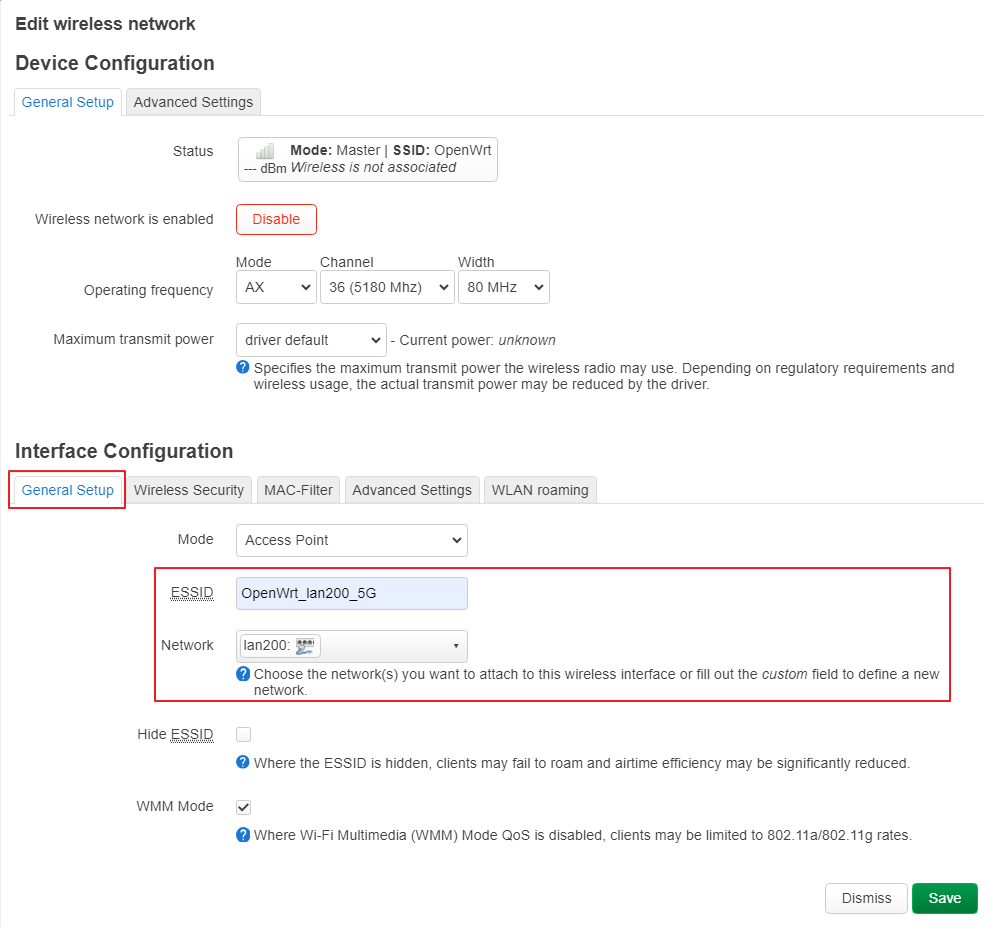
uci set wireless.wifinet2.ssid='OpenWrt_lan200'
uci set wireless.wifinet2.encryption='sae-mixed'
uci set wireless.wifinet2.key='YOUR_PASSWD'
uci set wireless.wifinet2.network='lan200'
uci set wireless.radio1.cell_density='0'
uci set wireless.default_radio1.ssid='OpenWrt_lan100_5G'
uci set wireless.default_radio1.encryption='sae-mixed'
uci set wireless.default_radio1.key='YOUR_PASSWD'
uci del wireless.radio1.disabled
uci set wireless.wifinet3=wifi-iface
uci set wireless.wifinet3.device='radio1'
uci set wireless.wifinet3.mode='ap'
uci set wireless.wifinet3.ssid='OpenWrt_lan200_5G'
uci set wireless.wifinet3.encryption='sae-mixed'
uci set wireless.wifinet3.key='YOUR_PASSWD'
uci set wireless.wifinet3.network='lan200'
# /etc/config/dhcp
uci del dhcp.lan.ra_slaac
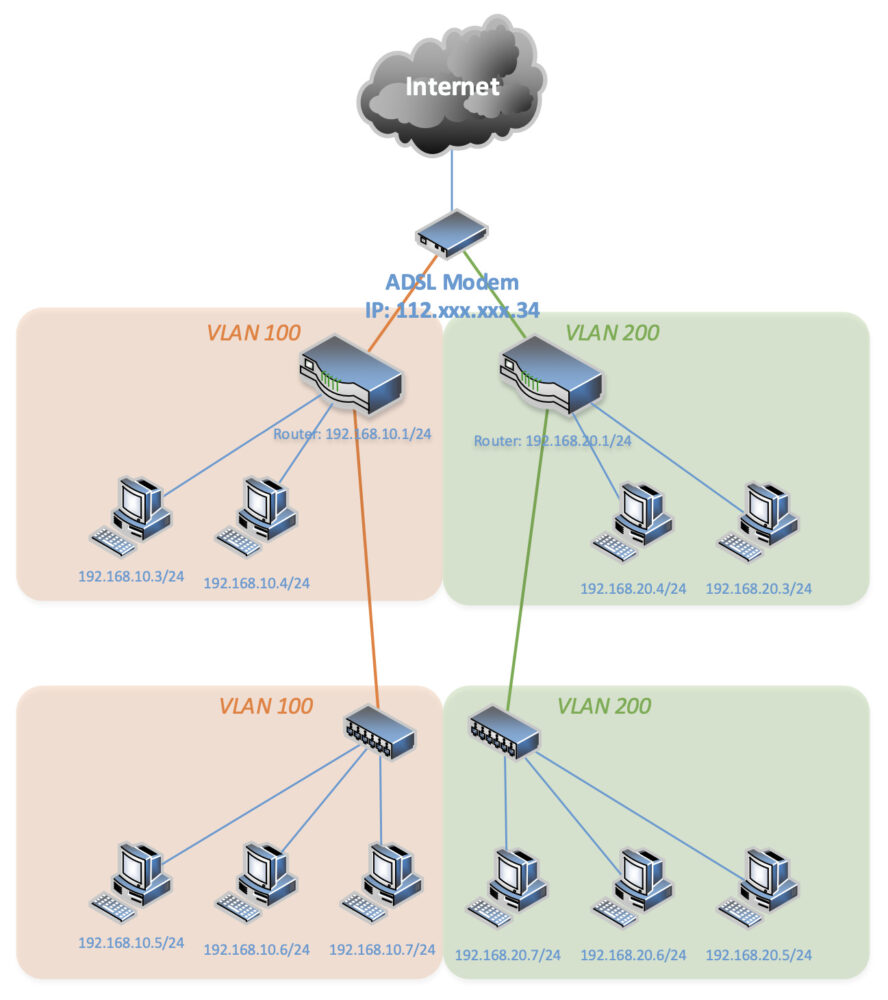
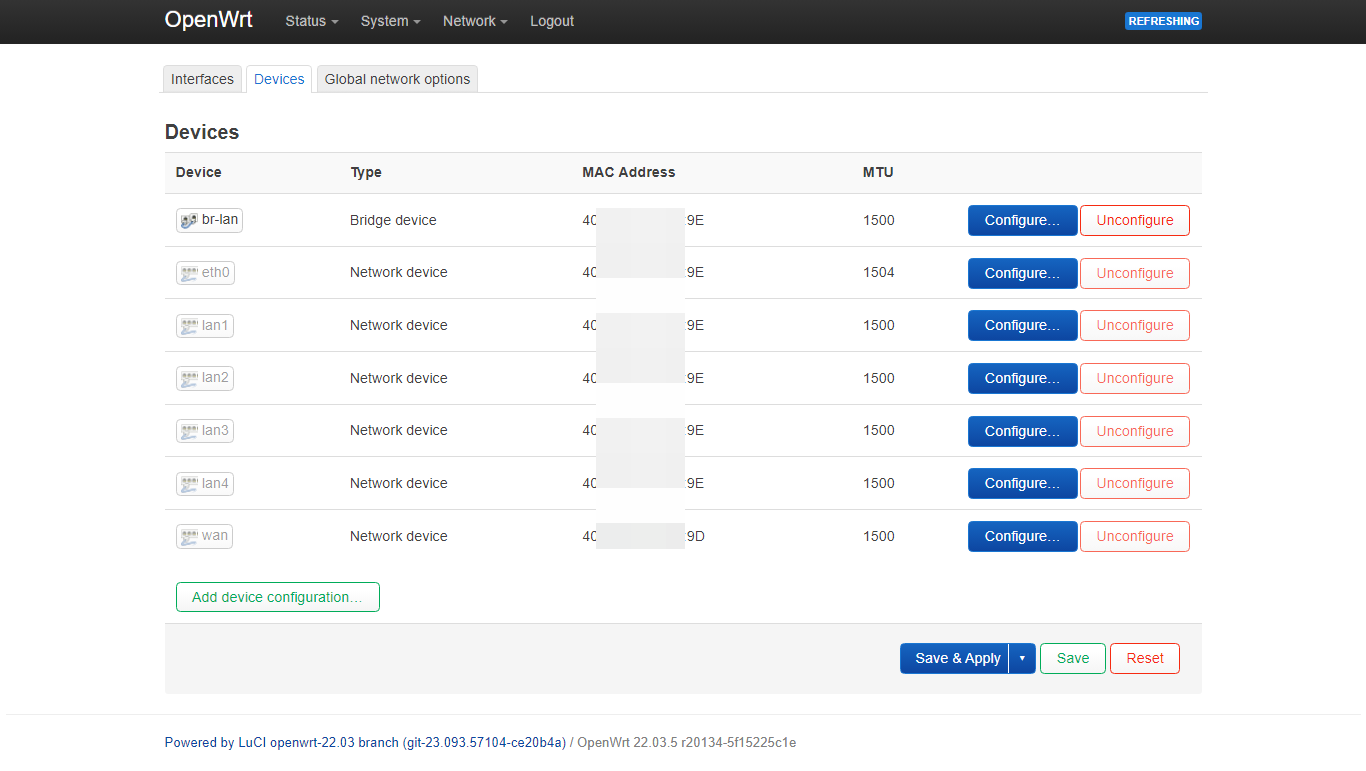
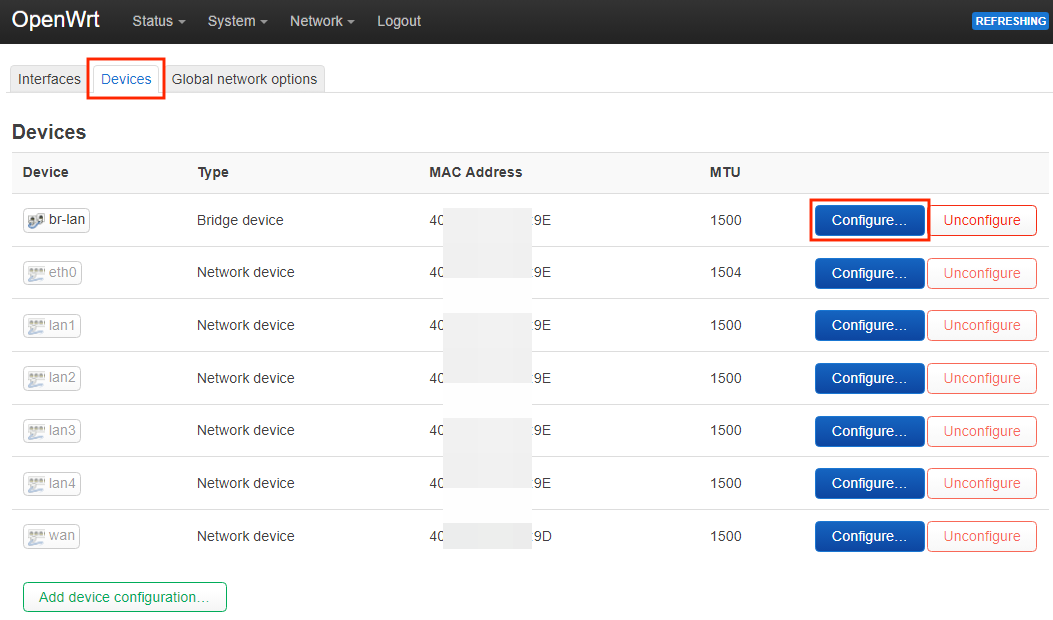
# /etc/config/network
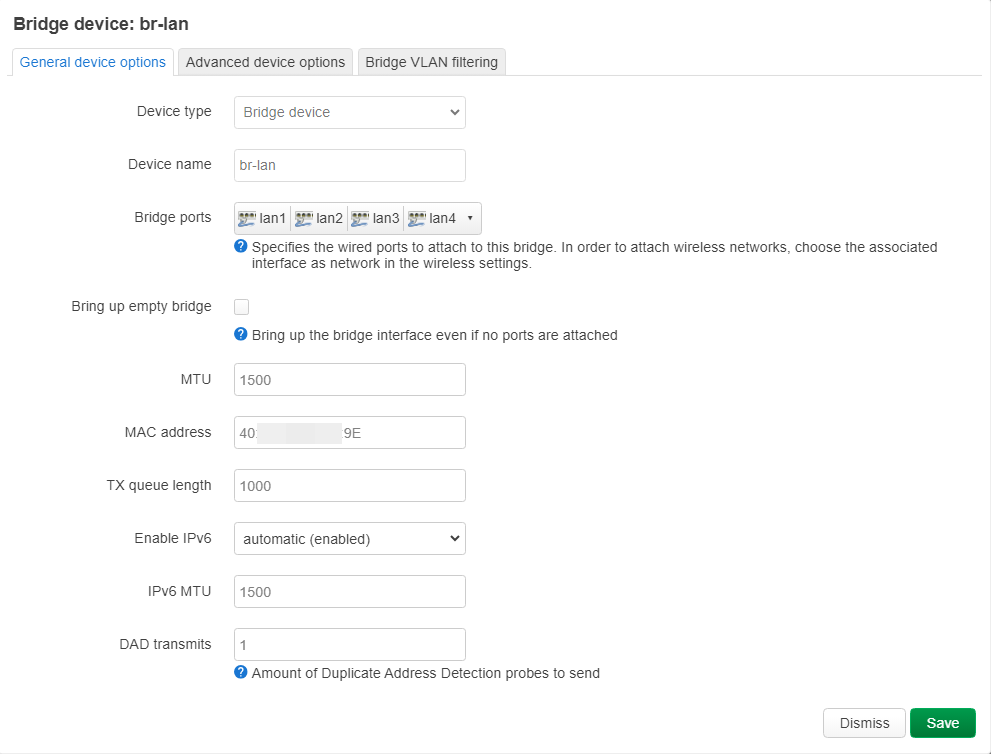
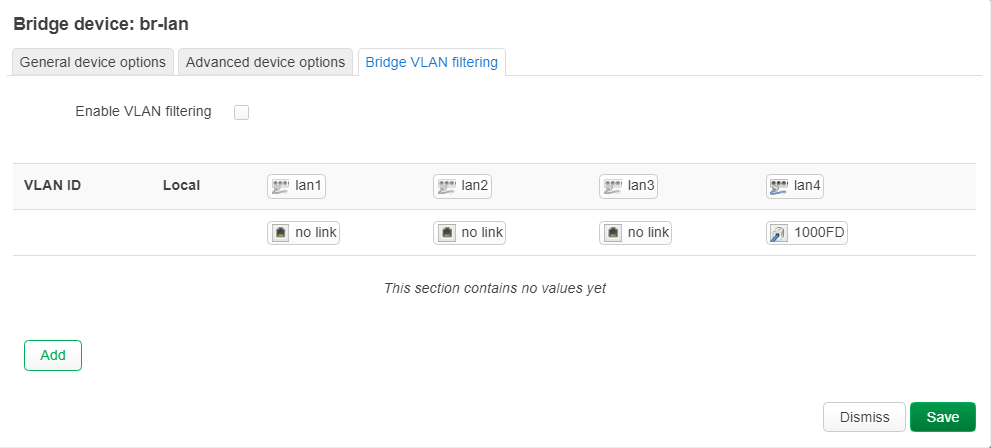
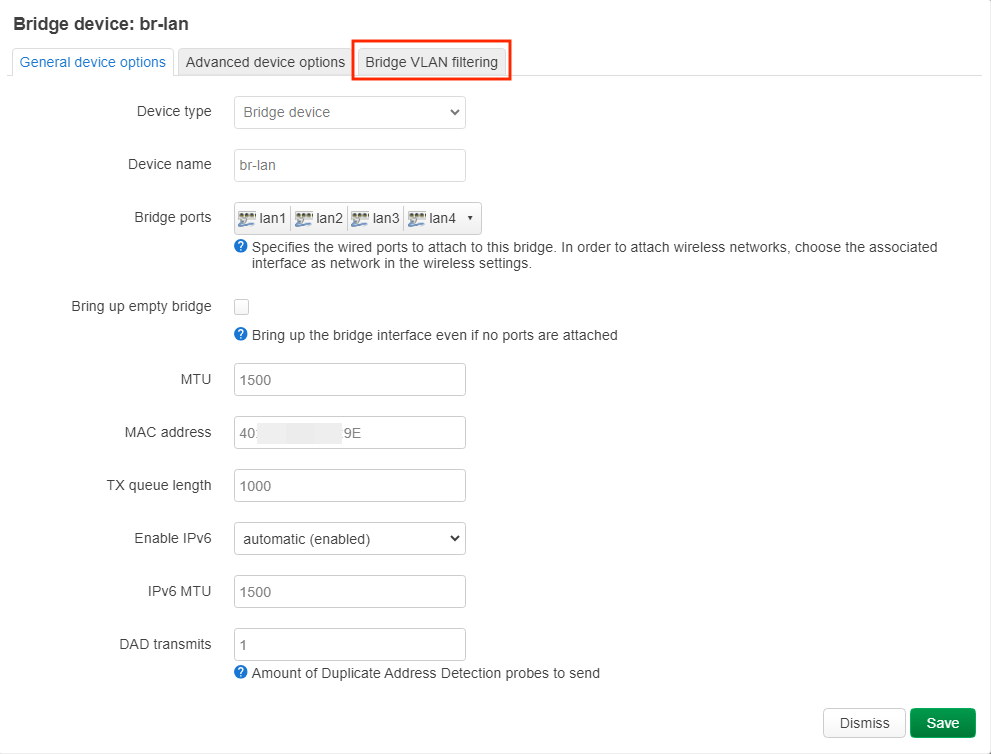
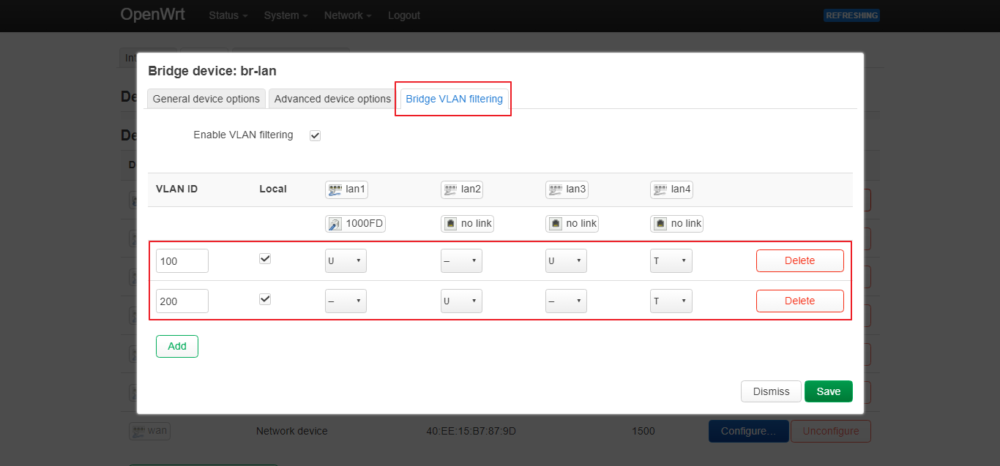
uci add network bridge-vlan # =cfg07a1b0
uci set network.@bridge-vlan[-1].device='br-lan'
uci set network.@bridge-vlan[-1].vlan='100'
uci add_list network.@bridge-vlan[-1].ports='lan1'
uci add_list network.@bridge-vlan[-1].ports='lan3'
uci add_list network.@bridge-vlan[-1].ports='lan4:t'
uci add network bridge-vlan # =cfg08a1b0
uci set network.@bridge-vlan[-1].device='br-lan'
uci set network.@bridge-vlan[-1].vlan='200'
uci add_list network.@bridge-vlan[-1].ports='lan2'
uci add_list network.@bridge-vlan[-1].ports='lan4:t'
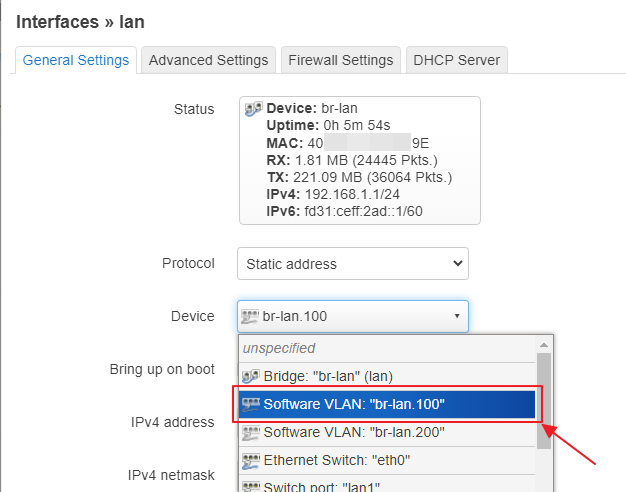
uci set network.lan.device='br-lan.100'
# /etc/config/dhcp
uci set dhcp.lan.start='2'
uci set dhcp.lan.limit='254'
uci set dhcp.lan200=dhcp
uci set dhcp.lan200.interface='lan200'
uci set dhcp.lan200.start='100'
uci set dhcp.lan200.limit='150'
uci set dhcp.lan200.leasetime='12h'
uci set dhcp.lan200.start='2'
uci set dhcp.lan200.limit='254'
# /etc/config/network
uci set network.lan.ipaddr='192.168.10.1'
uci set network.lan200=interface
uci set network.lan200.proto='static'
uci set network.lan200.device='br-lan.200'
uci set network.lan200.ipaddr='192.168.20.1'
uci set network.lan200.netmask='255.255.255.0'
# /etc/config/firewall
uci add firewall zone # =cfg0edc81
uci set firewall.@zone[-1].name='lan200'
uci set firewall.@zone[-1].input='ACCEPT'
uci set firewall.@zone[-1].output='ACCEPT'
uci set firewall.@zone[-1].forward='REJECT'
uci add_list firewall.@zone[-1].network='lan200'
uci add firewall forwarding # =cfg0fad58
uci set firewall.@forwarding[-1].src='lan200'
uci set firewall.@forwarding[-1].dest='wan'
# /etc/config/wireless
uci del wireless.radio0.disabled
uci set wireless.wifinet2=wifi-iface
uci set wireless.wifinet2.device='radio0'
uci set wireless.wifinet2.mode='ap'
uci set wireless.wifinet2.ssid='OpenWrt_lan200'
uci set wireless.wifinet2.encryption='sae-mixed'
uci set wireless.wifinet2.key='YOUR_PASSWD'
uci set wireless.wifinet2.network='lan200'
uci set wireless.radio0.cell_density='0'
uci set wireless.default_radio0.ssid='OpenWrt_lan100'
uci set wireless.default_radio0.encryption='sae-mixed'
uci set wireless.default_radio0.key='YOUR_PASSWD'
uci del wireless.radio1.disabled
uci set wireless.wifinet3=wifi-iface
uci set wireless.wifinet3.device='radio1'
uci set wireless.wifinet3.mode='ap'
uci set wireless.wifinet3.ssid='OpenWrt_lan200_5G'
uci set wireless.wifinet3.encryption='sae-mixed'
uci set wireless.wifinet3.key='YOUR_PASSWD'
uci set wireless.wifinet3.network='lan200'
uci set wireless.radio1.cell_density='0'
uci set wireless.default_radio1.ssid='OpenWrt_lan100_5G'
uci set wireless.default_radio1.encryption='sae-mixed'
uci set wireless.default_radio1.key='YOUR_PASSWD'